Question 1. Define and classify mucogingival surgery.
Answer:
Mucogingival surgery was described by Friedman as surgical procedures carried out for the correction of the relationship between the gingiva and the oral mucosa.
Mucogingival surgery can be broadly classified into:
- Procedures for the treatment of gingival recession (root coverage procedures)
- Procedures for increasing width of keratinized gingiva
- Management of high frenal attachment
- Procedures for extension of vestibular depth.
Read And Learn More: Periodontology Important Question And Answers
Question 2. Define and classify gingival recession.
Answer:
- Gingival recession is the apical migration of the gingival margin from the cementoenamel junction.
- The need for root coverage is determined by esthetic and functional factors such as root hypersensitivity and root caries.
Classification Of Gingival Recession
- Sullivan and Atkins
- Shallow narrow
- Shallow wide
- Deep narrow
- Deep wide
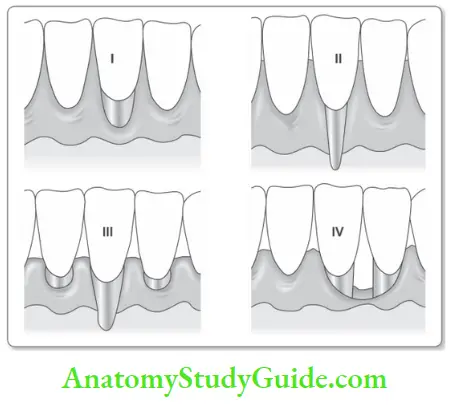
Miller’s Classification
- Class 1: Marginal tissue recession not-extending to the mucogingival junction. No loss of interdental bone or soft tissue.
- Class 2: Marginal tissue recession extends to or beyond the mucogingival junction. No loss of interdental bone or soft tissue.
- Class 3: Marginal tissue recession extends to or beyond the mucogingival junction. Loss of interdental bone or soft tissue is apical to the CEJ, but coronal to the apical extent of marginal tissue recession.
- Class 4: Marginal tissue recession extends beyond the mucogingival junction. Loss of interdental bone extends to a level apical to the extent of the marginal tissue recession.
Question 3. Describe the various procedures for the management of gingival recession.
Answer:
Procedures for the treatment of gingival recession can be further classified as:
- Pedicle Grafts
- Laterally repositioned pedicle graft
- Apically positioned pedicle graft
- Double papilla pedicle graft
- Coronally positioned pedicle graft (semilunar graft).
- Free Grafts
- Free gingival graft
- Free connective tissue graft.
- Coronally Repositioned Flap.
- Guided Tissue Regeneration.

Question 4. Describe the indications, contraindications, and technique of pedicle grafts.
Answer:
Laterally Repositioned Pedicle Graft: The laterally repositioned pedicle graft was originally described by Grupe and Warren in 1956. The technique utilizes the availability of keratinized gingiva adjacent to an area of gingival recession as a tissue source.
Pedicle Grafts Indications
- Decreased zone of attached gingiva in isolated area
- Class 1 and class 2 gingival recession (Miller’s classifiation).
Pedicle Grafts Contraindications
- Deep interproximal loss of attachment
- Excessive prominence of the root surface
- Cervical erosion resulting in dentine exposure
- Signifiant interdental bone loss.
Pedicle Grafts Procedure
- Step 1: Following administration of local anesthesia, the gingival margin on the recessed teeth is de-epithelialized using a scalpel blade no: 11 or 15.
- Step 2: The root surface is thoroughly planed and smoothened.
- Step 3: The donor site is carefully evaluated and vertical incisions including the interdental papillae are placed. These incisions are extended till the mucogingival junction to increase the mobility of the flap and decrease tension. The vertical incisions normally involve one papilla immediately adjacent to the recession site on the donor side and the next papilla as well.
- Step 4: The entire area outlined by the vertical incisions is raised as an flap by sharp dissection using a scalpel blade number 15. The elevated flip should consist of epithelium and a thin layer of connective tissue while leaving behind at least the periosteum, in the exposed area of the donor site.
- Step 5: The elevated flap is placed over the recipient site in such a manner as to cover the entire area of recession. The interdental sutures are used to anchor the interdental papillae to their new tissue base. A lateral suture may also be placed on both lateral borders of the repositioned pedicle for further anchorage.
- Step 6: A periodontal dressing may also be placed to further stabilize the repositioned pedicle.

The dressing also protects the raw donor site which has to heal by secondary intention
Question 5. Describe the indications, contraindications, and technique of the coronally positioned flap.
Answer:
Bernimoulin et al. (1975) first reported the coronally positioned graft. In 1986, Tarnow described the semilunar coronally positioned flap.
Coronally Positioned Flap Indications
- Class 1 gingival recession in single or multiple teeth
- Adequate vestibular depth
- Minimum keratinized gingival width of 3 mm.
Coronally Positioned Flap Procedure
- Step 1: After proper local anesthesia, the teeth with the recession are root planed.
- Step 2: A full thickness followed by a split-thickness flap with two vertical releasing incisions is raised, and the papillae are de-epithelialized.
- Step 3: The flap is coronally positioned and sutured to the de-epithelialized papillae. The semilunar coronally positioned flap is a variation of the coronally repositioned flap, where a segment of keratinized gingiva is elevated coronally to cover the area of recession by making a semilunar incision on the keratinized gingiva apical to the recession. It is used for shallow recessions in the maxillary anterior region.

Question 6. Write about subepithelial connective tissue graft.
Answer:
- The subepithelial connective tissue graft was first described by Langer and Langer in 1985. It is used in combination with a coronally advanced flap.
- This technique combines the use of a partial thickness flap with the placement of a connective tissue graft.
- This enables the graft to benefit from a double vascularization, from both the periosteum and the buccal flap.
Tissue Graft Procedure
Step 1: Following administration of the local anesthesia and root planing the recipient site is prepared.
Step 2:
- Preparation of the recipient site. A partial thickness flap is raised at the reception site using a sulcular incision with a Bard-Parker number 11 blade.
- The design of the flip should ideally be an envelope as this helps to retain the connective tissue graft in place.
- If additional coronal repositioning of the flap is planned, then vertical incisions extending to the mucogingival junction may be necessary to improve flap mobility. The flap that has been raised creates a subepithelial space into which the connective graft is placed.
Step 3: Harvesting graft from donor Site. A tin foil placed over the recession site helps to serve as a template to decide the size of the graft Th required size of connective tissue graft is harvested from the palate.
Techniques to Harvest Graft from Donor Site
- Window Technique
- Two incisions are utilized to outline a connective tissue wedge which is eventually used as the graft. The 1st incision is placed 5–6 mm from the free gingival margin in a direction perpendicular to the long axis of the root.
- This incision is made to bone and defies the width of the wedge of tissue to be removed.
- A second parallel incision of the same width is placed parallel to the long axis of the tooth in a manner so as to enclose a mass of connective tissue between the blade and bone.
- The tip of the blade is however carried to bone to define the apical extent of the connective tissue wedge.
- The blade is also marginally rotated within tissue to connect the two incisions at the extent of their width.
- A sharp periosteal elevator is then inserted between bone and the fist incision to elevate the connective tissue wedge from its base.
- Tissue forceps is then used to delicately extricate the connective tissue wedge. The epithelial margin of the wedge is trimmed with scissors and the graft is prepared for placement in the recipient site.
- A suture is placed across the small epithelial wound in the palate if necessary or it may be permitted to heal by secondary intention.
- Trap Door Technique
- The tin foil confirming to the width of the recipient site is transferred to the palate and three incisions are placed.
- Two horizontal incisions running anteroposteriorly are placed along the width of the rectangle.
- This results in a tissue trap door which is reflected as a partial thickness flap by sharp dissection resulting in an exposure of a connective tissue bed. The connective tissue graft is then harvested from this bed and is ready for placement at the recipient site.
- The epithelial trap door may be sutured back in place for primary closure of the wound at the donor site.
Step 4:
- Suturing of the graft. The harvested connective tissue graft is inserted in the subepithelial space created beneath the flap.
- The coronal portion of the graft lies at, or slightly above, the CEJ level, and the graft is secured to the papillae by resorbable sutures. The buccal flap is then pulled upward over the graft and sutured.

Free Grafts
- The free grafts differ from the pedicle grafts primarily in the absence of an attachment to tissue.
- While pedicle grafts have the additional advantage of blood supply from a tissue base, free grafts are exclusively dependent on the collateral circulation of the vascular connective tissue bed they are placed on.
- They are therefore more technique-sensitive and proper case selection is an important determinant of clinical success.
Question 7. Describe free gingival/epithelial graft.
Answer:
- Bjorn in 1963, and Sullivan and Atkins in 1968, were the first to describe the free gingival autograft.
- The free gingival graft consists of epithelium and connective tissue and does not have their own blood supply. It derives its blood supply from the recipient’s connective bed.
Gingival Or Epithelia Graft Indications
- Increase width of keratinized gingiva
- Increase vestibular depth
- Root coverage procedure
- To remove an abnormal frenal attachment
- For soft tissue ridge augmentation.
Gingival Or Epithelia Graft Procedure
Step 1:
- Following administration of local anesthesia is the preparation of the recipient periosteal/ connective tissue bed by removal of epithelium around the recession area to a distance of 3–4 mm in all directions.
- It is on this vascular bed that harvested free gingival graft is sutured onto and receives its blood supply.
Step 2:
- A graft of 0.75 to 1.5 mm thickness is harvested from the recipient sites (for example, palate, tuberosity).
- The graft is secured in place by sutures, ensuring a good adaptation to the periosteal bed, without any dead space between them.
- Such adaptation promotes quick revascularization of the graft and promotes healing. A periodontal pack or a cyano-acrylate dressing may serve to further stabilize the graft in this position.
- Free connective tissue graft consistes only of connective tissue and was originally described by Edel.
- The advantage of this graft was that the donor tissue was obtained from the undersurface of the palatal flap, thus enabling primary closure of the flap and better esthetics of the grafted tissue.
Healing of Free Gingival Graft
- The initial phase (plasmic circulation) – 0–3 days
- Diffusion of fluid from host bed
- Marked inflammation in the first 48 hours
- No union except thin fibrin clot
- Epithelium- sloughing
- (Re)vascularization phase 4 to 11 days
- Capillaries proliferate into the graft
- Tissue maturation phase (Organic union) 12: 42 days
- Mature epithelium, keratinization.
Question 8. Describe the various mucogingival procedures used for augmentation of keratinised gingiva.
Answer:
- Procedures for augmentation of keratinized gingiva are performed primarily on the basis of a rationale that suggests that a quantum of keratinized gingiva is directly proportional to the ability of the periodontium to resist the onslaught of disease.
- No attempt is made to cover the root recession. Indications for the augmentation of keratinized gingiva are:
- Increase the width of keratinized gingiva around an abutment for field prosthesis
- Teeth undergoing orthodontic movement
- A planned site for implant rehabilitation
- An area of progressive recession
- Prevention of post-vestibuloplasty reduction of the sulcus.
Procedures for the augmentation of attached gingiva apical to gingival recession include:
- Free gingival autografts
- The accordion technique described by Rateitschak
- Strip technique described by Han
- Free connective tissue graft
- Apical displacement procedures, for example, apically repositioned flap.
Free Gingival Graft for Augmentation of Keratinized Gingiva
- The free gingival graft represents one of the most predictable techniques for the achievement of keratinized gingival augmentation.
- The procedure is similar to that described earlier.
- Variations In Technique
- Accordion technique: This technique utilizes alternate partincisions on either side of the graft to enable the graft to be stretched. This helps the utilization of a limited amount of graft tissue over a larger tissue bed.
- Strip technique: This technique involves the placement of keratinized tissue strips harvested from the palate. The strips are placed in a manner so as to outline the area where keratinized gingiva is to be formed and is another method of expanding the capability of a limited amount of graft tissue.
- Free connective tissue technique: A connective tissue graft harvested from the undersurface of a palatal flap may also be used as a graft for the augmentation of keratinized gingiva. Connective tissue from a keratinized zone carries genetic determinants for keratinized epithelialization alone and hence the use of such a graft results in the formation of keratinized gingiva.
The free gingival graft has also been used as one part of a two-stage procedure for root coverage in conjunction with the coronally repositioned flap.
Apical Displacement Procedures – Apically Repositioned Flap
- The apically repositioned flap technique for the elimination of periodontal pockets and osseous surgery has been described in the chapter of periodontal flap surgery.
- A partial thickness variation of the apically displaced flap can be used for augmentation of keratinized gingiva as well.
- The technique involves the elevation of a partial thickness flap till the mucogingival junction leaving the connective tissue and periosteum of existing keratinized gingiva intact.
- This partial thickness flap is then repositioned at the previous mucogingival junction.
- Healing produces an expanded band of keratinized gingival tissue as a repositioned band of keratinized epithelium takes attachment to an underlying tissue bed.
Question 9. What are the procedures for the correction of frenal relationships?
Answer:
- Mucogingival surgery for correction of frenal relationships is aimed at preventing the problems that are associated with high frenal attachments.
- These procedures are more commonly employed to treat the labial frenum and less frequently directed towards a lingual frenum and buccal and accessory frenzy.
- High frenal attachments are frequently associated with shallow vestibules and these procedures may be combined with vestibular extension procedures as well.
- These procedures may also be performed using electro-surgical devices and indeed such devices may offer better hemostasis and quicker healing.
- The most common procedures involved are frenectomy and frenotomy which essentially differ in the extent of resection of the frenum that is employed.
- Frenectomy involves the complete removal of the frenum along with its attachment to bone whereas frenotomy involves a relieving incision of the frenum to decrease its tensional effect on the mucogingival complex.
Frenal Relationships Procedure
- Step 1: Adequate anesthesia is administered by local infiltration in and around the frenum.
- Step 2: If a frenotomy is to be performed, the lip of the patient is held taut while a relieving incision is extended to the center of the frenum till the depth of the vestibule. Sutures may be placed for effctive hemostasis.
- Step 3: If a frenectomy is to be performed, the frenum is gripped with a hemostat, and incisions are extended above and below the hemostat, through the frenal tissue, and to the depth of the vestibule. The two incisions meet at the tip of the hemostat resulting in the removal of a triangle piece of frenal tissue.
- Step 4: The muscle attachments at the depth of the vestibule are relieved by blunt dissection and sutures are placed for hemostasis and approximation of tissue margins.
- Step 5: The labial mucosa may also be sutured to the periosteum at the depth of the vestibule in order to ensure maintenance of the new vestibular depth.
- Step 6: Fibrous band extensions of the frenum into interdental papillary gingiva may also be carefully excised to decrease tissue bulk if orthodontic treatment is planned. Such situations may be encountered in clinical diastemas in relation to high frenal attachments.
- Step 7: A periodontal pack is placed after bleeding is stopped by a pressure application with gauze.
Frenal attachment resections take time to heal due to the larger secondary intention healing component but are nevertheless predictable and successful procedures for the management of high frenal attachments.
Conclusion: Mucogingival surgery may be indicated for esthetic and functional reasons such as prevention of root caries, and dental hypersensitivity.
Leave a Reply