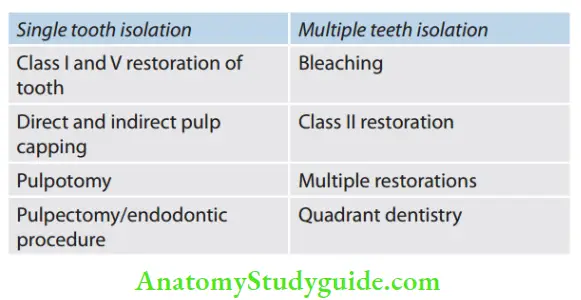
Isolation Of Teeth Notes
An effctive isolation of the teeth from the tongue, soft tissues, gingival fluid, and saliva can prove crucial to have safe and successful endodontic therapy. Though many means of isolation are present, according to the American Association of Endodontists, rubber dam isolation is considered a standard of care during endodontic treatment.
Table of Contents
This is because it acts as a barrier to prevent oral pathogens to enter the accessed tooth, and protects the patient from irrigants and aspiration of instruments. It represents the indispensable “Gold Standard of Care” in endodontic practice.
Read And Learn More: Endodontics Notes
The following components of the oral environment need to be controlled during operative procedures:
- Saliva
- Moving organs
- Tongue
- Mandible
- Lips and cheek
- Gingival tissue
- Buccal and lingual vestibular spaces
Advantages of moisture control
- Patient-related factors:
- Provides comfort to the patient
- Protects patients from aspiration of foreign bodies
- Protects patient’s soft tissues like tongue and cheeks by retracting them from the operating field
- Operator-related factors:
- A dry and clean operating field
- Infection control by minimizing aerosol production
- Increased accessibility to the operative site
- Improved properties of dental materials, hence better results
are obtained - Protection of the patient and operator
- Improved visibility of the working field
- Less fogging of the dental mirror
- Prevents contamination of tooth preparation
- Hemorrhage from the gingiva does not enter the operative site
Isolation With Rubber Dam
The rubber dam was introduced by Sanford Christie Barnum, a New York dentist, in 1864. A rubber dam can be defined as a flat thin sheet of latex/non-latex that is held by a clamp and frame which is perforated to show the tooth/teeth protruding through the perforations while all other teeth are covered and protected by the sheet.
A rubber dam is mandatory while doing root canal treatment in a few parts of the world from a medico-legal point of view.

Advantages of using a rubber dam:
- It helps in improving the accessibility and visibility of the working area
- It gives a clean and dry aseptic field while working
- It protects the lips, cheeks, and tongue by keeping them out of the way
- It acts as a raincoat for the teeth
- It helps to avoid unnecessary contamination, thereby infection control
- It protects the patient from aspiration of instruments andmedicaments
- It helps in keeping teeth saliva free while performing endodontic treatment so the tooth does not get contaminated by bacteria present in saliva
- It improves the efficiency of the treatment
- It potentially improves the properties of dental materials
- It provides protection to patients and dentist
Disadvantages of using a rubber dam:
- Incorrect use may damage porcelain crowns/crown margins or may traumatize gingival tissues
- Insecure clamps can be swallowed or aspirated
- Careless placing and removal of rubber dam can damage oral mucosa
- Time consuming and expensive
- There are chances of perforation during the preparation of the access cavity if the tooth is abnormally positioned
- There are chances of incorrect shade while selecting a shade for composite restoration due to bright colored dam
- Some patient may find it as claustrophobic
- Since it blocks of oral airway, it is difficult to use in patients with temporary nasal congestion
Contraindications of use of rubber dam
- Asthmatic patients
- Mouth breathers
- Extremely malpositioned tooth
Rubber dam equipment:
- Rubber dam sheet
- Rubber dam clamps
- Rubber dam forceps
- Rubber dam frame
- Rubber dam punch
Rubber dam accessories:
- Lubricant/petroleum jelly
- Dental floss
- Rubber dam napkin
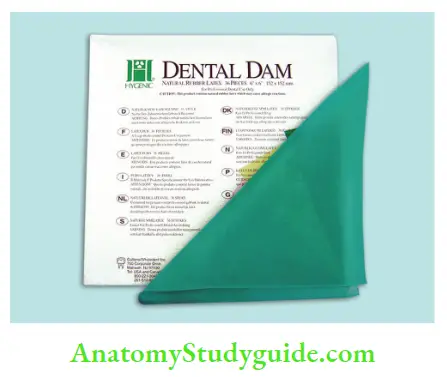
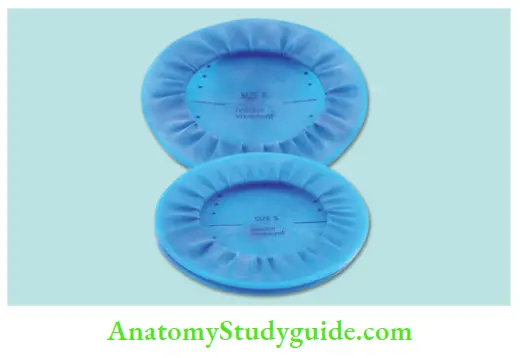
Rubber Dam Sheet:
- Rubber dam sheet is normally available in size 5 × 5 or 6 × 6 sq inches in light and dark colors. Dark colors are preferred (green or black) for good contrast
- The sheet has dry and shiny sides. The dull side faces the occlusal surface of isolated teeth because it is less reflective than shiny surface
- It is available in three thicknesses, that is, light, medium, and heavy. The thicker dam is effective in retracting the tissues and is more resistant to tearing. These are preferred for isolating class V cavities with a cervical retainer.
- Thinner dam can easily pass through the contacts easier, so especially helpful in cases of tight contacts. Middle grade is usually preferred as thin is more prone to tearing and heavier one is more difficult to apply
- Latex-free dam is necessary as the number of patients is increasing with latex allergy
- Flexi dam is a latex-free dam of standard thickness with no rubber smell.
The thickness of rubber dam sheet
Thin – 0.15 mm
Medium – 0.20 mm
Heavy – 0.25 mm
Extra heavy – 0.30 mm
Special heavy – 0.35 mm
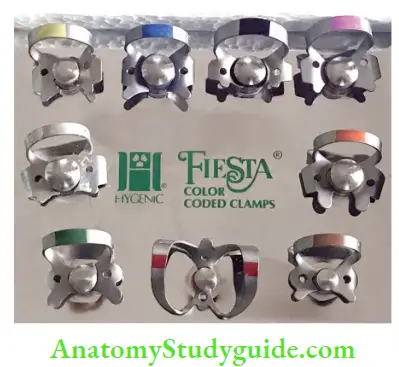
Rubber Dam Clamps:
- Rubber dam clamps to hold the rubber dam onto the tooth are available in different shapes and sizes
- Clamps mainly serve two functions:
- Thy anchor the rubber dam to the tooth
- Help in retracting the gingiva.
Classification of Rubber Dam Clamps
On the Basis of Jaw Design
- Bland
- Retentive
Bland Clamps
- Bland clamps are usually identifid by the jaws, which are flat and point directly toward each other
- In these clamps, flat jaws usually grasp the tooth at or above the gingival margin
- They can be used in fully erupted teeth where cervical constriction prevents the clamp from slipping of the tooth
Retentive Clamps
- These clamps have jaws which are directed gingivally and grasp the teeth more gingivally
- Jaws of clamps should have a four-point contact and should not extend beyond the mesial and distal line angles of the tooth. If not placed properly, it results in rocking and tilting of the clamp
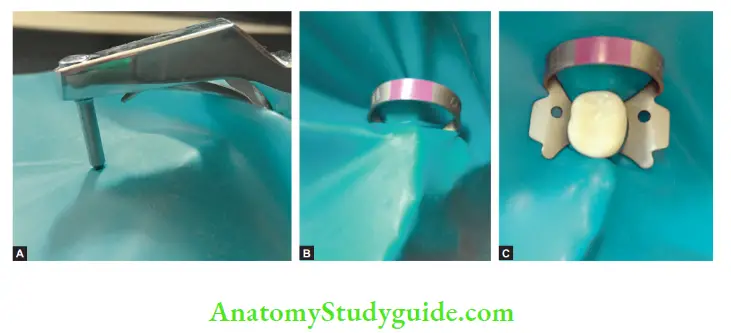
Both bland and retentive can be divided into winged and wingless-type.

- (A) Schematic presentation of winged and wingless clamp;
- (B) Photograph showing winged and wingless clamp
- Winged: These have anterior and lateral wings which provide extra retention of rubber dams. But these interfere with the placement of matrix band retainers and wedges
- Wingless: They have no wings. Here retainer is first placed on the tooth and then the dam is stretched over the clamp onto the tooth
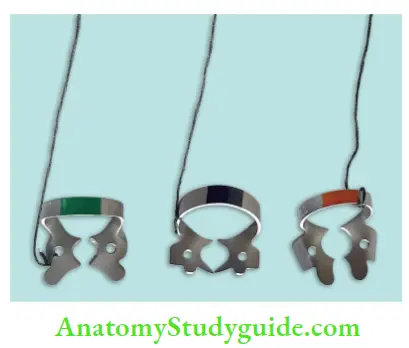
On the Basis of Material Used
- Metallic
- Nonmetallic/plastic
- Metallic: Traditionally, clamps have been made from tempered carbon steel and stainless steel. The problem with using metallic clamps is that they appear radiopaque on the radiograph, thereby overlapping the structures.
- Nonmetallic/plastic: Nonmetallic are made from polycarbonate plastic. They are radiolucent but they are bulky so don’t easily fi the teeth.
![]()

Retainer numbers and their applications
Retainer no. – Application
W2: – Small premolars
W4: – Most of premolars
W56: – Most of the molars
W7: – Mandibular molars
W8: – Maxillary molars
W27: – Terminal Mandibular molar
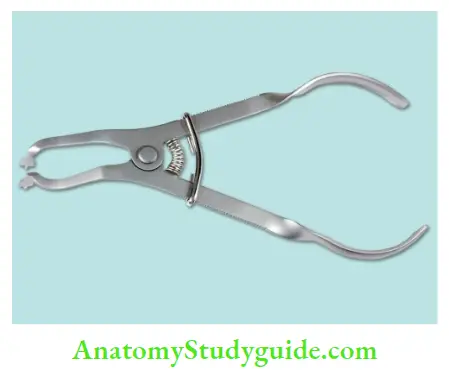
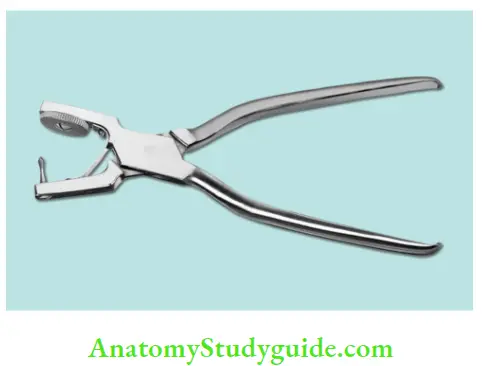
Rubber Dam Forceps:
- Rubber dam forceps is used to carry the clamp to the tooth
- When the handles of forceps are compressed together, the two working ends move apart
- The working end has small projections that fi into two corresponding holes of the rubber dam clamp
- The area between the working end and the handle has a sliding lock device which locks the handles in positions while the clinician moves the clamp around the tooth
- It should be taken care that forceps do not have deep grooves at their tips or they become very difficult to remove once the clamp is in place.
Rubber Dam Frame:
- The rubber dam frame supports the edges of the rubber dam
- Frames have been improved dramatically since their old style with the huge “butterflies”
- Modern frames have sharp pins which easily grip the dam. These are mainly designed with pins that slope backward
- Rubber dam frames are available in either metal or plastic
- Plastic frames have advantage of being radiolucent.
- When taut, the rubber dam sheet exerts too much pull on the rubber dam clamps, causing them to come loose, especially clamps attached to molars
- To overcome this problem, a new easy-to-use rubber dam frame, Safe-T-Frame, has been developed that offers a secure fit without stretching the rubber dam sheet.
- Instead, its “snap-shut” design takes advantage of the clamping effect on the sheet, which is caused when its two mated frame members are firmly pressed together. In this way, the sheet is securely attached, but without being stretched. Held in this manner, the dam sheet is under less tension, and hence, exerts less tugging on clamps, especially on those attached to molars.
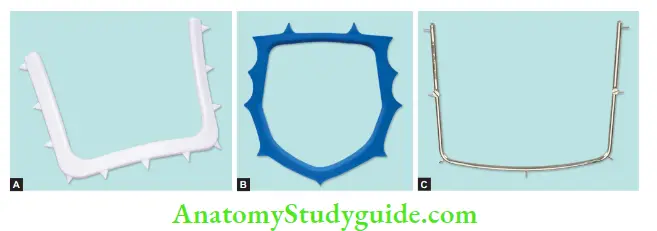
- (A) Ash pattern–most suitable for children;
- (B) Swenska N-O frame;
- (C) Young’s holder–U-shaped metal frame with small metal projections for securing borders of the rubber dam.
Rubber dam frames serve the following purposes:
- Support the edges of the rubber dam
- Retract the soft tissues
- Improve accessibility to the isolated teeth
Rubber Dam Punch:
- A rubber dam punch is used to make the holes in the rubber sheet through which the teeth can be isolated
- The working end is designed with a plunger on one side and a wheel on the other side
- This wheel has different sized holes on the flat surface facing the plunger
- The punch must produce a clean-cut hole every time
- Two types of holes are made, single and multihole
- If the rubber dam punch is not cutting cleanly and leaving behind a tag of rubber, the dam will often split as it is stretched out.
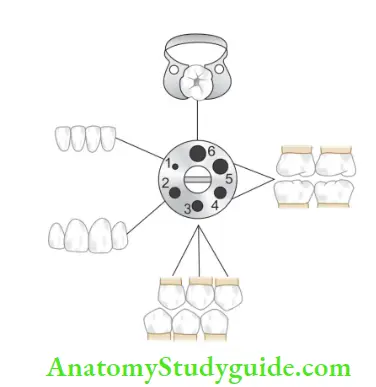
Rubber Dam Template:
- It is an inked rubber stamp which helps in marking the dots on the sheet according to the position of the tooth
- Holes should be punched according to arch and missing teeth.
Rubber Dam Accessories:
- Lubricant
- It is applied on the undersurface of the dam in the area of punched holes to facilitate the passing of the dam through the proximal contacts
- Petroleum-based lubricant should be avoided because it is difficult to remove and can interfere with bonding procedures. This, water-soluble lubricants like soap slurry should be preferred as a lubricant
- Petroleum jelly is often used at the corner of the mouth to prevent irritation.

- Dental Floss:
- It is usually required for testing interdental contacts
- Floss is tied to the clamp to prevent its accidental aspiration
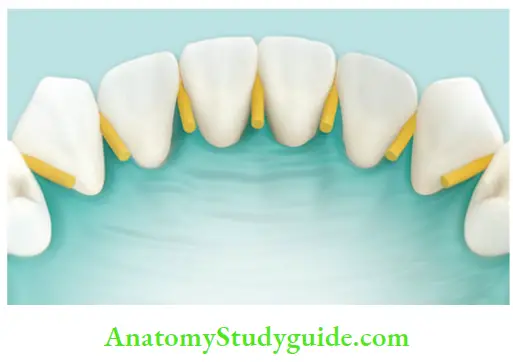
- Wedjets:
Wedjet cord is made up of natural latex to stabilize the dam with little chance of tissue trauma.

- Modeling Compound:
It is used to secure and stabilize the retainer to the tooth. In some cases, they can be used as retainers instead of clamps.
Rubber Dam Napkin:
- This is a sheet of absorbent materials usually placed between the rubber sheet and soft tissues.
- It absorbs saliva from the corner of the patient’s mouth
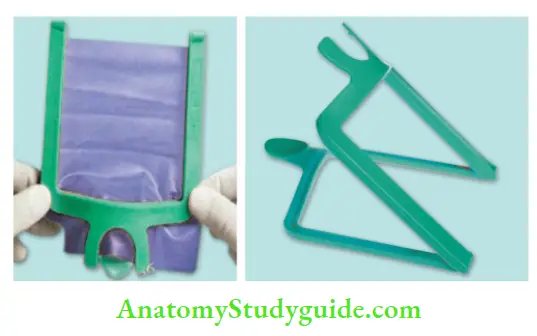
Recent Modifications In The Designs Of Rubber Dam
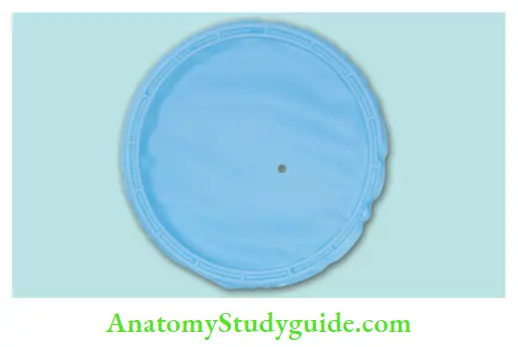
Insta-Dam:
It is a recently introduced disposable rubber dam for quick, convenient rubber dam isolation.
Salient Features of Insta-dam:
- It is a natural latex dam with a pre-punched hole and built-in frame
- Its compact design is just the right size to fi outside the patient’s lips
- It is made up of stretchable and tear-resistant, medium gauge latex material
- Radiographs may be taken without removing the dam
- Built-in flexible nylon frame eliminates bulky frames and sterilization
- Off-center, pre-punched hole customizes fit to any quadrant—add more holes if desired.
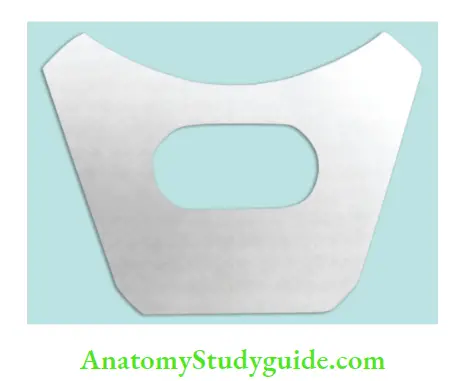
Hat Dam:
It is a clear plastic form which is shaped like a hat without the top. It is trimmed and fitted around the tooth which can’t be clamped.
Handi Dam:
- Another recently introduced dam is the Handi dam
- This is pre-framed rubber dam eliminates the need for a traditional frame
- Handi dam is easy to place and saves time of both patient and doctor
- It allows easy access to the oral cavity during the procedure
Optra Dam:
It is an anatomically shaped rubber dam for isolation. It is made up of flexible latex. For use, the intraoral ring is positioned in the gingivobuccal fold and the outer ring remains outside the mouth. Dam is secured around the teeth by fitting the septum of the dam interproximal and in the sulcus using dental floss.
Dry Dam:
Another newer type of rubber dam is also available which does not require a frame “dry dam.”
Liquid Dam:
It is a resinous material which is applied on the gingival aspect of the teeth, especially before bleaching, microabrasion, sandblasting, etc.
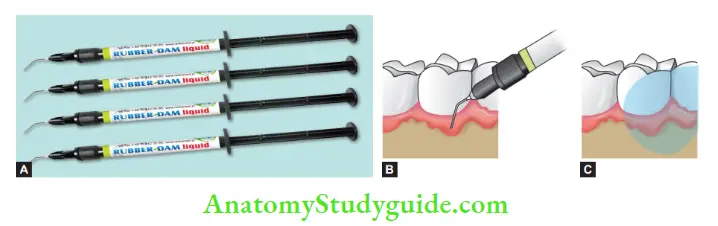
- (A) Resinous material;
- (B and
- C) Applied on gingival aspect of the teeth and cured to protect gingiva specially before bleaching, microbrasion, sandblasting, etc.
Placement Of Rubber Dam
Before placement of the rubber dam, the following procedures should be done:
- Through prophylaxis of the oral cavity
- Check contacts with dental flss
- Check for any rough contact areas
- Anesthetize the gingiva if required
- Rinse and dry the operated field.
Methods of Rubber Dam Placement
- Method 1: Clamp placed before rubber dam
- Select an appropriate clamp according to the tooth size
- Tie a flss to the clamp bow and place the clamp onto the tooth
- Larger holes are required in this technique as the rubber dam has to be stretched over the clamp. Usually, two or three overlapping holes are made
- Stretching of the rubber dam over the clamps can be done in the following sequence:
- Stretch the rubber dam sheet over the clamp
- Then stretch the sheet over the buccal surface and allow to settle into place beneath the buccal contour
- Finally, the sheet is carried to the palatal/lingual side and released
- This method is mainly used in posterior teeth in both adults and children except the third molar.
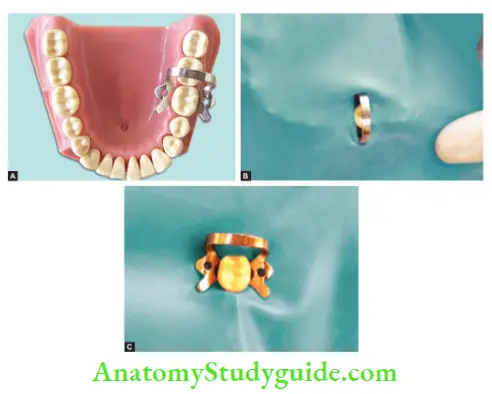
- (A) Placing clamp on selected tooth;
- (B) Stretching rubber dam sheet over clamp;
- (C) After complete stretching, tooth is isolated.
- Method 2: Placement of rubber dam and clamp together
- Select an appropriate clamp according to tooth anatomy
- Tie an flss around the clamp and check the stability
- Punch the hole in the rubber dam sheet
- The clamp is held with clamp forceps and its wings are inserted into the punched hole
- Both clamp and rubber dam are carried to the oral cavity and the clamp is tensed to stretch the hole
- Both clamp and rubber dam is advanced over the crown. First, jaw of the clamp is tilted to the lingual side to lie on the gingival margin of the lingual side
- After this, the jaw of the clamp is positioned on the buccal side
- After seating the clamp, again check the stability of the clamp
- Remove the forceps from the clamp
- Now release the rubber sheet from wings to lie around the cervical margin of the tooth.
- Method 3: Split dam technique
This method is a split dam technique in which a rubber dam is placed to isolate the tooth without the use of a rubber dam clamp. In this technique, two overlapping holes are punched in the dam. The dam is stretched over the tooth to be treated and over the adjacent tooth on each side.
The edge of the rubber dam is carefully teased through the contacts of the distal side of adjacent teeth.
Split dam technique is indicated:
- To isolate anterior teeth
- When there is an insufficient crown structure
- When isolation of teeth with a porcelain crown is required. In such cases, placement of a rubber dam clamp over the crown margins can damage the cervical porcelain
- Dam is placed without using the clamp
- Here two overlapping holes are punched and dam is stretched over the tooth to be treated and an adjacent tooth on each side
Management Of Difficult Cases
- Malpositioned Teeth
- To manage these cases, the following modifications are done:
- Adjust the spacing of the holes
- In tilted teeth, estimate the position of the root center at the gingival margin rather than the tip of the crown
- Another approach is to make a customized cardboard template
- Tight broad contact areas can be managed by:
- Wedging the contact open temporarily for passing the rubber sheet
- Use of lubricant.
Extensive Loss of Coronal Tissue:
When the sound tooth margin is at or below the gingival margin because of decay or fracture, the rubber dam application becomes difficult. In such cases, isolating the tooth
- Use retentive clamps
- Punch a bigger hole in the rubber dam sheet so that it can be stretched to involve more teeth, including the tooth to be treated
- In some cases, the modification of the gingival margin can be tried so as to provide a supragingival preparation margin. This can be accomplished by gingivectomy or flap surgery.
Crown with Poor Retentive Shape:
Sometimes anatomy of teeth limits the placement of rubber dams (lack of undercuts and retentive areas). In such cases, the following can be done:
- Placing a clamp on another tooth
- Using a clamp which engages interdental spaces below the contact point
- By building a retentive shape on the crown with a composite resin bonded to the acid-etched tooth surface.
Teeth with Porcelain Crowns:
In such cases, placing a rubber dam may cause damage to the porcelain crown. To avoid this
- The clamp should be placed on another tooth
- The clamp should engage below the crown margin
- Do not place a clamp on the porcelain edges
- Place a layer of rubber dam sheet between the clamp and the porcelain crown which acts as a cushion and thus minimizes localized pressure on the porcelain.
Leakage:
- Sometimes leakage is seen through the rubber dam because of accidental tears or holes. Such leaking gaps can be sealed using cavity, periodontal packs, liquid rubber dam, rubber dam adhesives, or ordeal
- For sealing the larger gaps, the rubber dam adhesives in combination with orabase can be tried
- If leakage persists despite of these efforts, the rubber dam sheet should be replaced with a new one
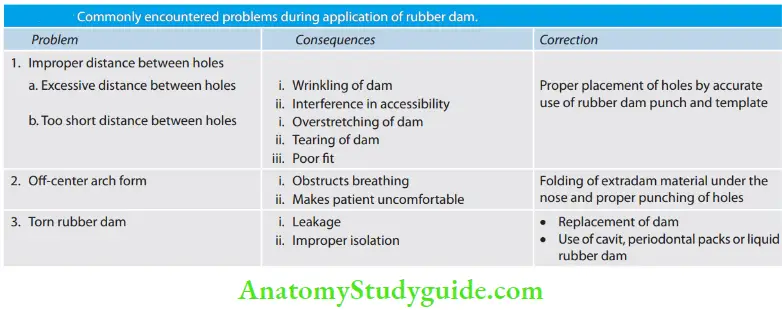
- Depending upon the clinical condition, isolation of single or multiple teeth can be done with the help of a rubber dam. entails problems commonly encountered during the application of rubber dams.
Removal of Rubber Dam:
- Before the rubber dam is removed, use the water syringe and high-volume evacuator to flush out all debris that collected during the procedure
- Cutaway tied thread from the neck of the teeth. Stretch the rubber dam facially and pull the septal rubber away from the gingival tissue and the tooth
- Protect the underlying soft tissue by placing a fingertip beneath the septum
- Free the dam from the interproximal space, but leave the rubber dam over the anterior and posterior anchor teeth
- Use the clamp forceps to remove the clamp
- Once the retainer is removed, release the dam from the anchor tooth and remove the dam and frame simultaneously
- Wipe the patient’s mouth, lips, and chin with a tissue or gauze to prevent saliva from getting on the patient’s face
- Check for any missing fragments after the procedure
- If a fragment of the rubber dam is found missing, inspect the interproximal area because pieces of the rubber dam left under the free gingiva can result in gingival irritation.
Leave a Reply