Access Cavity Preparation Introduction
Endodontic treatment starts with an ideal access cavity preparation and further steps of root canal treatment are based on the accuracy and correctness of the access cavity preparation which decides straight-line access to the apical foramen. This preliminary step permits the localization, cleaning, shaping, disinfection, and three-dimensional obturation of the root canal system.
Table of Contents
Knowledge of pulp chamber morphology and examination of preoperative radiograph should be put together when going to prepare access cavity. An improperly prepared access cavity in terms of position, extent, or depth affects the final outcome of endodontic treatment.
Read And Learn More: Endodontics Notes
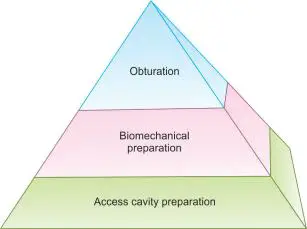
Access Cavity Preparation Definition
Access cavity preparation is defined as an endodontic coronal preparation which enables unobstructed access to the canal orifices, a straight line access to apical foramen, complete control over instrumentation, and accommodates obturation technique.
Ideal coronal access forms the foundation of the pyramid of endodontic treatment. It allows straight entry into canal orifices with line angles forming a funnel which drops smoothly into the canals. Removal of coronal interferences on instruments reduces the adverse unidirectional forces directed on the instruments which may result in instrumental errors like ledging and perforation.
An improperly prepared access cavity can impair the instrumentation, disinfection, and obturation, therefore affecting the prognosis of the endodontic treatment.
Before going for access cavity preparation, a study of preoperative periapical radiographs is necessary because it helps in knowing
- Morphology of the tooth
- Anatomy of the root canal system
- Number of canals
- Curvature and branching of the canal system
- Length of the canal
- Position and size of the pulp chamber and its distance from the occlusal surface
- Position of apical foramen
- Calcification, and resorption present if any
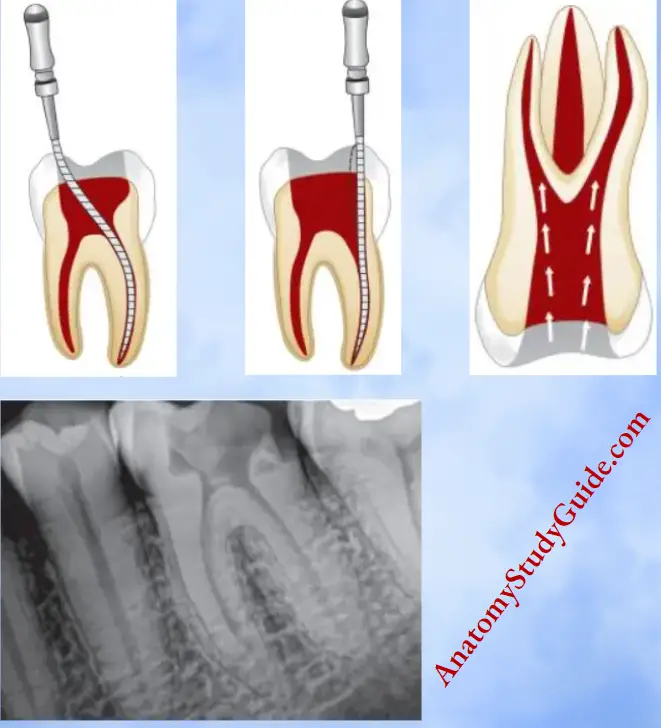
Objectives of access cavity preparation:
- Direct straight-line access to the apical foramen. It helps in
- Improved instrument control because of minimal instrument deflection and ease of instrumentation in the canal
- Improved obturation
- Decreased incidence of iatrogenic errors
- Complete deroofing of the pulp chamber. It helps in
- Complete debridement of the pulp chamber
- Improved visibility
- Locating canal orifices
- Permitting straight-line access
- Preventing discoloration of teeth because of remaining
- Complete debridement of the pulp chamber
- Improved visibility of pulpal tissue
- Conserve sound tooth structure as much as possible so as to avoid weakening of the remaining tooth structure. The presence of walls allows
- Proper application of rubber dam
- Stable reference point
- Flooding of the chamber with irrigant
- Support for temporary restoration
- Provide positive support for temporary filing so as to avoid any contamination of the cavity. Walls of the cavity should be fired in a shallow funnel shape with the occlusal surface wider than the flor
Instruments For Access Cavity Preparation
To achieve access cavity preparation, every dentist should have the following set of instruments.
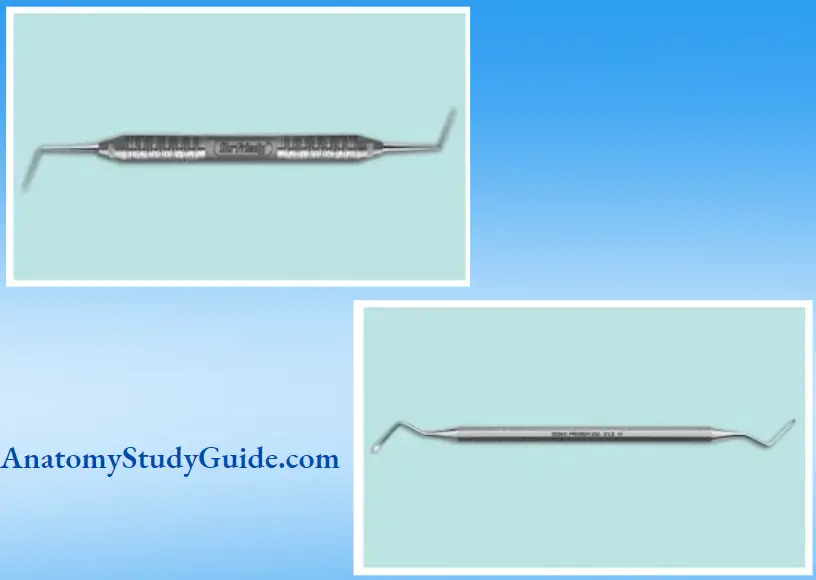
Endodontic Explorer:
- DG 16: DG 16 was designed by Dr. David Green in 1951. It is designed because a straight explorer and cow-horn explorer did not help in locating canal orifices, especially in the case of posterior teeth. But, the design of DG 16 helps to identify canal orifices and to determine canal angulation.
- CK (Clark-Khademi) 17: It is used to identify calcified canals because of being thinner and stiffer in nature.
- Endodontic spoon excavator: It is a double-ended excavator with a long shank so as to reach deep into the prepared cavities. It is used to excavate the base of the pulp chamber.
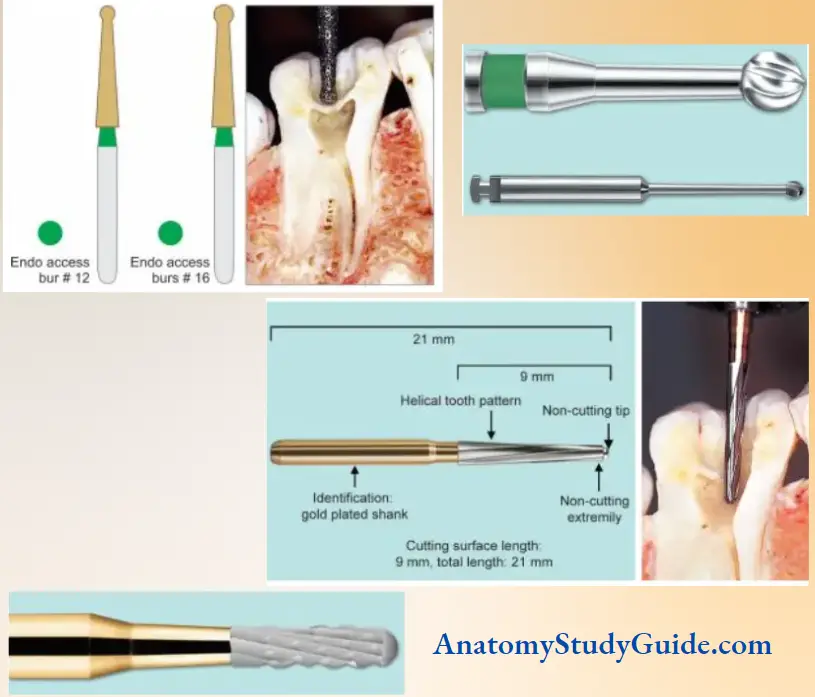
Access Opening Burs:
- Diamond Round Burs
Nos. 2 and 4 round diamond burs are used to gain entry into the tooth structure and restorative materials. No. 2 size burs are used for anterior and premolars, whereas No. 4 is used for molars.
- Carbide Round Burs:
Nos. 2 and 4 surgical-length round burs are used to reach the pulp. They have longer shanks, so provide better visibility.
No. 2 size burs are used for anterior and premolars, whereas No. 4 is used for molars. These burs are used to gain entry through the dentin, restorative materials, etc.
- Transmetal Bur:
This is used for cutting any type of metal. It has a saw tooth blade configuration which provides efficiency without vibrations. This bur is especially helpful for entering in hot teeth.
- Endo Z Bur:
It is safe-ended tapered carbide bur. Lateral cutting edges of Endo Z bur are used to flare, flatten, and refine the internal axial walls. Its noncutting tip can be safely placed on the pulpal floor without the risk of perforation.
- Tapered Diamond Bur:
It is used at high speed to flatten, flare, and fill the axial walls of the pulp chamber.
- X-Gates:
Four Gates-Glidden drills are combined to form one X-Gates. Nos. 1–4 Gates-Glidden are used in a sequential manner to form a funnel-shaped access coronal surface. X-Gates are used at the speed of 500–750 rpm in brushing stroke. The purpose of using X-Gates is
- To fire and blend canal orifices
- To remove lingual shoulder
- To relocate coronal most parts of the canal away from furcal danger
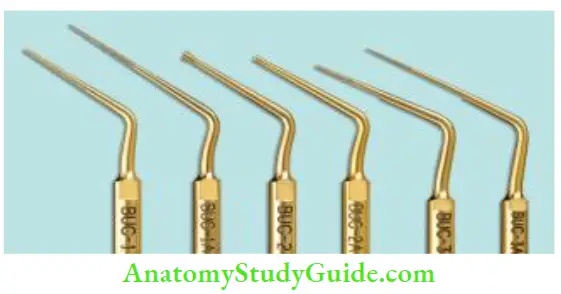
Ultrasonic Instruments:
Ultrasonic tips of various lengths, diameters, and tapers are used with or without water port delivery. In general, these are used to create troughs along the grooves to expose hidden orifices, remove pulp stones, negotiate calcified canals, and fish access preparation.
Guidelines For Access Cavity Preparation
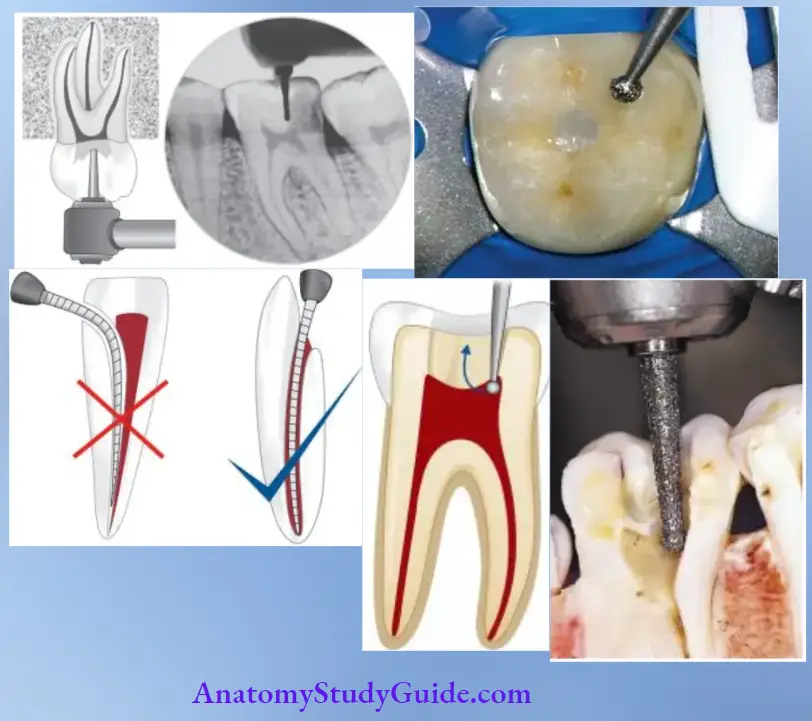
- Before initiating access cavity preparation, check the depth of preparation and position of the pulp chamber by aligning the bur and handpiece against the radiograph
- Use round bur for penetrating into the pulp chamber. Once “drop in” into the pulp chamber is obtained, the round bur is moved inside to outside in a brushing motion. By this, dentinal overhangs are removed.
- After this, finishing and flying of the preparation is done using non-end cutting bur. It creates a smooth transition between the access cavity and walls of pulp chamber and firing of the pulp chamber occlusal
- Diamond burs are preferred over tungsten carbide burs because they cut more smoothly, produce lesser vibrations, and are well tolerated by patients. Complete removal of chamber roof facilitates the removal of the pulp tissue, calcification, caries or any residuals of previous restorations
- The walls of the pulp chamber are filled and tapered to form a gentle funnel shape with a larger diameter toward the occlusal surface. The shape of the access cavity differs from that used in restorative dentistry. For restorations, the focus is on pits, fissures, sulci, and fossae and one must avoid underlying pulp. For access cavity, one must uncover the pulp by removing the roof of the pulp chamber
- Access cavity is prepared through the occlusal or lingual surface never through the proximal or gingival surface. Improper access cavity results in inadequate canal instrumentation, iatrogenic errors, and poor prognosis
The shape of the access cavity is determined by
- Size of pulp chamber: In young patients, access preparation is wider than in older ones
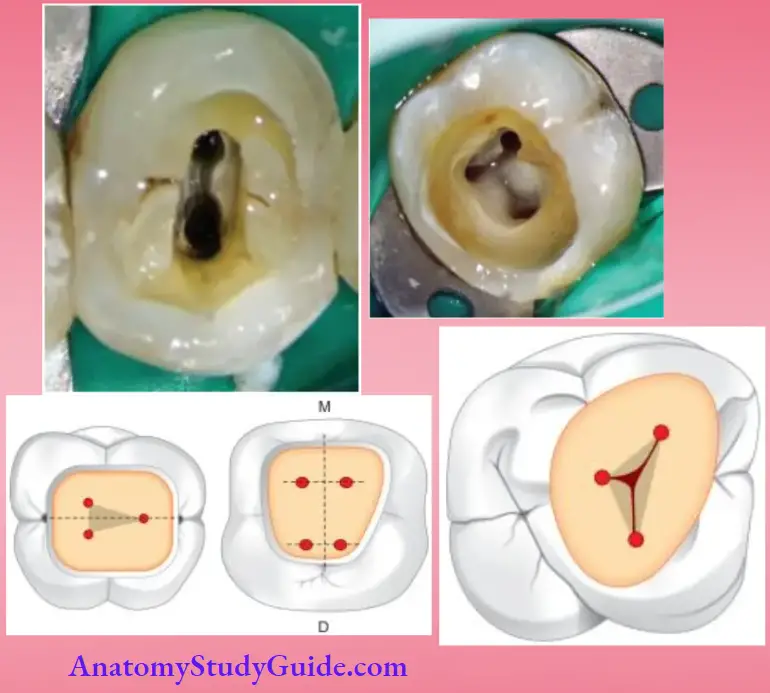
- The shape of the pulp chamber: Final outline form should reflect the shape of the pulp chamber. It is triangular in interiors, ovoid buccolingually in premolars, and trapezoidal or triangular in molars
- Number, position, and curvature of the canal: It can lead to modified access preparation, like shamrock preparation in maxillary molar
Laws Of Access Cavity Preparation For Locating Canal Orifies
- Law of centrality: The floor of pulp chamber is almost always located in the center of the tooth at the level of the cementoenamel junction
- Law of cementoenamel junction(CEJ): Distance from the external surface of the clinical crown to the wall of pulp chamber is the same throughout the tooth circumference at the level of CEJ
- Law of concentricity: Walls of the pulp chamber are always concentric to the external surface of the tooth at the level of CEJ. This indicates anatomy of the external tooth surface reflects the anatomy of the pulp chamber
- Law of color change: The color of floor of the pulp chamber is darker than the cavity walls
- Law of symmetry: Except for the maxillary molars, canal orifices are equidistant from a line drawn in mesiodistal direction through the flor of the pulp chamber
- Law of orifice location: Canal orifices are located at the junction of floor and walls and at the terminus of root development fusion lines
Tests For Locating Canals:
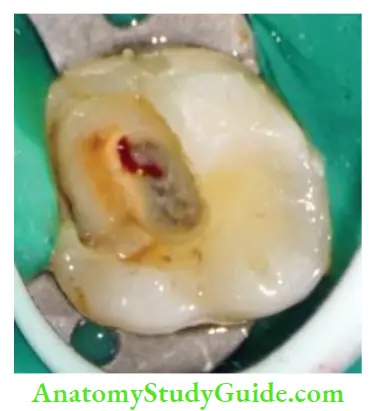
In case of vital pulp: Droplet of blood at orifice or a red line within a groove that originates from orifices. If the pulp is nonvital: A white line that can be seen as one trough along a groove.
Access Cavity Of Anterior Teeth
- Remove all caries and any defective restorations so as to prevent contamination of pulp space and have a straight line access into the canals.
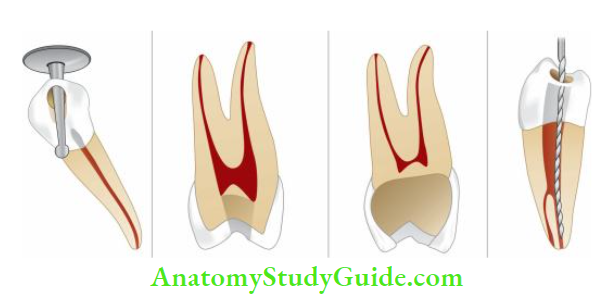
- An access opening is initiated at the occlusal to the cingulum by using round bur almost perpendicular to the palatal surface. Due to its constant position, the cingulum is the choice of a landmark because other areas like the gingival margin can retract and the incisal margin can abrade, causing the loss of a landmark.
- Once enamel is penetrated, the bur is directed 45° to the long axis of the tooth, until “a drop in” is felt.
- Now chamber roof is removed by moving the round bur from inside to outside. Locate the canal orifices using a sharp endodontic explorer.
- Once the canal orifices are located, remove the lingual shoulder using Gates-Glidden drills or safe-tipped diamond or carbide burs. The lingual shoulder is a prominence of dentin formed by the removal of the lingual roof which extends from the cingulum to approximately 2 mm apical to the orifice.
- During the removal of the lingual shoulder, the orifice should also be fired so that it becomes confluent with all the walls of access cavity preparation. By this, straight-line access to the apical foramen is achieved.
- Since the outline form of the access cavity reflects the internal anatomy of the pulp space, the technique of the access opening of anterior teeth is the same, the shape may vary according to the internal anatomy of each tooth.
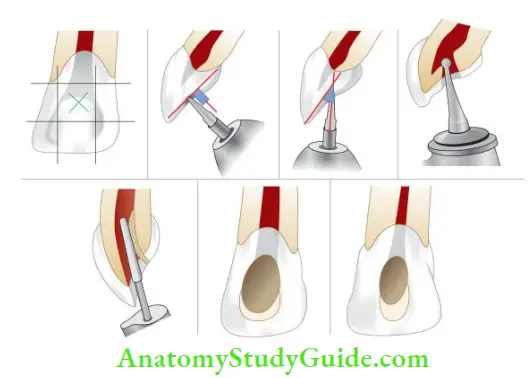
- (A) Initial point for entry of the bur is the middle of middle third of the palatal surface
- (B) Keep the round bur perpendicular to the long axis of the tooth
- (C) Bur is directed 45° to the long axis of the tooth to penetrate the pulp chamber
- (D) Removal of the chamber roof
- (F) Fial access cavity shape of the maxillary central incisor
- (G) Access cavity shape of the maxillary lateral incisor
Maxillary Central Incisor:
- The outline form of the access cavity of the maxillary central incisor is a rounded triangular shape with the base facing the incisal aspect
- The width of base depends upon the distance between the mesial and distal pulp horns
- Shape may change from triangular to slightly oval in mature teeth because of less prominence of mesial and distal pulp horns
Maxillary Lateral Incisor:
The shape of the access cavity is almost similar to that of the maxillary central incisor except that
- It is smaller in size
- When pulp horns are present, the shape of the access cavity is
rounded triangle - If pulp horns are missing, the shape is oval
- Frequently, distal or palatal curvature of the apical third of the root is found. This explains the reason for often found lesions of endodontic origin on the palatal surface of the lateral incisor
Maxillary Canine:
The shape of the access cavity of the canine is oval with greater dimensions labiopalatally.
Mandibular Incisors:
The access cavity of mandibular central and lateral incisors is almost similar in steps and shape. It is different from maxillary incisors in the following aspects:
- Smaller in shape
- The shape is a long oval with greater dimensions directed incisogingivally
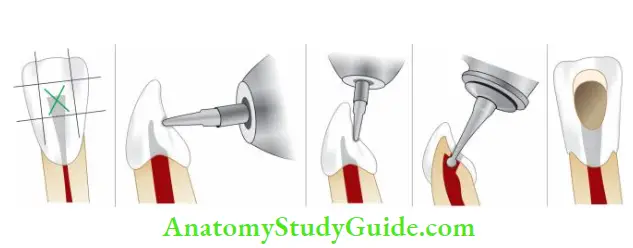
Mandibular Canine:
The shape of access opening of the mandibular canine is similar to
maxillary canine except that
- It is smaller in size
- Root canal outline is narrower in mesiodistal dimension
- Two canals are often present in mandibular canines Commonly seen errors during access cavity preparation of anterior teeth are shown in.
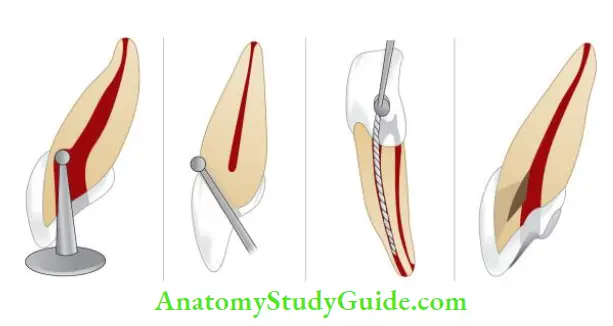
Access Cavity Preparation For Premolars
- In premolars, the pulp chamber is located in the center of the occlusal surface between buccal and lingual cusp tips. Two pulp horns are located within the peaks of their cusps and orifices are located within the horns. So, access cavity can be prepared without involving the cusps
- Penetrate the enamel with the No. 4 round bur directed parallel to the long axis of the tooth. The bur is moved in a buccolingual direction to widen the orifice
- Once the “drop-in” is felt, locate the canal orifices with the help of a sharp endodontic explorer
- Remove the roof of the pulp chamber using a round, tapered fissure or non-end cutting bur alongside the walls of the pulp chamber working from inside to outside
- Remove any remaining cervical bulges or obstructions using safety tip burs or Gates-Glidden drills and obtain a straight line access to canals
- Final preparation has larger dimensions buccolingually. Two canals are often joined by a shallow groove located at the floor of the pulp chamber
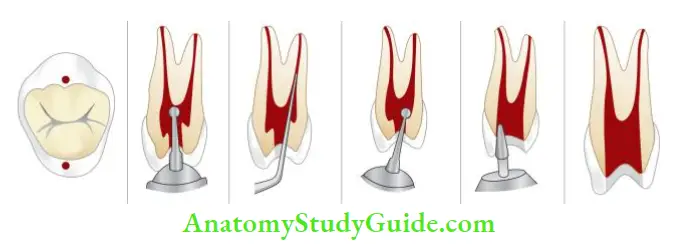
Access Cavity Preparation For Premolars Clinical Tips:
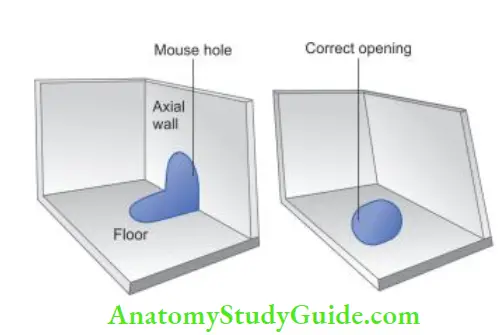
- Extension of orifices to the axial walls results in the “mouse hole effect”
- It is caused by under extension of the access cavity
- The mousehole effect results in hindrance to straight-line access which may cause procedural errors
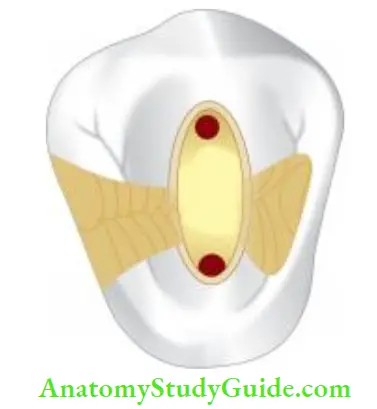
Maxillary First Premolar:
The shape of the access cavity is ovoid where boundaries should not exceed half the lingual incline of the buccal cusp and half the buccal incline of the lingual cusp.
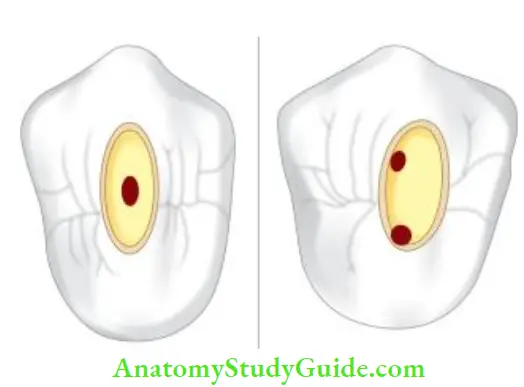
Maxillary Second Premolar:
It is similar to that of the maxillary first premolar. Weine stated that the second premolar has a single root with an ovoid canal in 60% of the cases. The finding of a single, eccentric canal orifice indicates the presence of another canal.
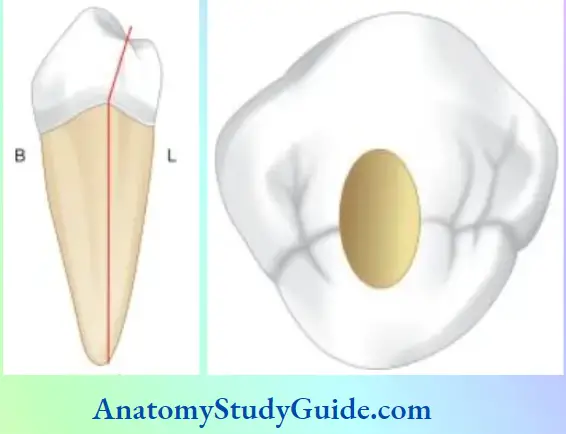
Mandibular First Premolar:
The access cavity of the mandibular first premolar differs from the maxillary premolar in the following aspects:
- There is the presence of a 30° lingual inclination of the crown to the root; hence the starting point of bur penetration should be halfway up the lingual incline of the buccal cusp on a line connecting the cusp tips
- The shape of the access cavity is oval which is wider mesiodistally when compared to its maxillary counterpart
Mandibular Second Premolar:
Th access cavity preparation is similar to the mandibular first premolar except that in the mandibular second premolar
- Enamel penetration is initiated in the central groove because its crown has a smaller lingual tilt
- Because of better developed lingual half, the lingual boundary of the access opening extends halfway up to the lingual cusp incline, making the pulp chamber wider buccolingually
- Root canals are more often oval than round
- An ovoid access opening is wider mesiodistally
Commonly seen errors during access cavity preparation of premolars are shown in.
- (A) Perforation caused by ignoring lingual tilt of premolar;
- (B) Under extended preparation;
- (C) Over-extended preparation;
- (D) Failure to locate extra canal.
Access Cavity Preparation For Maxillary Molars
- Determine the shape and size of the access opening by measuring the boundaries of the pulp chamber mesially and distally
- The mesial boundary is a line joining the mesiobuccal and mesiolingual cusps and the distal boundary is the oblique ridge. The starting point of bur penetration is on the central groove midway between mesial and distal boundaries
- Penetrate the enamel with No. 4 round bur in the central groove directed palatally and prepare an external outline form
- Penetrate the bur deep into the dentin until the clinician feels a “drop” into the pulp chamber
- Explore the canal orifices with a sharp endodontic explorer. All the canal orifices should be positioned entirely on the pulp floor and should not extend to the axial walls
- Now remove the complete roof of the pulp chamber using a tapered fissure, round bur, safety tip diamond or the carbide bur working from inside to outside. The shape and size of the internal anatomy of the pulp chamber guide the cutting
- Now remove any cervical bulges, ledges or obstruction if present
- Smoothen and finish the access cavity walls so as to make them confluent within the walls of the pulp chamber and slightly divergent toward the occlusal surface
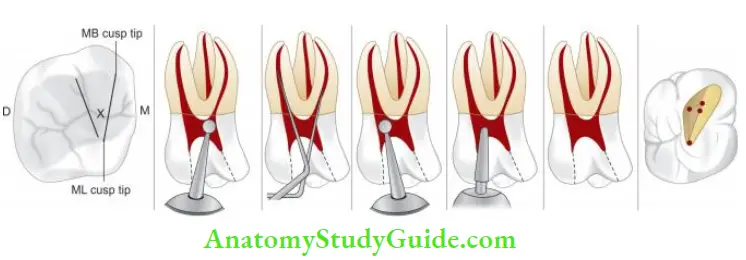
Maxillary First Molar:
- The shape of pulp chamber is rhomboid with an acute mesiobuccal angle, obtuse distobuccal angle, and palatal right angles
- The palatal canal orifice is located palatally. Mesiobuccal
canal orifice is located under the mesiobuccal cusp. The distobuccal canal orifice is located slightly distal and palatal to the mesiobuccal orifice - A line drawn to connect all three orifices (i.e., MB, DB, and palatal) forms a triangle, termed as molar triangle
- Almost always a second mesiobuccal canal, that is, MB2 is present in the first maxillary molars, which is located palatal and mesial to the MB1. Though its position can vary, sometimes it can lie a line between MB1 and palatal orifices
- Because of the presence of MB2, the access cavity acquires a rhomboid shape with corners corresponding to all the canal orifices, that is, MB1, MB2, DB, and palatal. Luebke showed that an entire wall is not extended to search and facilitate cleaning, shaping, and obturation of an extra canal.
- He recommended the extension of only that portion of the wall where an extra canal is present and this may result in a “cloverleaf appearance” in the outline form. Luebke referred this to as a shamrock preparation
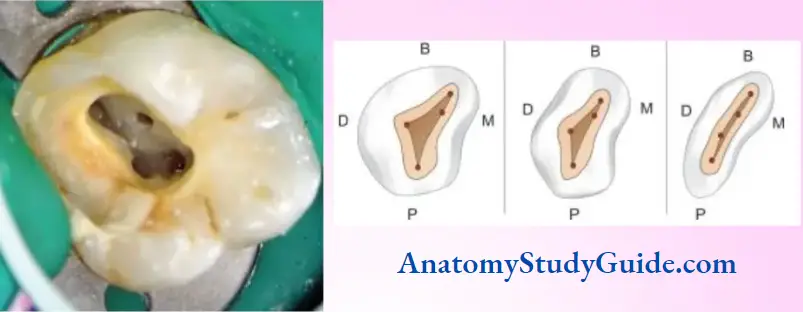
Maxillary Second Molar:
The basic technique is similar to that of the first molar but with the following differences:
- The roots are found closer which may even fuse to form a single root
- MB2 is less likely to be present in the second molar
- The canals form a rounded triangle with a base toward the buccal side
- The mesiobuccal orifice is located more toward the mesial and buccal than in the first molar
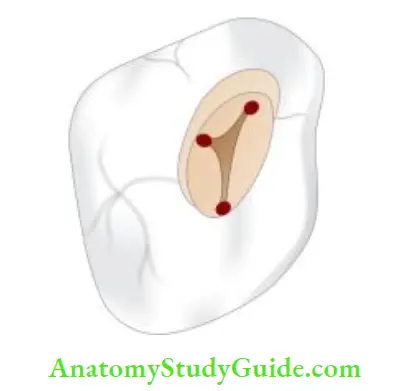
Access Cavity Preparation For Mandibular Molars
- Remove caries and any restorative material if present
- Enamel is penetrated with No. 4 round bur on the central fossa midway between the mesial and distal boundaries. The mesial boundary is a line joining the mesial cusp tips and the distal boundary is the line joining buccal and the lingual grooves
- Bur is penetrated in the central fossa and directed toward the distal root. Once the “drop” into the pulp chamber is felt, remove the roof of the pulp chamber working from inside to outside with the help of round bur, tapered fissure, safety tip diamond, or the carbide bur
- Explore canal orifices with sharp endodontic explorer
- Move the bur from inside to outside to deroof the chamber
- Finish and smoothen the access cavity with slight divergence toward the occlusal surface
- When four canals are present, the shape of the access cavity is rhomboid, but when two canals are present, the access cavity is oval in shape with wider dimensions buccolingually
- Second molars with fused roots usually have two canals, buccal and lingual though the number, type, shape, and form of canals may vary.
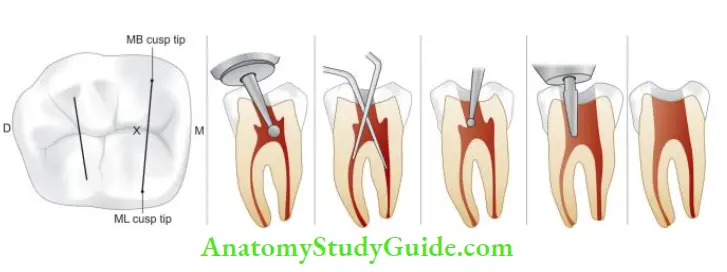
Mandibular First Molar:
- The mesiobuccal orifice is under the mesiobuccal cusp. The mesiolingual orifice is located in a depression formed by mesial and lingual walls. The distal orifice is oval in shape with the largest diameter buccolingually located distal to the buccal groove
- Orifices of all the canals are usually located in the mesial two-thirds of the crown
- Cases have also been reported with an extramarital canal, that is, the middle mesial canal (1%–15%) lying in the developmental groove between mesiobuccal and mesiolingual canals. Distal root has also been shown to have more than one orifice, that is, distobuccal, distolingual, and middle distal. These orifices are usually joined by the developmental grooves
- The shape of the access cavity is usually trapezoidal or rhomboid irrespective of the number of canals present
- The mesial wall is straight, the distal wall is round. The buccal and lingual walls converge to meet the mesial and distal walls.
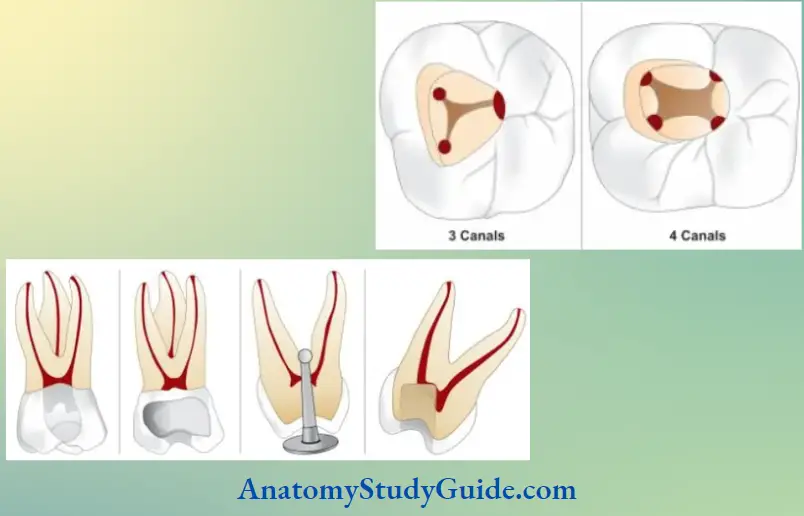
Mandibular Second Molar:
- Access opening of the mandibular second molar is similar to that of the first molar except for the following differences:
- The pulp chamber is smaller in size
- One, two or more canals may be present
- Mesiobuccal and mesiolingual canal orifices are usually located closer
- When three canals are present, the shape of the access cavity is
almost similar to the mandibular first molar, but it is more triangular and less of a rhomboid shape - When two canal orifices are present, the access cavity is rectangular, wider mesiodistally, and narrower buccolingually
- Because of buccoaxial inclination, sometimes it is necessary to reduce a large portion of the mesiobuccal cusp to gain convenience form for the mesiobuccal canal
Commonly seen errors during access cavity preparation of molars are shown in. shows the shape of the access opening of maxillary and mandibular teeth.
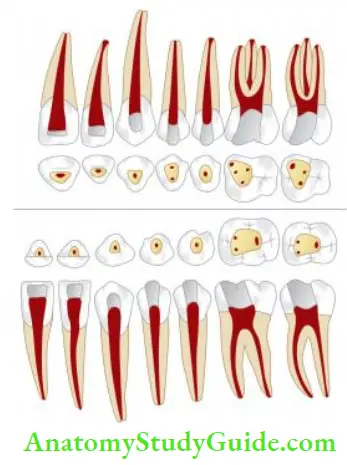
Clinical Management Of Difficult Cases For Access Opening
For optimal treatment of teeth with abnormal pulpal anatomy, the following are required:
Good Quality Radiographs:
Good quality radiographs with angled views and contrast are required for a better assessment of root canal anatomy. If the canal disappears midway from the orifice to the apex, one should always suspect bifurcation. If the radiograph shows the presence of a canal at an unusual place, one should suspect the abnormal anatomy of the pulp space.
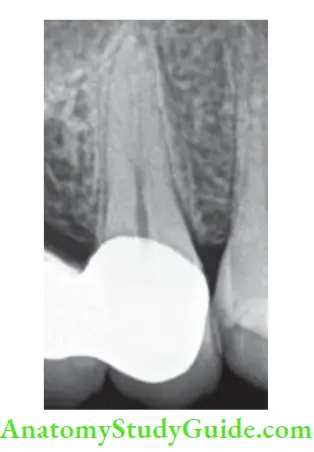
Magnification:
The use of a surgical operating microscope is recommended for endodontic treatment.
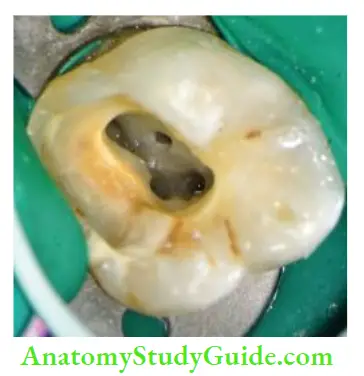
Knowledge of Clinical Anatomy:
One should evaluate the gingival contour for abnormal anatomy of the tooth. For example, a broad labiogingival wall in the maxillary premolar may suggest a broad buccal root and thus two root canals. Teeth with extra cusp may indicate an aberrant pulp chamber.
Color of Pulpal Floor:
In general, the pulpal floor is dark gray in color, whereas the axial dentin is lighter in color. This color difference helps the clinician to be very accurate in removing axial dentin so as to expose the pulpal floor.
Extension of Access Cavity:
The initial access shape is determined by the shape of the pulpal floor but later it is extended to gain straight-line access to the canals. Sometimes modified access cavity is prepared to locate MB2 in maxillary molars or the second buccal canal in maxillary premolars.
Management of Cases with Extensive Restorations:
If extensive restorations or full veneer crowns are marginally intact with no caries, then they can be retained with access cavities being cut through them. For cutting porcelain restorations, diamond burs are effctive and for cutting through metal crowns, a fie cross-cut tungsten carbide bur is very effctive.
Restorative materials often alter the anatomic landmarks making the access cavity preparation difficult. If possible, complete removal of extensive restoration allows the most favorable access to the root canals. When access cavity is made through restoration, the following can occur:
- Coronal leakage because of loosening of filings due to vibrations while access preparation
- Poor visibility and accessibility
- Blockage of the canal if restoration pieces get stuck into the canal system
- Misdirection of bur penetration (because in some cases restorations are placed to change the crown to root angulations so as to correct occlusal discrepancies)
Tilted and Angulated Crowns:
If a tooth is severely tilted, the access cavity should be prepared with great care to avoid perforations. Preoperative radiographs are of great help in evaluating the relationship of the crown to the root. Sometimes it becomes necessary to open up the pulp chamber without applying the rubber dam so that the bur can be placed at the correct angulation.
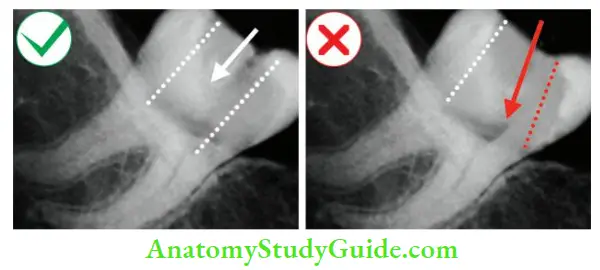
If not taken care of, the access cavity preparation in tilted crowns can result in
- Failure to locate canals
- Gouging of the tooth structure
- Procedural accidents such as
- Instrument separation
- Perforation
- Improper debridement of pulp space
Calcified Canals:
Pulp canal obliteration in the form of calcific metamorphosis or calcification is characterized by the deposition of hard tissue within the root canal space. These can cause obliteration of the pulp chamber and canal making management of the root canal difficult. Steps to manage teeth with calcified canals.
Access Preparation of Calcified Canals:
- Success in negotiating small or calcified canals is predicated on a proper access opening and identification of the canal orifice
- To locate the calcified orifice, mentally visualize and plan the normal spatial relationship of the pulp space onto a radiograph of the calcified tooth. Measure the distance from the occlusal surface to the pulp chamber from the preoperative radiograph
- Start with the access preparation using a small No. 2 or 4 round bur. Avoid removing large amounts of dentin in the hope of finding a canal orifice. By doing this all the pulp flor landmarks are lost, also the strength and dentinal thickness of the tooth get compromised.
- Small round burs should be used to create a path to the orifice. This will further ease the instruments into the proper lane to allow the effortless introduction of fees into the canals
Location of the Canal Orifice:
- If an orifice is present, use DG 16 explorer and apply firm pressure to force the instrument slightly into the orifice, where it will “stick.” At this suspected point, place No. 8 or 10 K-fie or canal pathfinder into the orifice and try to negotiate the canal
- Probing with the explorer yields a characteristic “stick,” but if the explorer lies too close to the root surface, it actually penetrates a thin area of remaining dentin. The most common sign of accidental perforation is bleeding, but bleeding may also indicate that the pulp in the calcified canal is vital. If there is any doubt, place a small instrument in the opening and take a radiograph
- Sometimes, not anesthetizing the patient while performing access opening can be useful. The patient should be told to indicate when he/she feels a sharp sensation during access with a bur. At that point, a sharp DG 16 Endo Explorer is used to locate the canal. It is easy to tell the difference between PDL and pulp with a small fee. Reaction to pain is sharper if fie gets inserted into a pulp than if it is in PDL
- Once the orifice has been located, a No. 8 K-fie is penetrated into the canal to negotiate the calcified canal. A No. 10 K-fie is too large and a No. 6 K-fie is too weak to apply any fim apical pressure. The use of nickel–titanium files is not recommended for this purpose because of the lack of strength in the long axis of the fie. Forceful probing of the canal with fie instruments and chelating agents results in the formation of a false canal and continued instrumentation in a false canal results in perforation
For guidelines of negotiating calcified canals, refer to page number Page no 276.
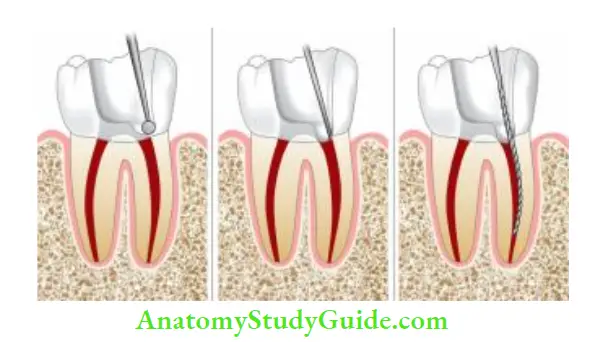
Sclerosed Canals:
- Sclerosed canals make endodontic treatment a challenge. Management:
- For visualization, magnification, and illumination are the main requirements. Dyes can be used to locate the sclerotic canals
- While negotiating, précised amount of dentin should be removed with the help of ultrasonic tips to avoid over cutting
- Long shank low-speed No. 2 round burs can also be used
- The use of chelating agents in these cases is not of much help because it softens the dentin indiscriminately, resulting in procedural errors such as perforations
Teeth with No or Minimal Crown:
Though it seems to be quite simple to prepare access cavity in such teeth, the following precautions are needed while dealing with such cases:
- Evaluate the preoperative radiograph to assess root angulation and depth of preparation
- Start the cavity preparation without applying the rubber dam
- Apply rubber dam as soon as the canals are located
- If precautions are not taken in case of a missing crown, there are chances of occurrence of iatrogenic errors like perforations due to misdirection of the bur
- In such cases, sometimes it becomes imperative to rebuild the tooth previous to endodontic treatment
- In teeth with weakened walls, it is necessary to reinforce the walls before initiating endodontic treatment so as to achieve the following goals:
- Return the tooth to its normal form and function
- Prevent coronal leakage during treatment
- Allow use of rubber dam clamps
- Prevent fracture of walls which can complicate the endodontic procedure
Minimal Invasive Endodontics Or Recent Trends In Endodontic Access Preparation
According to traditional access preparation, access is based on radiographs which are 2D views of 3D objects. Dentin is sacrificed liberally for expedient removal of debris and necrotic tissue with straight-line access to avoid iatrogenic errors.
But, due to extensive loss of tooth structure, such preparations have shown fractures under functional loads. Extended access cavity preparations reduce the amount of sound dentin, increase the deformability of the tooth, and compromise the strength to fracture of endodontically treated teeth.
Conservative endodontic cavity (CEC) is prepared to minimize the loss of tooth structure and preserve chamber roof and paracervical dentin resulting in improved fracture resistance of teeth.
Ninja is an extremely conservative approach which improves the fracture resistance of endodontically treated teeth.
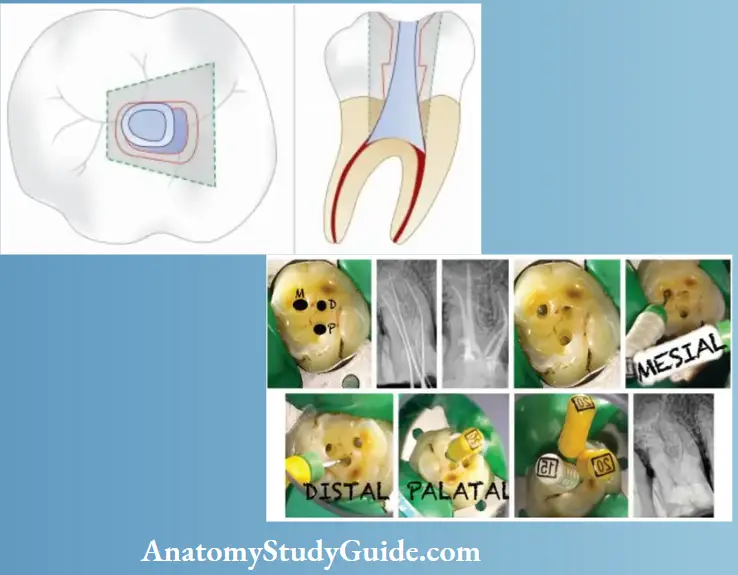
Minimal removal of the tooth structure from inside to outside from the coronal to the apical region is required to provide an endo-end restorative prosthodontic (EERP) continuum. A tooth may fail not because of poor endodontic treatment but due to irreparable microcracks/ fractures due to the removal of a considerable amount of paracervical/periculum dentin (PCD). Hence, the conservation of dentin and enamel is the best and only proven method to buttress the endodontically treated tooth.
Importance of Dental Hard Tissues:
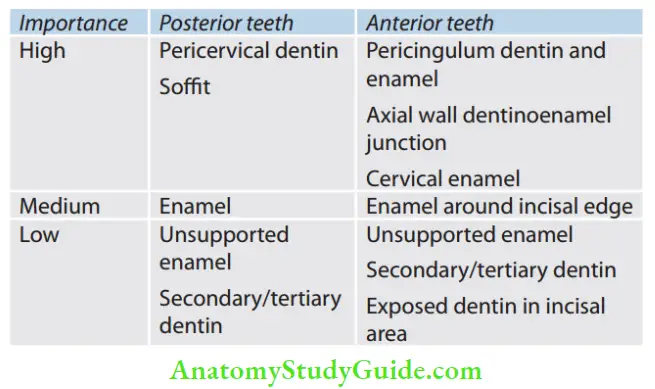
Newer Guidelines for Access Preparation:
- Visualize the internal anatomy of the tooth using
- Normal and angled periapical radiographs
- Position of CEJ
- Palpation along the attached gingiva to determine the root location direction
- Follow the caries
Important areas to consider:
- Pericervical/ pericingulum dentin (PCD)
It is the area near the alveolar crest and is irreplaceable. This is the critical zone, roughly 4 mm above and 4 mm below the crystal bone, and is important for giving ferrule and preventing fracture of the tooth at the cervical area. Also, CEJ is the most ideal area for transmitting the stress from the crown to the apex. The apex of the tooth can be resected, coronal one-third of the tooth can be replaced prosthetically, but PCD is irreplaceable
- Avoid the use of GG drills and round burs
GG drills are not end-cutting and are self-centering. But cervical self-centering can be dangerous. Also, due to the thin shank, it is difficult to move it away from high-risk anatomy leading to strip perforations
-
- Round burs
- Dropping round bur into a scant/non-existent chamber can lead to furcation perforation
- Omnidirectional cutting blades can lead to a severe loss of PCD
- Flat walls in three dimensions cannot be cut with round bur because it only point cut but does not do planning
- Round burs
- Preserve tooth structure for three-dimensional ferrule
- The 3D ferrule is mandatory for the long-term survival of the tooth. A sufficient amount of tooth structure should be present to have a minimum of 1.5–2.5 mm of vertical height, 1 mm of thickness, and almost parallel walls for the success of post-endodontic restoration
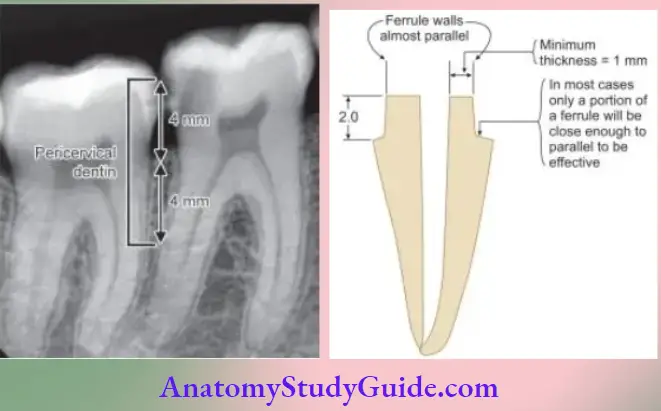
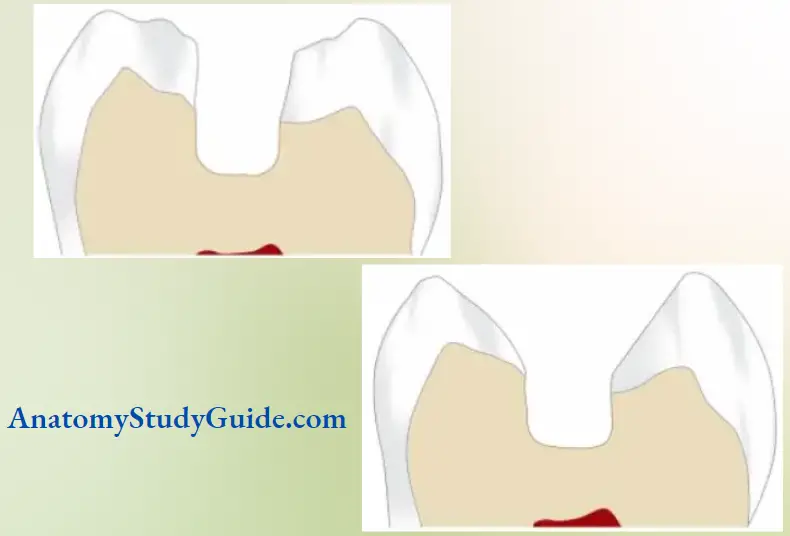
- Cavosurface design:
- Cala Lilly preparation: If abundant highly bondable structure such as etchable porcelain or the enamel is available and a highly filed composite is to be placed, the cavosurface should be cala-lilied (generously beveled on those areas). Enamel is cut back at 45° with a calla lily shape. Preparation is in the middle and apical portion of the coronal tooth
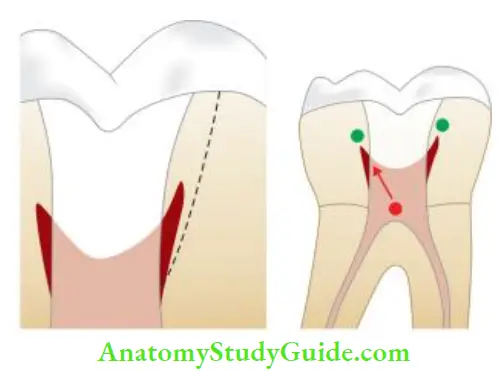
- Posterior teeth:
- Banking/SoffiStepped access: Soff is a small piece of chamber roof near a point where it curves 900 and becomes the wall left behind. This tiny lip of 0.5 to 3.0 mm thickness gives strength to the tooth. Its removal can lead to collateral damage to PCD. Attempting to remove the pulp chamber roof doesn’t accomplish any real endodontic objective. Rather, it gouges the walls that are responsible for the long-term survival of the tooth. This 360° off can also be compared with a metal ring that stabilizes a wooden barrel. The pulp beneath it can be removed with an explorer
- Anterior teeth:
- Traditional: When access goes deeper in the tooth, inverse funneling is created resulting in decreased fracture resistance of the tooth, especially with all ceramic preparation which requires deep axial reduction and finish lines. Also, the removal of the lingual shoulder to explore the lingual canal results in greater loss of tooth structure
- New model by Clark Khademi (CK): Loading of maxillary anterior teeth results in severe tensile forces at the cingulum. Pericingulum dentin should be preserved. So, CK suggested access preparation closer to the incisal edge. In worn teeth/calcified teeth, access may be made through the incisal edge. Incisal placement preserves periculum dentin. A beveled margin is created and access is started. The smaller internal shape is compensated by the funnel shape externally. The shape forms a true funnel wherein a narrow portion of the funnel is in the PCD zone and can surface at a 45° angle to become the mouth/top of the funnel. In some anterior teeth, labial access may be better suited
Labial access can be made in the following cases:
- Presence of two canals (incidence as high as 41.4%)
- Patients with limited mouth opening (post-trauma maxillomandibular fixation)
- Crowded teeth
- Patients with Class II, division 2 dentition
Newer Guidelines for Access Preparation Advantages:
- Preservation of dentin in the cingulum area which is essential for adequate resistance and retention of the crown
- Visibility and accessibility which prevents gouging of labial wall
Conclusion:
To have optimal straight-line endodontic access cannot be overemphasized. A compromised access cavity design could lead to inadequate cleaning, shaping, and obturation compromising the successful outcome. Successful access cavity preparation relies on a sound knowledge of the internal and external anatomy of teeth.
The use of magnification, ultrasonic endodontic tips, and diagnostic aids improve the ability of an operator to identify the root canal orifices more precisely. According to contemporary techniques, minimal removal of tooth structure should be done to provide EERP continuum for their long-term survival because iatrogenic removal of tooth structure may lead to retrograde vertical/oblique/horizontal fracture of the tooth.
Therefore, a precise balance between providing adequate access and preservation of tooth structure should be the aim of access cavity preparation, enhancing both successful outcomes and long-term survival of the tooth
Leave a Reply