Cleaning And Shaping Of Root Canal System Introduction
Endodontic treatment mainly consists of three steps or Endodontics Treatment Steps :
Table of Contents
- Cleaning and shaping of the root canal system
- Disinfection
- Obturation
Cleaning and shaping is one of the most important steps in root canal therapy for obtaining success in the root canal treatment
Read And Learn More: Endodontics Notes
Cleaning and Shaping of the Root Canal System
Cleaning and shaping of the canals mean:
- To remove all the contents from the root canal which may cause the growth of microorganisms or the breakdown of toxic products into the periradicular tissues.
- To prepare the root canal not only for disinfection but also to develop a shape that permits a three-dimensional sealing of the canal.
- To remove all the irregularities, obstructions, and old filings from the canals, if present.
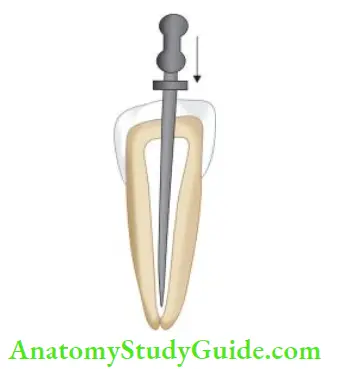
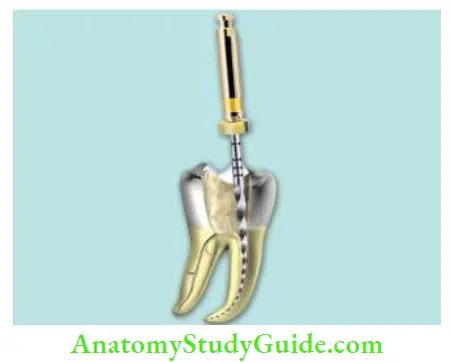
Cleaning of canals can be assessed by the presence of clean dentinal shavings, and the color of the irrigant whereas a properly shaped canal should feel smooth in all dimensions when the tip of the fie is pushed against the canal walls.
Endodontics Treatment Steps
For the success of endodontic treatment, one must remove all the contents of the root canal completely because any communication from the root canal system to periodontal space acts as a portal of exit which can lead to the formation of lesions of endodontic origin.
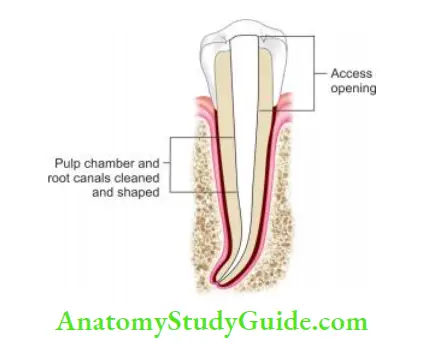
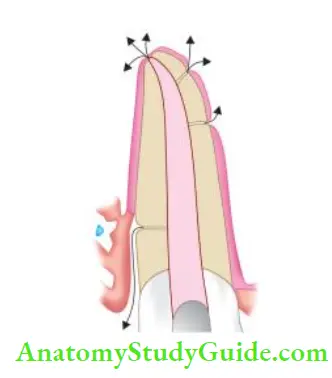
Biomechanical preparation of the root canal system was a hit-and-trial method before Dr Schilder gave the concept of cleaning and shaping. With changing concepts of root canal treatment, the preparation is described as instrumentation, chemomechanical instrumentation, biomechanical preparation, etc.
which describes the mode of root canal therapy, but the ultimate goal is of cleaning and shaping of the root canal system.
Objectives Of Biomechanical Preparation
Basics Of Root Canal Treatment or Mechanical Objectives of Root Canal Preparation:
The mechanics of cleaning and shaping may be viewed as an extension of the principles of a coronal cavity preparation to the full length of the root canal system. Schilder gave the following fie mechanical objectives:
1. Root canal preparation should develop a continuously tapering cone:
This shape mimics the natural canal shape. Here, the funnel-shaped preparation of the canal merges with the access cavity so that instruments will slide into the canal, thus forming a continuous channel.
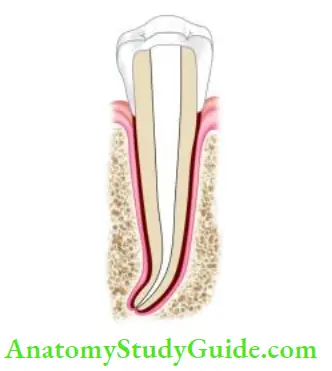
2. Making the preparation in multiple planes which introduces the concept of “flow”:
This objective preserves the natural curve of the canal.
3. Making the canal narrower apically and widest coronally: To create continuous taper up to the apical third which creates the resistance form to hold gutta-percha in the canal.
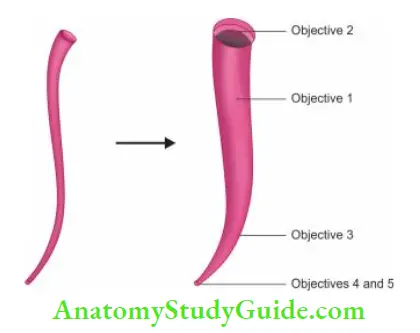
4. Avoid transportation of the foramen:
There should be gentle and minute enlargement of the foramen while maintaining its position.
5. Keep the apical opening as small as possible:
The foramen size should be kept as small as possible as overlapping of foramen contributes to a number of iatrogenic problems. Doubling the fie size apically increases the surface area of the foramen four folds (πr2). Ths enlarging of apical foramen should be avoided.
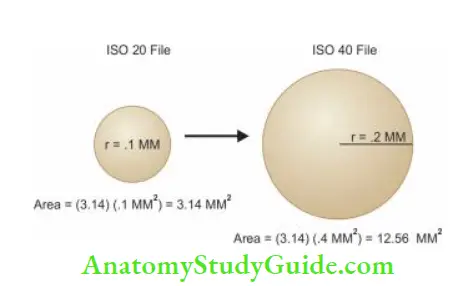
Biologic Objectives of Root Canal Preparation:
- The procedure should be confined to the root canal space
- All infected pulp tissue, bacteria, and their by-products should be removed from the root canal
- Necrotic debris should not be forced periodically
- Sufficient space for intracanal medicaments and irrigants should be created
Basics Of Root Canal Treatment
Clinical Objectives of Biomechanical Preparation:
- The clinician should evaluate the tooth to be treated to ensure that the particular tooth has a favorable prognosis
- Before performing cleaning and shaping, straight-line access to the canal orifice should be obtained
- All the overlying dentin should be removed and there should be fired and smooth internal walls to provide straight-line access to root canals
- Since shaping facilitates cleaning, in properly shaped canals, instruments and irrigants can go deeper into the canals to remove all the debris and contents of the root canal
- This creates a smooth tapered opening to the apical terminus for obtaining three-dimensional obturation of the root canal system
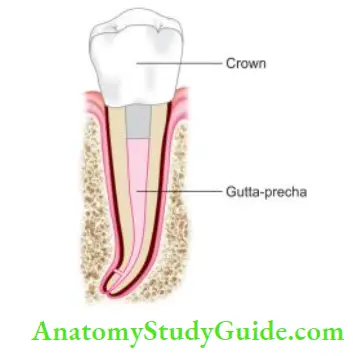
- After obturation, there should be complete sealing of the pulp chamber and the access cavity so as to prevent microleakage into the canal system
- The tooth should be restored with permanent restoration to maintain its form, function, and esthetics
- Patients should be recalled on a regular basis to evaluate the success of the treatment
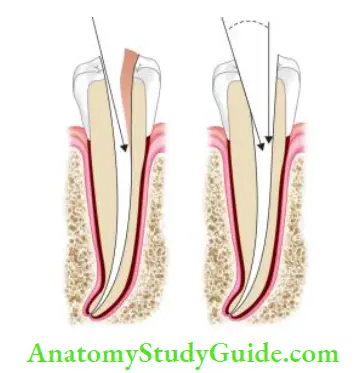
Different Movements of Instruments
Reaming:
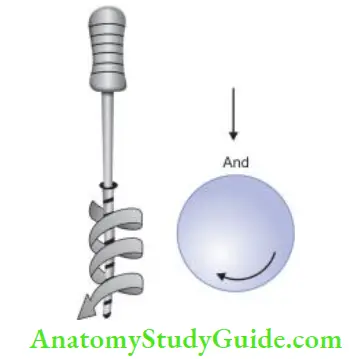
- To dream means the use of the sharp-edged tool for enlarging holes
- It involves clockwise rotation of an instrument (reamer is most commonly used)
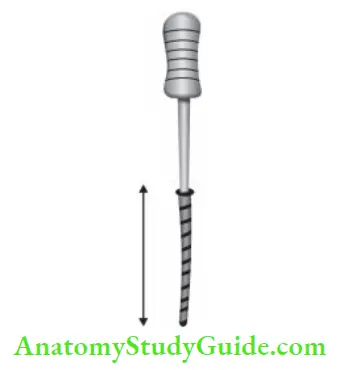
Filing:
- Term filing indicates push-pull motion of an instrument
- This active pushing of fie with apically directed pressure may result in iatrogenic errors like ledge formation.
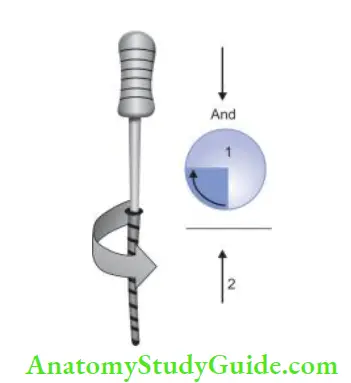
Combination of Reaming and Filing:
- In this technique, the file is inserted with a quarter turn clockwise and apically directed pressure (i.e., reaming) and then is subsequently withdrawn (i.e., firing)
- File edges get engaged into dentin while insertion and break the loose dentin during its withdrawal
- By performing this combination of reaming and firing repeatedly, canal enlargement takes place
- Ths technique has also been shown to cause frequent ledge formation, perforation, and other procedural errors
- To overcome these shortcomings, this technique was modified by Schilder. He suggested giving a clockwise rotation of half revolution followed by directing the instrument apically.
- In this method, every time when a fie is withdrawn, it is followed by the next in the series. Though this method is effective in producing clean canals, it is very laborious and time-consuming
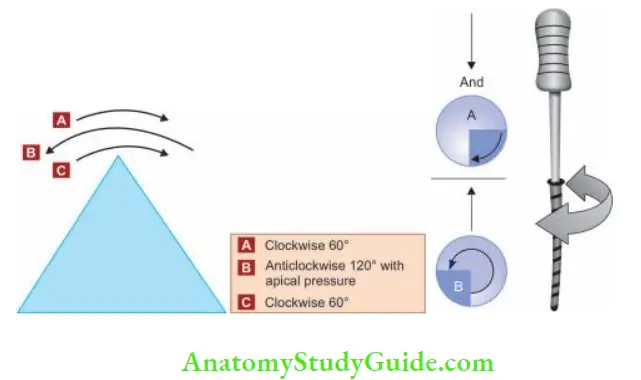
Balanced Force Technique:
- This technique involves oscillation of the instrument right and left with different arcs in either direction
- The instrument is first inserted into the canal by moving it clockwise with one quarter turn
- Then to cut dentin, the file is rotated counterclockwise simultaneously pushing apically to prevent it from backing out of the canal
- Finally, the file is removed by rotating the file clockwise and simultaneously pulling the instrument out of the canal
- This technique offers the most efficient dentin cutting but care should be taken not to apply excessive force with this technique because it may lock the instrument into the canal
- Since H-fies and broaches do not possess left-hand cutting effiency, they are not used with this technique
- Simultaneous apical pressure and anticlockwise rotation of the fie maintain the balance between tooth structure and the elastic memory of the instrument, this balance locates the instrument near the canal axis and thus avoids transportation of the canal
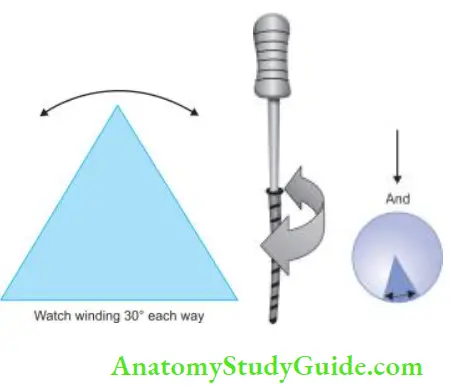
Watch-Winding:
- It is back and forth oscillation of the endodontic instrument right and left as it is advanced into the canal
- The angle of rotation is usually 30–60°
- Ths technique is effient with K-type instruments
- Watch-winding motion is less aggressive than quarter turn and pulls motion because in this motion, the instrument tip is not forced into the apical area with each motion, thereby reducing the frequency of instrumental errors
Watch-Winding and Pull Motion
- In this, first instrument is moved apically by rotating it right and left through an arc
- When the instrument feels any resistance, it is taken out of the canal by pull motion
- This technique is primarily used with Hedstorm fies. When used with H-fies, watch-winding motion cannot cut dentin because these can cut only during pull motion
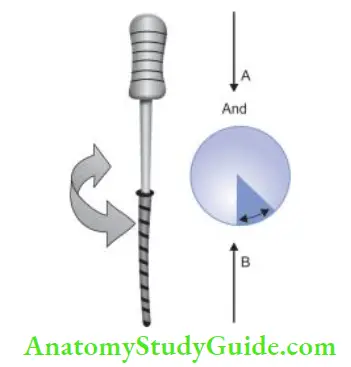
Motions of instruments for cleaning and shaping:
1. Follow:
It is performed using files during initial cleaning and shaping. In this, fie is pre-curved so as to follow canal curvatures
2. Follow withdrawal:
It is performed with files when apical foramen is reached. In this, simple in and out motion is given to the instrument. It is done to create a path for foramen and no attempt is made to shape the canal
3. Cart:
Cart means transporting. In this, the pre-curved reamer is passed through the canal with gentle force and random touch with a dentinal wall up to the apical foramen. It is done to transport pulp remnants and dentinal debris
4. Carve:
Carve is performed with reamers to do the shaping of the canals. In this a pre-curved reamer as touched with dentinal wall and canal is shaped on withdrawal
5. Smooth:
It is performed with fies. In this, circumferential motion is given to smoothen the canal walls
6. Patency:
It is performed with fies or reamers. Patency means that the apical foramen has been cleared of any debris in its path
Basic Principles Of Canal Instrumentation
- Thre should be straight-line access to the canal orifices
- Establish the apical patency by passing a #10 fie across the apex (0.5 mm) so as to make minor constriction patent. Patency keeps the clear passage to the apical foramen by removing debris from the apical area
- Files always work within the canal along with copious irrigation
- Preparation of the canal should be completed while retaining its original form and the shape
- Canal enlargement should be done in the sequential order without skipping file sizes
- All the working instruments should be kept in confines of the root canal to avoid any procedural accidents
- After each insertion and removal of the fie, its flutes should be cleaned and inspected
- Fine instruments should be used extravagantly
- Recapitulation is regularly done to loosen debris by returning to working length (WL). Canal walls should not be enlarged during recapitulation
- Never force the instrument in the canal, it may cause instrument separation, ledge formation, etc.
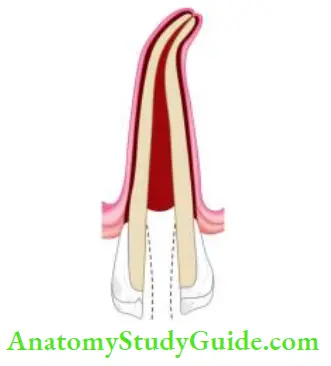
Apical Gauging:
For optimal cleaning and shaping of the root canal, it is imperative to accurately determine the endodontic WL and working width (WW) of each root canal. Inadequate determination of the width of the canal and subsequently the WW amplifies the possibilities of its insufficient cleaning and shaping. Therefore, the final instrument size must be large enough to touch all walls.
Because most canals are oval in their cross-sectional shape, so the goal should be to make the final apical instrument size correspond to the largest diameter of the oval, whenever possible. Ths is done by apical gauging.
Apical gauging is a mechanical term which clinically indicates the measuring of the apical diameter prior to obturation of the root canal system. It is important as it gives us a fairly good approximation of canal diameter in the critical apical 3–5 mm.
Tuning verifies if there is a uniform taper in the apical one-third of the shaped canal.
Apical gauging helps in
- Choosing the best master cone that closely matches canal length and taper
- Achieving true tug back—as opposed to false tug back
- Minimizing gutta-percha (GP) extrusions during obturation, especially with warm vertical compaction
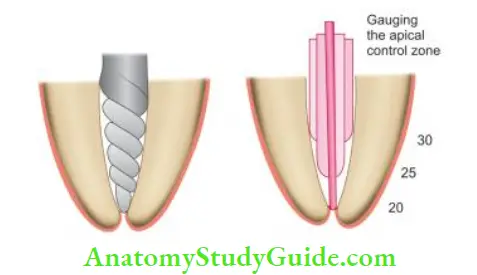
How to measure apical gauging?
- Establish the position of apical constriction and keep the working length (WL) 0.5 mm – 1 mm short of this
- After cleaning and shaping, passively insert 02 taper hand fies, starting from #15. If the file goes past the apical constriction, then choose the next largest fie and repeat
- When a fie passively binds short of the apical constriction, that will be the upper limit of the apical constriction diameter. The smaller fie before that would be the lower limit
Techniques Of Root Canal Preparation
Thre are three approaches used for cleaning and shaping
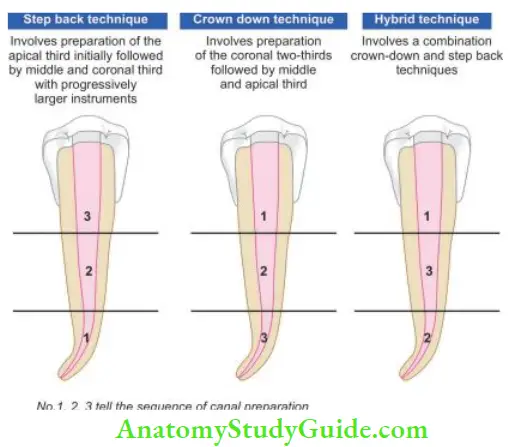
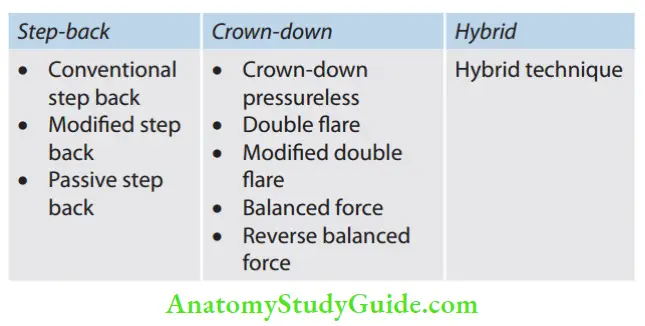
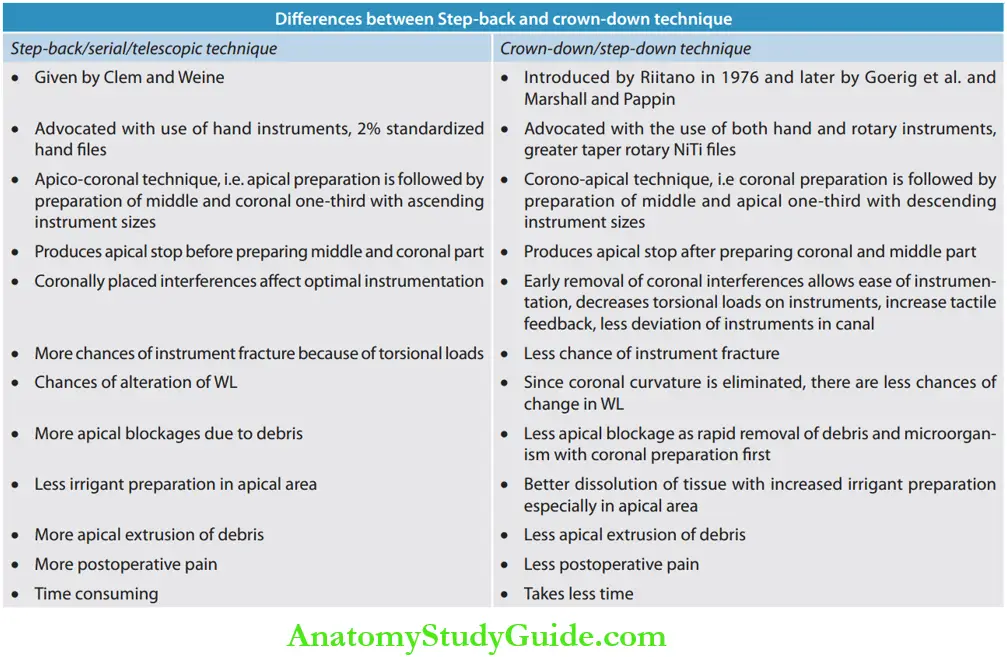
Step-Back Technique Telescopic Canal Preparation Or Serial Root Canal Preparation
The step-back technique emphasizes keeping the apical preparation small, in its original position, and producing a gradual taper coronally.
Clem was the first to describe a stepped preparation of the curved canal in which the apical portion was prepared using small, relatively flexible instruments. The coronal portion was shaped with larger instruments to obtain an adequate fire without undue enlargement at the apical portion. Weine, Martin, Walton, and Mullaney were early advocates of stepback preparation.
Mullaney (in 1960) divided the step-back preparation into two phases:
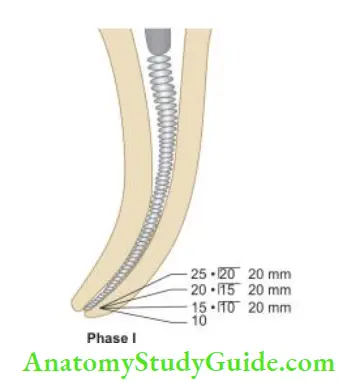
- Phase 1: It is the apical preparation starting at the apical constriction.
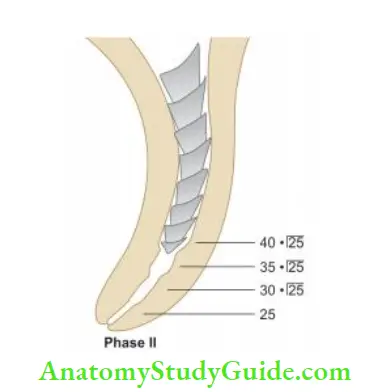
- Phase 2: It is the preparation of the remainder of the root canal, gradually stepping back while increasing in size.
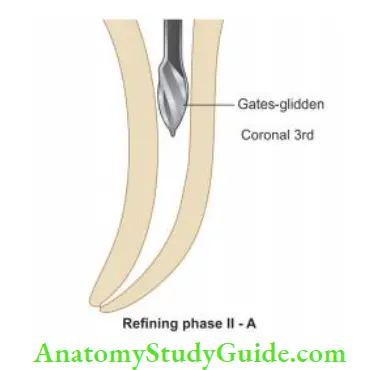
- Refining Phase 2A and 2B: It is the completion of the preparation to produce the continuing taper from the apex to the cervical.

- Phase 1:
- Cleaning and shaping begin after gaining straight-line access and determination of WL
- A #10 fie is inserted into the canal with watch-winding motion. In watch-winding motion, a gentle clockwise and anticlockwise rotation of fie with minimal apical pressure is given. Don’t use the instrument in filing motion as it can result in ledge formation
- Remove the instrument and irrigate the canal
- Do not forget to lubricate the instrument for use in the apical area because lubricant emulsifies fibrous pulp tissue allowing the instrument to remove it, whereas irrigants may not reach the apical area to dissolve the tissues
- Place the next larger size fits to the WL in a similar manner and again irrigate the canal
- Repeat the procedure until at least size 25 K-fie reaches the WL
- Always recapitulate the canal with the previous smaller number instrument to break the collected debris which are then washed away with the irrigant
- Phase 2:
- Place the next file in the series 1 mm short of WL. Insert the instrument into the canal with watch-winding motion, remove it after circumferential filing, irrigate, and recapitulate. Repeat the same procedure with successively larger fies at 1 mm increments from previously used fie
- For a coronal third of the canal, use Gates-glidden (GG) drills or bigger number of fies
- Final refining of the root canal is done using master apical file with push-pull strokes to achieve a smooth taper form of the root canal
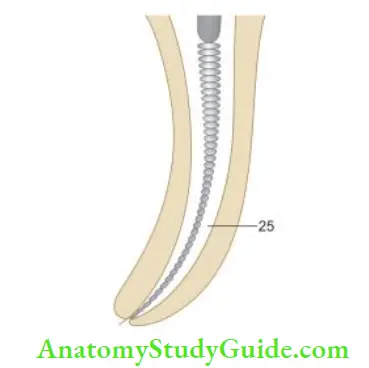
Advantages of Step-Back Techniques:
- This technique creates small apical preparation with larger instruments used at successively decreasing lengths to create a taper
- The Taper of canal preparation can be altered by changing the interval between consecutive instruments, for example, the taper of the prepared canal can be increased by reducing the intervals between each successive fie from 1 mm to 0.5 mm
Disadvantages of the Step-Back Technique:
- Diffilt to irrigate apical region
- More chances of pushing debris periodically
- Time-consuming
- It has a tendency to straighten the curved canal
- Increased chances of iatrogenic errors; ledge formation, instrument separation, zipping of the apical area, apical blockage, etc.
- Since the curvature of the canal is reduced during mid-root flying, there will be a loss in the WL
- Difficult to insert instruments in the canal
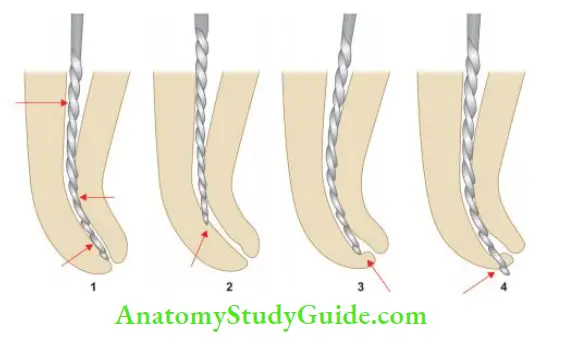
- (A) Stiffess in curved canals;
- (B) Ledge formation causing loss of working length;
- (C) Apical transportation;
- (D) Apical perforation.
Modified Step-Back Technique:
- In this technique, preparation is completed in the apical third of the canal
- After this, the step-back procedure is started 2–3 mm short of minor diameter/apical constriction so as to give an almost parallel retention form at the apical area
Modified Step-Back Technique Advantage:
- Less chances of apical transportation
Modified Step-Back Technique Disadvantage:
- Less space for irrigants leads to the accumulation of debris in the canals
Passive Step-Back Technique:
Torabinejad developed this technique; it involves a combination of hand and rotary instruments to obtain an adequate coronal fire and preparation of the apical part.
It provides a gradual enlargement of the root in an apical to the coronal direction without applying force, thereby reducing the occurrence of procedural errors like transportation of the canal, ledge, or zip formation.
Technique:
- Establish the apical patency using #10 fie
- Use #20, 25, 30, 35, and 40 into the canal passively. This step removes the debris and creates a mildly flared preparation for the insertion of Gates-glidden (GG) drills
- Now use #2 GG to drill into a mildly flared canal to a point, where it binds slightly. Here, it is pulled back 1–1.5 mm and then activated. In a similar fashion, use #3 and 4 GG drill coronally
- Place #20 fie up to WL and prepare the canal. The narrow canal should not be enlarged beyond size 25 or 30.
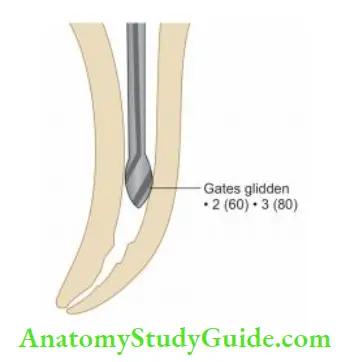
Crown-Down Or Step-Down Technique
It was first suggested by Goerig et al. In the crown-down technique, coronal one-third is instrumented before apical shaping
- A #10 file is placed in the canal to establish patency
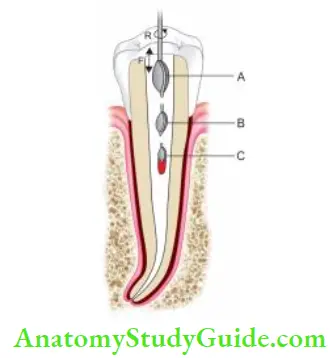
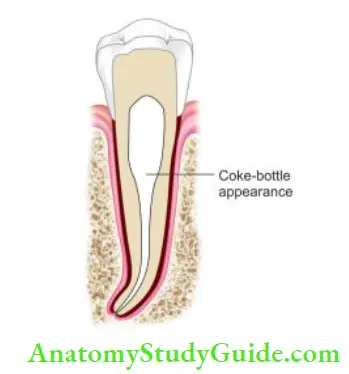
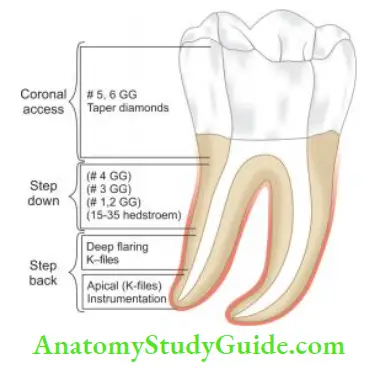
- Prepare the coronal third of the canal with progressively smaller GG drills or with greater taper instruments. One should avoid carrying all the GG drills to the same level which may result in excessive cutting of dentin, weakening of roots, and “coke-bottle appearance” in the radiographs
- Begin with step-down cleaning and shaping using K-flux, Triple-flex, or Safety Hedstrom instruments in the 0.02, 0.04, or 0.06 taper configurations depending on the canal size
- Start with a #50 instrument and work down the canal in a watch-winding motion until resistance is encountered. Then use sequentially smaller size instruments for step-down preparation. Irrigation and recapitulation after every instrumentation is done to prevent the canal from being blocked with dentinal debris
- Now enlarge the apical third to recommended master apical file size
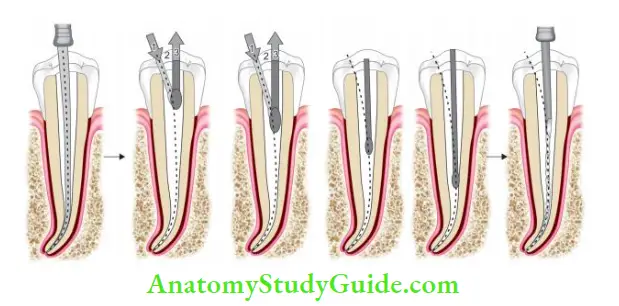
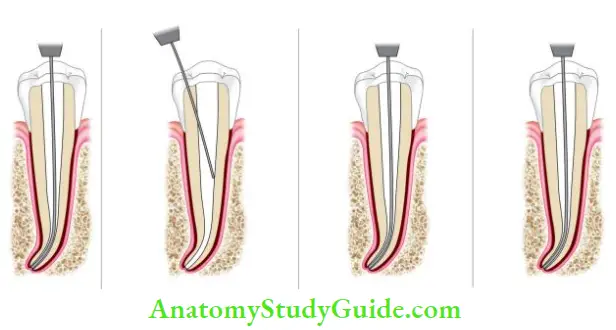
- (A) Place a No. 10 to establish patency;
- (B and C) Prepare the coronal third of the canal with progressively smaller GG drills;
- (D and E) Perform crown-down cleaning and shaping using progressively smaller files.
- (F) Enlarge apical third to recommended master apical file size.
Modifications of Crown-Down Technique:
Crown-Down Pressureless Technique
Marshall and Pappin advocated a “Crown-Down Pressureless Preparation” which involves early coronal flaring with GG drills, followed by preparation in the apical direction, hence the term “crown-down.” K-fires are used from large to small sequences without apical pressure, thus the term is “pressureless.”
Balanced Force Technique:
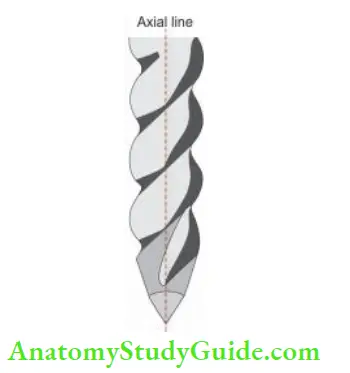
It was developed by Roane and Sabala in 1985. It involves the use of instruments with noncutting tips. Since K-type fies have pyramidal tips with cutting angles which can be quite aggressive with clockwise rotation, for this technique triangular cross-sectioned instruments should be used.
The decreased mass of the instrument and deeper cutting flutes improves the flexibility of the instrument and decrease restoring force of the instrument when placed in curved canals.
Flex-R file is recommended for this technique because this file has a “safe tip design” with a guiding land area behind the tip which allows the fie to follow the canal curvature without binding in the outside wall of the curved canal
Technique:
- The coronal and middle thirds of the canal are filled with GG drills
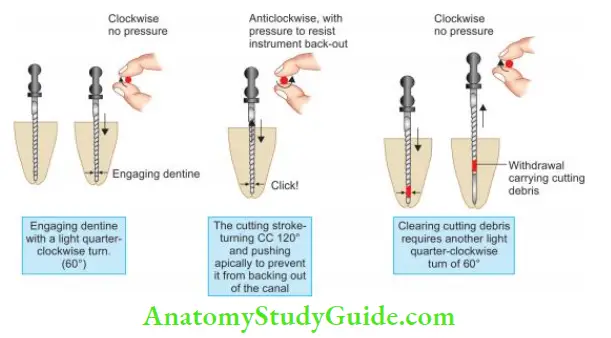
- After mechanical shaping with GG drills, balanced force hand instrumentation begins with a triad of movements: placing, cutting, and removing instruments using only rotary motions
- The first file which binds short of WL is placed into the canal and rotated clockwise a quarter of a turn. This movement causes flies to engage a small amount of dentin
- Now fie is rotated counterclockwise with apical pressure at least one-third of a revolution, this movement provides cutting action by shearing of a small amount of dentin engaged during clockwise rotation
- Then a final clockwise rotation is given to the instrument which loads the flutes of the fie with loosened debris and the fie is withdrawn
- This movement is repeated (clockwise insertion and counterclockwise cutting) while advancing the instrument apically in shallow steps
Reverse Balanced Force Preparation:
For the reverse balanced force technique, NiTi greater taper hand files are used because the flutes of these files are machined in a reverse direction, unlike other fees. Also, the handle of these files is increased in size to make the manipulation of files easier for the reverse balanced technique.
Technique:
- Insert GT fie in the canal and rotate it 60° in an anticlockwise direction and then 120° in a clockwise direction with apical pressure
- These files are used in the sequence from largest to the smallest in crown-down sequence progressively toward the apex till WL is achieved
- Prepare the apical portion of the canal using 2% tapered ISO fies in the balance force technique
Double Flare Technique:
It was introduced by Fava. In this, the canal is prepared in a crown-down manner using K-fies in decreasing sizes, and then to prepare the apical part step-back technique is followed by increasing file sizes.
Modified Double-Flared Technique:
- In this, a #40 Flex-R file is instrumented in the straight part of the canal, using a balanced force technique
- Sequentially, larger sizes of files are used to instrument the straight part of the canal and the coronal 4–5 mm of the canal is instrumented with GG drills
- A #20 Flex-R file is taken to the working length and the canal is prepared using the balanced force technique by sequential use of files
- Preparation till the WL is continued until clean dentin is removed, the master apical varying between #40 and 45
- A step-back technique using balanced forces is then used to prepare the remaining curved portion of the canal
Advantages of the crown-down technique:
- Permits straighter access to the apical region
- Eliminates coronal interferences which allow better determination of apical canal sizes
- Removes bulk of the tissue and microorganisms before apical shaping
- Allows deeper penetration of irrigants
- Less likely to alter the working length
- Eliminates the amount of necrotic debris that could be extruded through the apical foramen during instrumentation
- Freedom from constraints of the apical enlarging instruments
- Increased access allows greater control and less chance of zipping near the apical constriction
- It provides a coronal escape way that reduces the “piston in a cylinder effect” responsible for debris extrusion from the apex
Biological benefits:
- Removal of tissue debris coronally, thus minimizing the extrusion of debris periodically
- Reduction of postoperative sensitivity which could result from periapical extrusion of debris
- Greater volumes of irrigants can reach in canal irregularities in the early stages of canal preparation because of coronal flaring
- Better dissolution of tissue with increased penetration of the irrigants
- A rapid removal of contaminated and infected tissues from the root canal system
Crown-down technique Disadvantages
- More time-consuming than the step-back technique
- Excessively flared preparation in the coronal and middle thirds may weaken the root
- The use of end-cutting rotary instruments in small or partially calcified canals may cause perforation as the instrument moves apically
- In severely curved canals, rotary instrumentation is difficult because these can’t be preserved
- If less flexible rotary instruments are used too rapidly and forcefully in the canal, a ledge may form
Hybrid Technique of Canal Preparation
In this, a combination of crown-down preparation followed by a step-back technique is used.
Technique:
- Check the patency of the canal using #10 or 15 K files
- Prepare the coronal third of the canal using GG drills (in a sequence of #3 followed by nos. 2 and 1) till the point of curvature without applying excessive pressure
- Establish the WL using #15
- Prepare the apical portion of the canal from size #15 to the recommended Master Apical File (MAF) size using the stepback technique
- Recapitulate and irrigate the canal at every step so as to maintain the patency of the canal
- Perform the step-back procedure till the middle third of the canal so as to have a continuous funnel-shaped preparation
Hybrid Technique of Canal Preparation Advantages:
- It has the advantages of both crown-down and step-back procedure
- This technique maintains the integrity of dentin by avoiding excessive removal of radicular dentin
Canal Preparation Using Ultrasonic Instruments
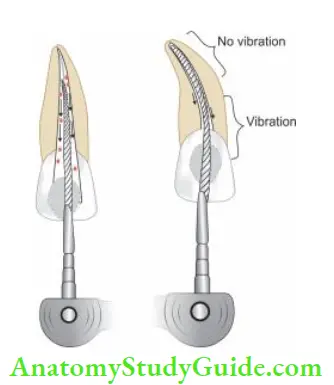
The concept of using ultrasound in endodontic therapy was suggested in 1957 by Richman. But, it was the late 1970s, when ultrasonic scaling units became common for use in endodontics resulting in endodontics. The machines used for this purpose are designed to transmit low-frequency ultrasonic vibration by conversion of electromagnetic energy to mechanical energy to produce oscillation of fie.
The file oscillates at the frequency of 20,000–25,000 vibrations/s. For the free movement of fie in the canal, it should not have any binding, especially at the apical end. During the oscillation of fie, there is a continuous flow of irrigants solutions from the handpiece along the fie. This causes the formation of cavitation.
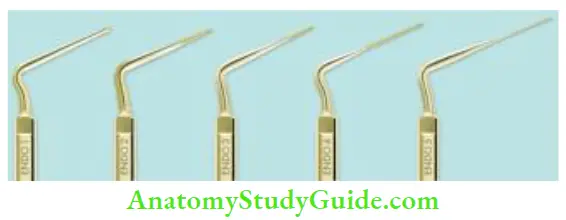
Technique:
- Before starting with ultrasonic instrumentation, an apical third of the canal should be prepared to at least size 15 fie
- After activation, ultrasonic fie is moved in a circumferential manner with push-pull stroke along the walls of the canal
- The file is activated for 1 minute. This procedure is repeated till the apex is prepared
Canal Preparation Using Ultrasonic Instruments Advantages:
- Less time consuming
- Produces cleaner canals because of the synergetic relationship between the ultrasound and the sodium hypochlorite
- The heat produced by ultrasonic vibration increases the chemical effects of the sodium hypochlorite
Canal Preparation Using Ultrasonic Instruments Disadvantages:
- Increased frequency of canal transportation
- Increased chances of overinstrumentation
Canal Preparation Using Sonic Instruments
The design of sonic instruments is similar to that of ultrasonics. They consist of a driver on to which an endodontic file is attached. The oscillatory pattern of the driver determines the nature of the movement of the attached file. In sonic instruments, on activation, there is a longitudinal pattern of vibration.
Sonic system uses three types of file systems for root canal preparation, viz; Heliosonic, Rispisonic, and the canal shaper instruments. These fies have spiral blades protruding along their length and noncutting tips.
Technique:
- After gaining straight-line access to the canal orifices, penetrate a small number of fie in the canal. Enlarge the canal #20 or 25 up to 3 mm of apex to make some space for sonic fie
- Now place sonic fie 0.5–1 mm short of #20 fie and do circumferential filling with up and down motion for 30–40 seconds
- After this, use the larger number of sonic fie and do the coronal flaring
- Now determine the WL and prepare the apical third of the canal using hand files
- Finally, blend the apical preparation with coronal flying using a smaller number of sonic file
Laser-Assisted Root Canal Therapy
Weichman and Johnson in 1971 were the first to suggest the use of lasers in endodontics. Neodymium-doped yttrium aluminum garnet (Nd: YAG), Ar, Excimer, Holmium, and Erbium (Er) laser beam are delivered through the optical fiber with a diameter of 200–400 mm equivalent to size #20–40 fie. Studies have shown different results with lasers.
Bahcall et al. in 1992 found that though the use of Nd: YAG laser can produce cleaner canals, but the heat produced by it may damage the surrounding supporting tissues, that is, bone and periodontal ligament (PDL). Hibst et al. showed that the use of Er: YAG laser may pose less thermal damage to the tissues because it causes localized heating thereby minimizing the absorption depth.
Er, Cr: YSGG (erbium, chromium: Yttrium scandium gallium garnet) is used to reduce anxiety and discomfort to the patient. Waterlase—hydrokinetic hard and soft tissue laser uses specialized fiers of various diameters and lengths to effectively clean the root canal walls and prepare the canal for obturation.
By using the hydrokinetic process in which water is energized by YSGG laser photons to cause molecular excitation and localized micro expansion, hard tissues are removed precisely with no thermal side effects.
With this technique, there is minimal patient discomfort and postoperative complications. Intracanal irradiation with laser reduces microbial flora, inflammation, and other postoperative complications, simultaneously providing the comfort to patient.
However, the performance of the equipment safety measures, temperature rise, and level of microbial reduction should be well documented before it becomes a current method of choice for treatment.
Evaluation Criteria Of Canal Preparation
- The spreader should be able to reach within 1 mm of the WL
- After canal preparation, when the master apical file is pressed firmly against each wall, it should feel smooth
- A microcomputed tomography scanner is used to record the precise canal anatomy before and after the instrumentation. A three-dimensional analysis of root canal geometry by high-resolution CT is then performed
Management Of Difficult Cases
- Management of curved canals
- Management of calcified canals
- Management of C-shaped canals
- Management of S-shaped canals
Management of Curved Canals:
For the anatomy of curved canals, please refer to page number 185. Challenges encountered during the treatment of curved canals are
- Negotiating the canal curvature
- Enlarging the canal space and maintaining the original anatomy
- Creating a taper-shaped canal
Steps:
In curved canals, a frequently seen problem is an occurrence of uneven cutting. The file can cut dentine evenly only if it engages dentine around its entire circumference. Once it becomes loose in a curved canal, it will tend to straighten up and will contact only at certain points along its length.
These areas are usually the outer portion of the curve, apical to the curve, on the inner part of the curve at the height of the curve, and the outer or inner curve coronal to the curve.
All this can lead to the occurrence of procedural errors like the formation of the ledge, transportation of foramen, perforation, or formation of elbow and zip in a curved canal. To avoid the occurrence of such errors, there should be even contact of the file to the canal dentine.
Factor affecting the success of negotiation of a curved canal:
- Degree of curvature
- Flexibility of instrument
- Length of root canal
- Width of root canal
- Skill of Operator
This can be done by:
- Decreasing the force which makes the straight fie bend against the curved dentine surface
- Decreasing the length of fie which aggressively cuts at a given span
1. Decrease in the firing force: It can be done in the following ways:
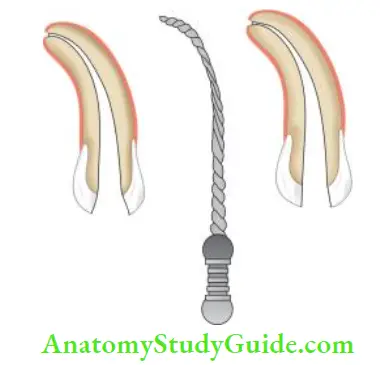
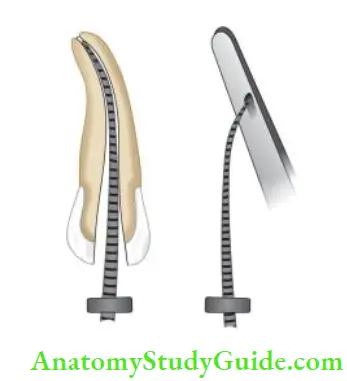
- Preserving the file: A pre-curved file has been shown to traverse the curve better than a straight file. Preserving can be done by
- Placing a gradual curve for the entire length of the file
- Placing a sharp curve of nearly 45° at the apical end of the instrument. It is then used when a sharp curve or an obstruction is present in the canal. The curve can be placed by grasping the flutes with a gauze sponge and carefully bending the file. To avoid losing the direction of the curve of the pre-curved file, a teardrop shape rubber stopper is used with a point showing the direction of the curve
- Extravagant use of smaller number fies: Small-sized instruments can follow the canal curvature because of their flexibility; they should be used extravagantly till the larger files are able to negotiate the canal without force
- Use of intermediate sizes of files: An increment of 0.05 mm between two consecutive instruments is too large to reach the correct working length in curved canals. To solve this problem, cut off a portion of the fine tip to create a size intermediate to two consecutive instruments. There is an increase of 0.02 mm of diameter per millimeter of the length, cutting 1 mm of the tip creates a new instrument size. For example, cutting 1 mm of #15 fie makes it #17 fie. In severely curved canals, cut 0.5 mm of the file to increase the instrument diameter by 0.01 mm to allow a smoother transition of the instrument sizes for even cutting
- Use of flexible fies: Flexible fies help in maintaining the shape of the curve and avoid the occurrence of procedural errors like the formation of ledge, elbow, or zipping of the canal
2. Decrease in Length of Actively Cutting File: It can be achieved by following means.
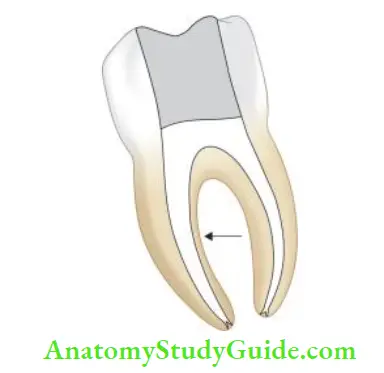
- Anticurvature filing (given by Lim and Stock)
- Anticurvature filing prevents excessive dentin removal from the thinner part of curved canals. If care is not taken while cleaning and shaping, strip formation can occur in the danger zone area. The danger zone has less dentin thickness than the safety zone, for example, on the mesial side of the mesial root of the mandibular molar
- Anticurvature filing involves the lesser filing of the canal wall which is facing the curvature. For example, in the case of the mesial root of a mandibular molar, more filing is done on the mesial side than on the distal side
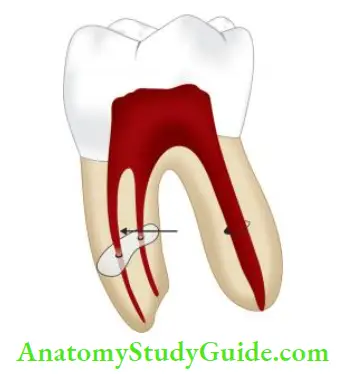
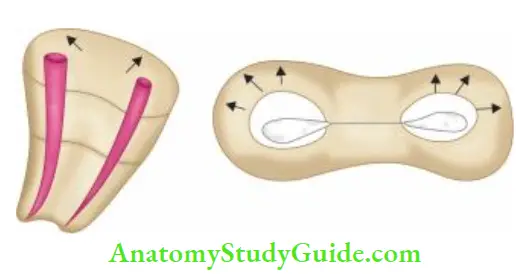
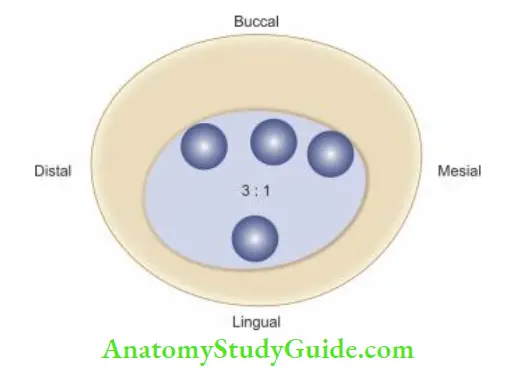
- Modifying cutting edges of the instrument: Cutting edges of the curved instrument can be modified by dulling the flute of outer portion of the apical third and the inner portion of the middle third with the help of a diamond file
- Changing the canal preparation techniques: Crown-down technique in which the preparation of the coronal part of the canal before the apical part removes the coronal interferences and allows the files to reach up to the apex more effectively are showing the management of curved root canals.
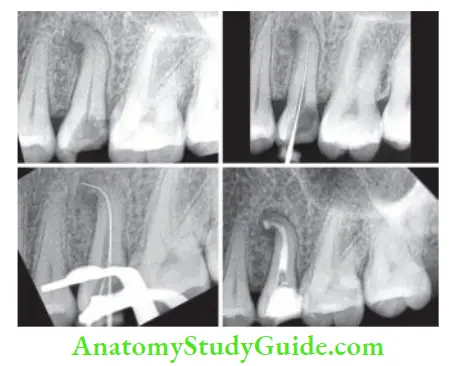
- (A) Radiograph showing carious pulp exposure with the widening of periodontal ligament space of maxillary second premolar
- (B) 10# K-fie was preserved in accordance with the curvature of the canal and the glide path was established till WL
- (C) Both canals negotiated till working length and coronal flaring were done with rotary files. Shaping of canals was done using S1 and S2 till working length. Canals were finished with F1
- (D) Final obturation with calamus dual for down pack and backfill.
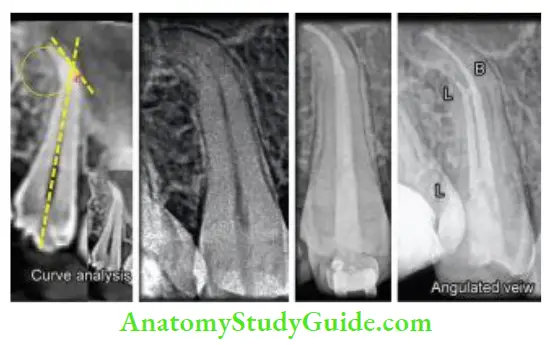
- (A) Preoperative radiograph;
- (B) Estimation of root canal curvature;
- (C) Postobturation radiograph;
- (D) Postobturation radiograph at diffrent angle.
Management of Calcified Canals:
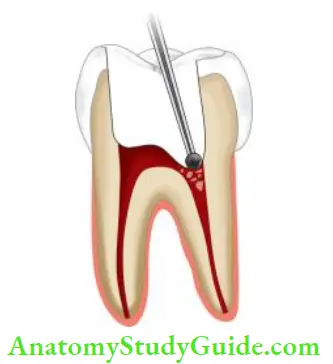
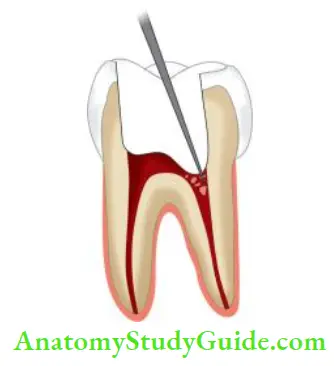
- For anatomy of calcified canals, For access opening of calcified canals.
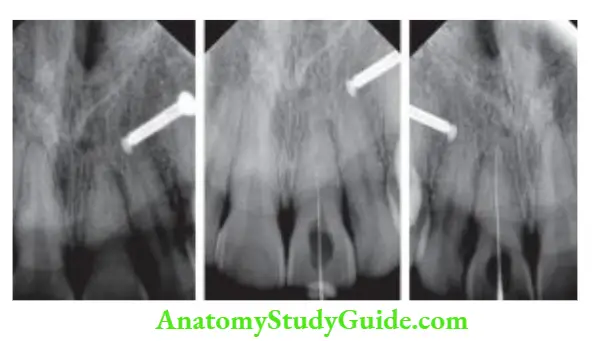
- Take a proper radiograph of the calcified tooth to visualize the location of the pulp chamber floor. Measure the distance from the occlusal surface to the pulp chamber from the preoperative radiograph
- Start with the access preparation using long shank #2 or #4 round bur
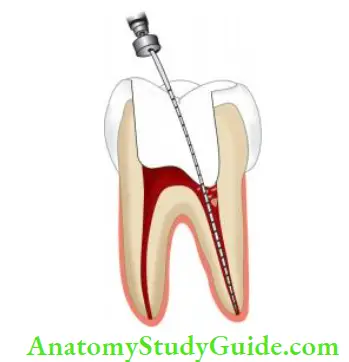
- Use DG–16 explorer and apply firm pressure to force the instrument slightly into the orifice, where it will “stick.” At this suspected point, place #8 or 10 K-fie or canal pathfinder into the orifice and try to negotiate the canal
- Always advance instruments slowly in calcified canals and clean the instrument on withdrawal and inspect before reinserting it into the canal
- When a fie instrument reaches the approximate canal length, do not remove it; rather obtain a radiograph to ascertain the position of the file
- Use chelating agents to assist canal penetration
- Do copious irrigation with NaOCl which enhances the dissolution of organic debris, lubricates the canal, and keeps dentin chips and pieces of calcified material in the solution
case management of nonvital maxillary central incisor with the calcified canal.
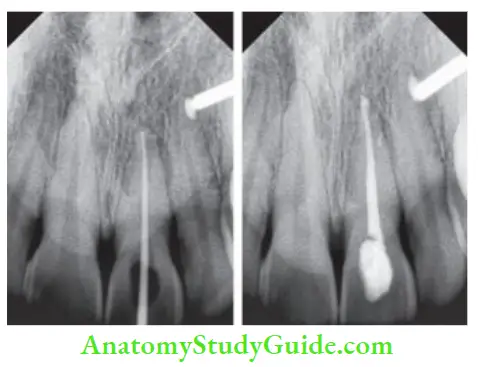
Management of C-Shaped Canals:
Diagnosis:
Following radiographic characteristics can predict the presence of C-shaped canals: radicular fusion when an instrument is inserted into any side of the canal, it always ends in the distal foramen of the tooth and a fie introduced in this canal could probe the whole extension of the C.
Negotiation of canals:
When the orifice is continuous C-shaped or arced, the number of canals can vary from one to three, when the orifice is oval, the number of canals can be one or two, and when the orifice is round, one canal is suspected. Explore the canals with small-size endodontic files (nos. 8, 10, 15 K-fie) so as not to miss irregularities.
Cleaning and shaping:
To gain access to irregularities in the C-shaped canal system, the coronal third is prepared using GG drills. Care should be taken to avoid perforation in C1 (continuous C type) and C2 (semicolon type) type canals. In narrow, interconnecting isthmus areas, GG drills should not be used and cleaning should be done using a #25 instrument. Anticurvature filing is recommended to avoid danger zones.
Caution should be taken to prevent strip perforation during cleaning and shaping of mandibular premolars, which have thin dentinal walls in the radicular groove area.
Cleaning of a C-shaped canal with rotary instruments should be assisted by ultrasonic irrigation.
Obturation:
Cleaning and shaping of C-shaped canals leave a very less remaining dentin thickness of 0.2–0.3 mm, forces of compaction during obturation can cause root fracture. So, thermoplasticized gutta-percha technique is preferred.
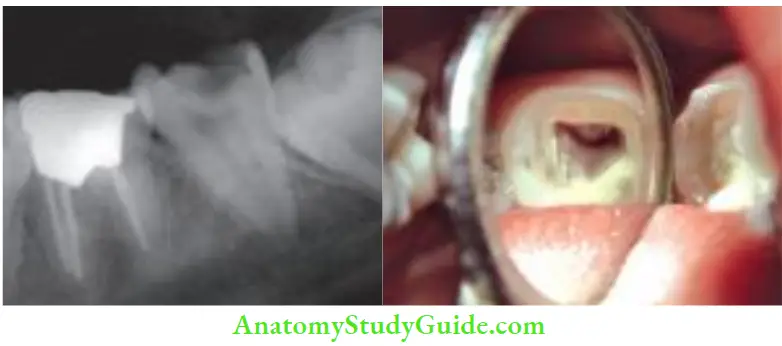
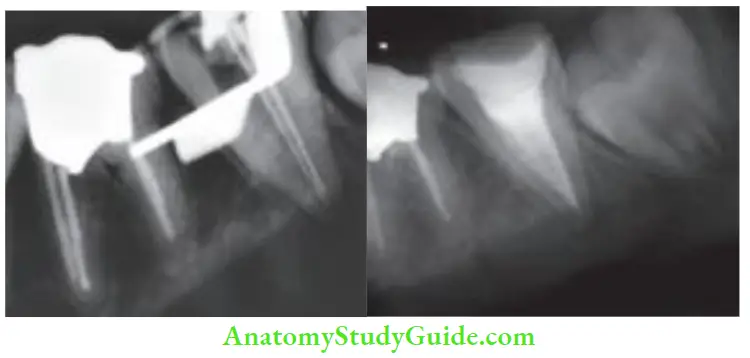
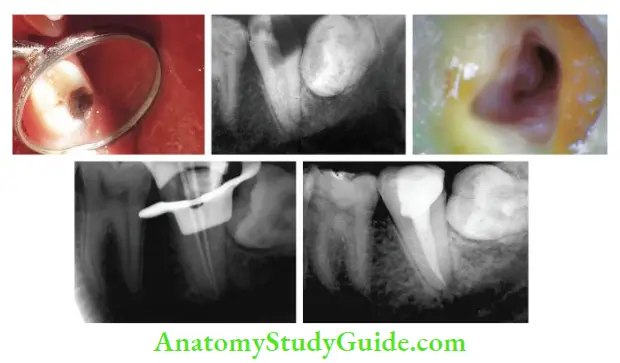
- (A) Preoperative photograph
- (B) preoperative radiograph
- (C) After access preparation
- (D) Working length radiograph
- (E) Postobturation radiograph.
Management of S-Shaped/ Bayonet-Shaped Canals:
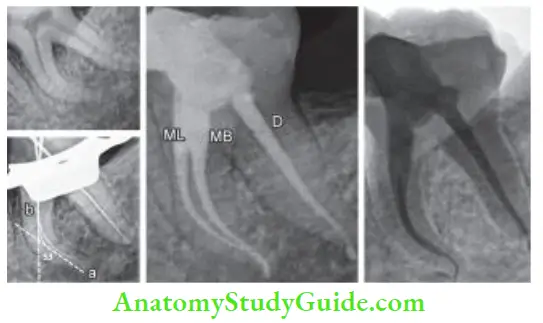
For optimal cleaning and shaping of S-shaped canals, the three-dimensional nature of these canals must be visualized with special consideration and evaluation to the multiple concavities along the external surfaces of the root. Failure to know these may result in the stripping of the canal along the inner surface of each curve.
During initial canal penetration, it is essential that there be an unrestricted approach to the first curve. For this, the access preparation is flared to allow a more direct entry. Once the canal is negotiated, passive shaping of the coronal curve is done first to facilitate the cleaning and shaping of the apical curve.
Constant recapitulation with small files and copious irrigation is necessary to prevent blockage and lodging. Over-curving the apical 3 mm of the file aids in maintaining the curvature in the apical portion of the canal as the coronal curve becomes almost straight during the later stages of cleaning and shaping.
Gradual use of small files with short amplitude strokes is essential to manage these canals effectively. To prevent stripping in the coronal curve, anti-curvature or reverse filing is recommended, with primary pressure being placed away from curve of coronal curvature.
Leave a Reply