Procedural Accidents Notes
Like any other field of dentistry, a clinician may face unwanted situations during root canal treatment which can affect the prognosis of endodontic therapy. These procedural accidents are collectively termed endodontic mishaps.
Table of Contents
Accurate diagnosis, proper case selection, and adherence to basic principles of endodontic therapy may prevent the occurrence of procedural accidents. But if any endodontic mishap occurs, inform the patient about:
- Incidence and nature of the mishap
- Procedures to correct it
- Alternative treatment options
- Prognosis of the affected tooth.
Endodontic mishaps may have dentolegal consequences. This prevention is the best option, both for the patient as well as the dentist. Knowledge of etiological factors involved in endodontic mishaps is mandatory for their prevention. Recognition of a procedural accident is the first step in its management.
Read And Learn More: Endodontics Notes
Endodontic mishaps:
- Inadequately cleaned and shaped root canal system
- Loss of working length
- Canal blockage
- Ledge formation
- Missed canals
- Instrument separation
- Deviation from normal canal anatomy
- Zipping
- Stripping or lateral wall perforation
- Canal transportation
- Inadequate canal preparation
- Over instrumentation
- Overpreparation
- Under preparation
- Perforations
- Coronal perforations
- Root perforations
- Cervical canal perforations
- Mid-root perforations
- Apical perforations
- Postspace perforations
- Obturation related
- Over obturation
- Under obturation
- Vertical root fracture
- Instrument aspiration
Inadequately Cleaned And Shaped Root Canal System
The main objective of cleaning and shaping is to remove pulp tissue, debris, and bacteria and to shape the canal for obturation. Errors that most often occur during canal preparation include:
Loss of Working Length:
Loss of working length during cleaning and shaping is a common procedural error. It is noted only on the master cone radiograph or when the master apical file is short of the established working length.
Etiology
- Secondary to other endodontic procedural errors, like blockages, ledge formation, and fractured instruments
- The rapid increase in file size
- Accumulation of dentinal debris in the apical third of the canal
- Lack of attention to detail, like malpositioned instrument stops, variations in reference points, poor radiographic technique, and improper use of instruments.
Prevention
- Use sound and reproducible reference points
- Precurve all instruments for use in curved canals
- Use directional instrument stops
- When verifying the instrument position radiographically, use consistent radiographic angles
- Always maintain the original preoperative shape of the canal
- Copious irrigation and recapitulation throughout cleaning and shaping procedures
- Always use sequential file sizes.

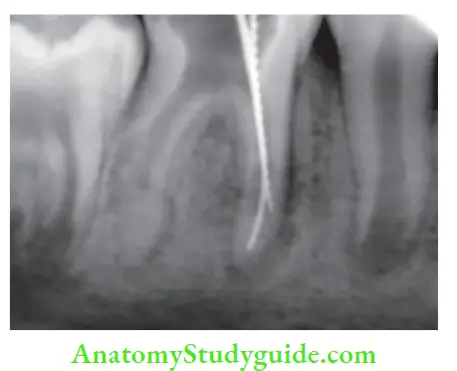
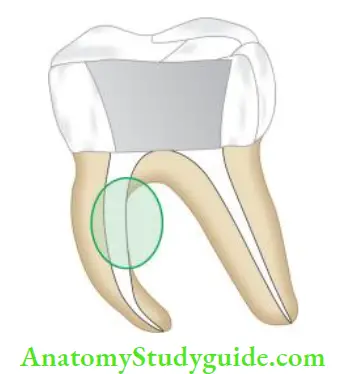
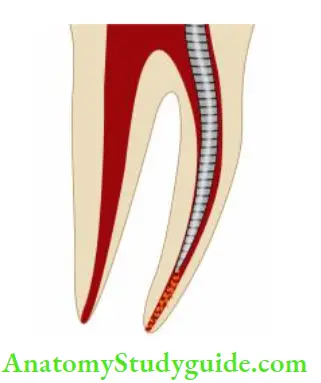
Canal Blockage
A blockage is an obstruction in a previously patent canal system that prevents access to the apical constriction or apical stop. It is confirmed by taking a radiograph which shows that the file is not reaching up to its established working length.
Etiology
- Common causes of canal blockage can be packed dentinal chips, tissue debris, cotton pellets, restorative materials, or the presence of fractured instruments
- If the tip of the instrument used is wider than the canal diameter.
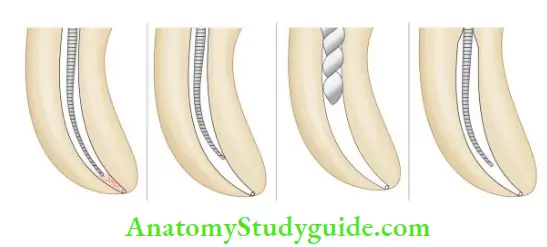
- (A) Dentin chips;
- (B) Wrong angulation of instrument;
- (C) Larger instrument than canal diameter;
- (D) Restriction to instrument making it short of apex.
Canal Blockage Treatment
- When a blockage occurs, place a small amount of EDTA lubricant on a filing instrument and introduce it into the canal. Use a gentle watch winding motion along with copious irrigation of the canal to remove the dentin chips or tissue debris
- If this does not solve the problem, endodontics may be used to dislodge the dentin chips by the action of acoustic streaming
- Whatever happens, do not force the instrument into the blockage as it may further pack the dentinal debris and worsen the condition. Moreover, forcing instruments may cause perforation of the canal.
Prevention
- Remove all caries, unsupported tooth structure, and restorations before completion of access cavity preparation
- Keep pulp chamber filed with an irrigant during canal preparation
- There should be a straight-line access to the canal apex
- Carry out copious irrigation during cleaning and shaping
- Intracanal instruments must always be wiped clean before reinserting into the canal system
- Use instruments in sequential order
- Recapitulate during instrumentation
- Avoid excessive pressure and rotation of instruments.
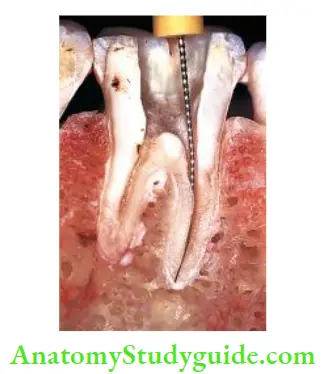
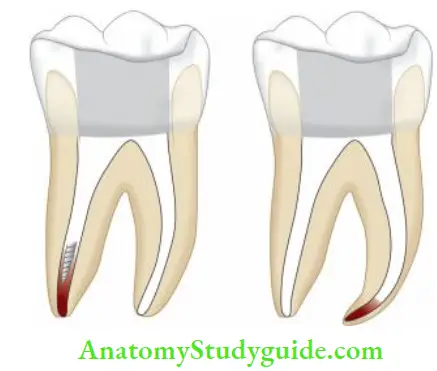
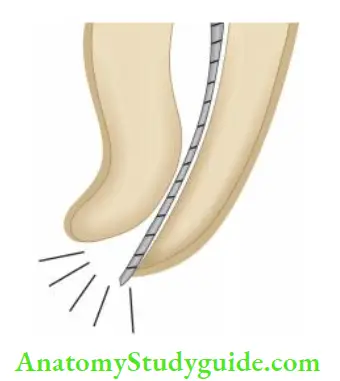
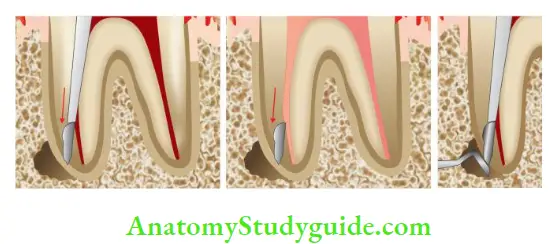
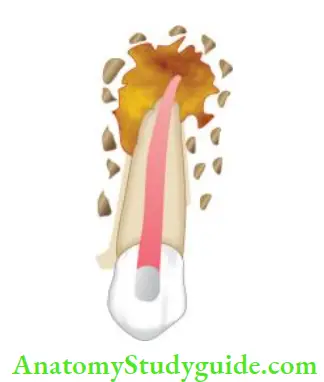
Ledge Formation
The ledge is an artificially created deviation of the root canal wall which prevents an endodontic instrument to established working length in an otherwise patent canal.
Etiology
- By forcing straight instruments short of working length in a curved canal
- Rotating the fie at working length causes deviation from the natural canal pathway, straightening of the canal, and creation of a ledge in the dentinal wall
- Rapid advancement in fie sizes or skipping file sizes.
Identification of Ledge Formation
One may get suspicious that a ledge has been formed when there is
- Loss of tactile sensation at the tip of the instrument
- Loose feeling instead of binding at the apex
- The instrument can no longer reach its estimated working length
- When in doubt, take a radiograph with an instrument placed in the canal.
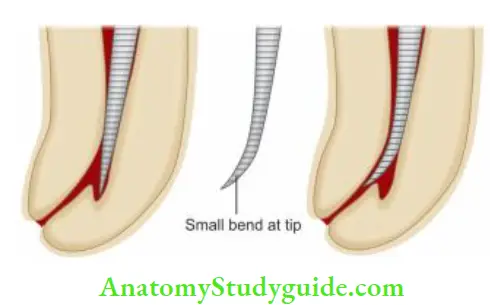
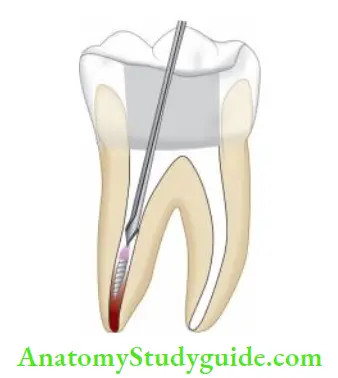
Ledge Formation Treatment
To negotiate a ledge, choose a smaller number fie, usually No. 10 or 15
- Give a small bend at the tip of the instrument and penetrate the fie carefully into the canal
- Once the tip of the fie is apical to the ledge, it is moved in and out of the canal utilizing ultrashort push-pull movements with emphasis on staying apical to the defect
- When fie moves freely, it may be turned clockwise upon withdrawal to rasp, reduce, smooth, or eliminate the ledge. When the ledge is bypassed, then efforts are directed towards establishing the apical patency with a No. 10 fie.
Prevention of Ledge Formation
- Use of stainless steel patency fies to determine canal curvature
- Accurate evaluation of radiograph and tooth anatomy
- Preserving the instruments for curved canals
- Use of flexible NiTi files
- Use of safe-ended instruments with noncutting tips
- Use of sequential firing. Avoid skipping instrument sizes
- Frequent irrigation and recapitulation during biomechanical preparation.
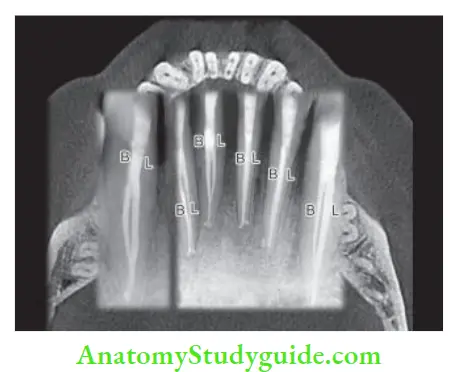
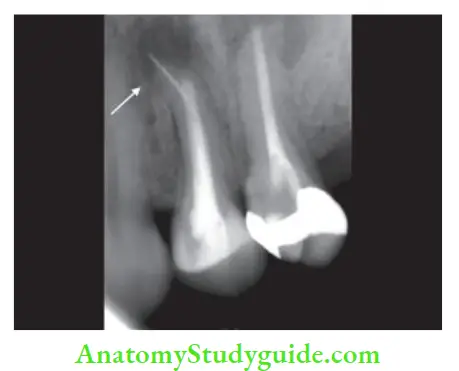
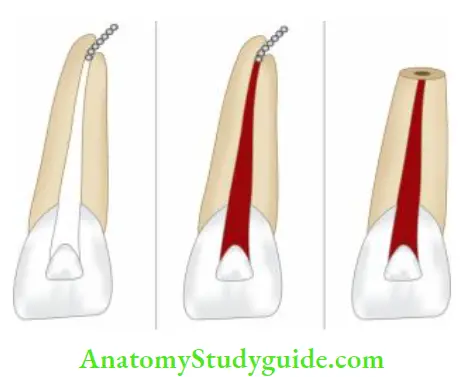
Missed Canal
The missed canal can contribute to endodontic failure because it holds the tissue debris, bacteria and other irritants. This, a tooth should be retreated first conservatively if endodontic failure exists, before going for an endodontic surgery procedure.
Etiology
- Lack of thorough knowledge of root canal anatomy and its variations
- Inadequate access cavity preparation.
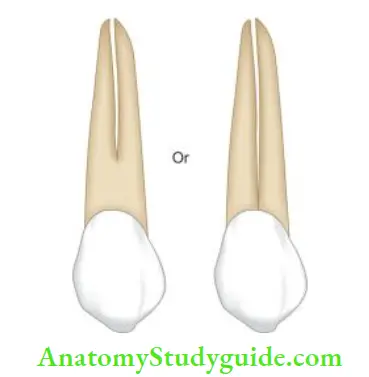
Common Sites for Missed Canals
- During canal exploration, if the canal is not centered in the root, one should look for the presence of extracranial
- There are several teeth which have a predisposition for extra canal which might be missed if not explored accurately while treatment. For example,
- Maxillary premolars may have three canals (mesiobuccal, distobuccal, and palatal)
- Maxillary first molars usually have four canals
- Mandibular incisors usually have two canals
- Mandibular premolars often have complex root anatomy
- Mandibular molars may have extramarital and/or distal canals in some cases.
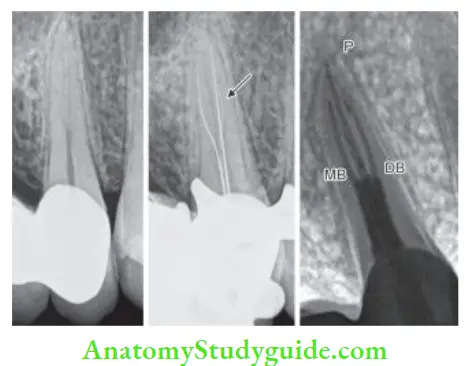
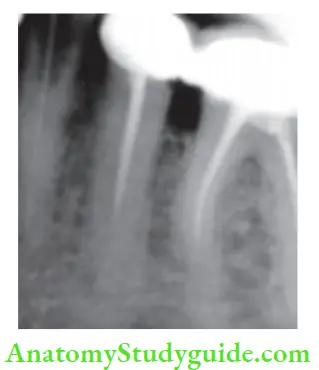
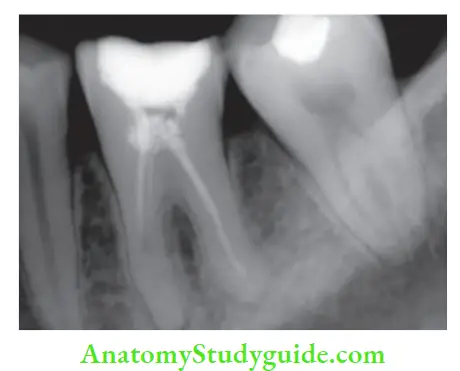
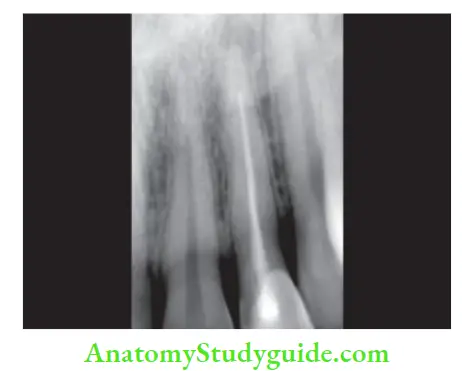
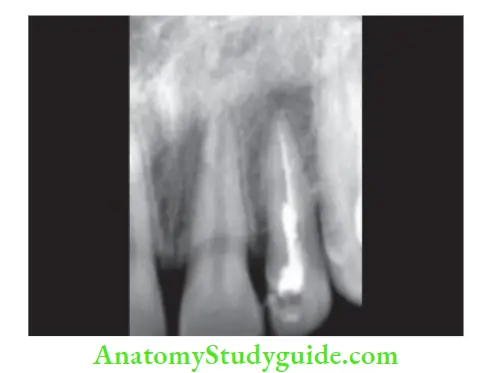
- (A) Preoperative radiograph;
- (B) Working length radiograph;
- (C) Post obturation radiograph.
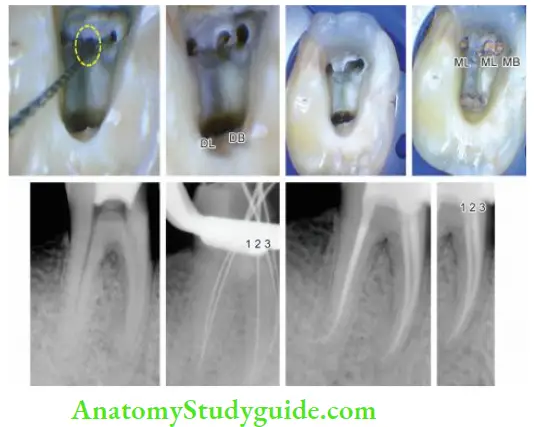
Missed canals can be located by
- Taking radiographs
- Use of magnifying loupes or endomicroscopy
- Accurate access cavity preparation
- Use of ultrasonics
- Use of dyes such as methylene blue
- Use of sodium hypochlorite: After thorough cleaning and shaping, the pulp chamber is filled with sodium hypochlorite. If bubbles appear in, it indicates either there is residual tissue present in a missed canal or residual chelator in the prepared canal. This is called the Champagne test.

Prevention of Missed Canal
- Good radiographs were taken at different horizontal angulations
- Good illumination and magnification
- Adequate access cavity preparation
- Clinicians should always look for an additional canal in every tooth being treated
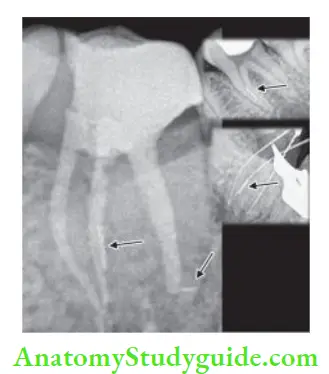
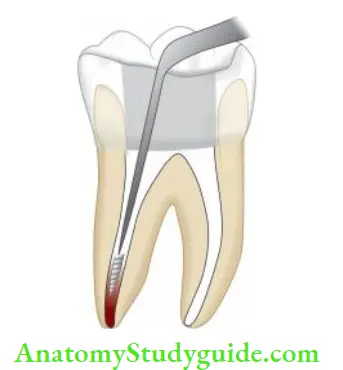
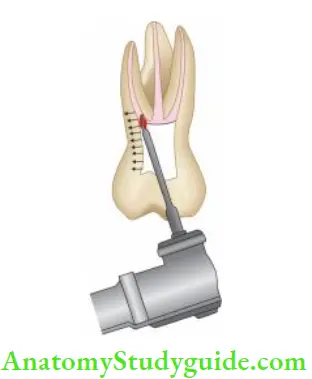
Instrument Separation
Instrument separation is a common and frustrating problem in endodontic treatment which occurs due to improper or overuse of instruments especially while working in curved, narrow, or tortuous canals.
Etiology
- Variation from normal root canal anatomy
- Overuse of damaged instruments
- Overuse of dull instruments
- Inadequate irrigation
- Use of excessive pressure while inserting in the canal
- Improper access cavity preparation.
Management
When an instrument fracture occurs, take a radiograph to
evaluate:
- Curvature and length of the canal
- Accessibility of instrument
- Location of separated instrument
- Amount of dentin present around the instrument
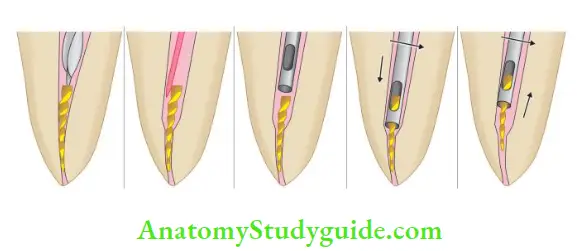
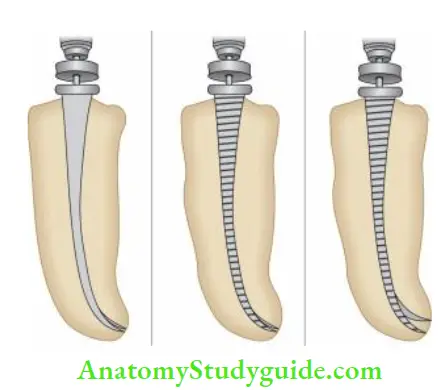
File Bypass Technique:
- The key to bypassing a file is to establish straight-line access and patency with No. 6 or 8 fie
- In order to get past the broken instrument fragment,a small sharp bend should be given at the end of the instrument
- Insert the fie slowly and carefully into the canal. When negotiation occurs past the fragment, one will find a catch. Do not remove the file at this point. Use small in and out movements along with copious irrigation of canal
- While doing these movements, sometimes the fie may kink and it becomes difficult to place the fie to the same length. In such cases, use the new file with a similar bend and repeat the above procedure
- Once the patency with a No. 15 instrument is achieved, shift to K reamers. Use a “place pull/rotate/withdrawal” movement rather than a firing motion. Every time the reamer rotates, there will be a “clicking” sound as the flies brush up against the fie fragment
- One must avoid placing an instrument directly on top of the broken file. This can push it deeper resulting in a loss of patency. If the file is visible at this point, it is possible to use a small-tipped ultrasonic instrument or one-fourth turn withdrawal-type handpiece to dislodge and remove it. management of separated instruments by bypass technique and incorporating the separated instrument in the final obturation of the canal.


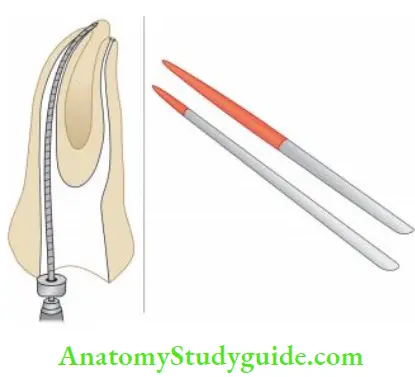
Instrument Retrieval
- To remove the separated fie, expose its first. It can be done by modified Gates-Glidden drills. GG is modified by removing its bottom half and thus creating a flat surface
- Perform crown down technique with Gates-Glidden drills. The use of modified Gates-Glidden to enlarge the canal to a point where the instrument is located; this way a platform is created which enables to visualization of the broken fragment. It creates a flat area of dentin surrounding the fie fragment
- Thereafter, a small tipped ultrasonic instrument is used in a counter-clockwise motion to loosen the file
- Irrigation combined with ultrasonics can frequently flash the fie out.
Special instruments used for retrieval of separated instruments are:
- Masserann kit
- Endoextractor
- Instrument removal system
- Wire-loop technique
- Surgical removal of the broken instrument.
Masserann Kit
In the Masserann kit, an extractor is present into which the instrument to be retrieved is locked. It has assorted end-cutting trepan burs which are large and rigid and meant to be used only in the coronal portion of straight canals.
Steps for retrieving instruments using Masserann kit
- Enlarge the canal orifice using a round bur
- Gain a straight line access to the fractured instrument using Gates-Glidden drills
- Move end-cutting trepan burs slowly in an anticlockwise direction so as to free 4 mm of the fragment. These burs can be used by hand or with reduction gear contra-angle handpiece at the speed of 300–600 rpm
- Take the extractor and slide it over the free end of the fragment
- Firmly hold the extractor in place and rotate the screw head until the fragment is gripped
- Once gripped tightly, move the extractor in an anticlockwise direction for the removal of all cutting root canal instruments and in a clockwise direction for removing instruments.
Use of Endoextractor
In the endo extractor, cyanoacrylate adhesive is placed on it so as to lock the object into the extractor. The technique for removal is the same as that for the Masserann extractor.
Instrument Removal System
The instrument removal system consists of different sizes of microtubes and inserts wedges which fit into the separated instruments. Microtube has a 45° beveled end and a handle.
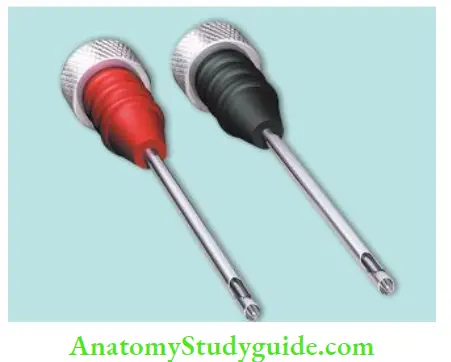
The technique of using IRS
- Gain straight-line access to the canal
- Select a microtube and insert it into the canal
- After this guide, the head of the separated instruments into the lumen of the microtube
- Place an insert wedge through the open end of the microtube till it comes in contact with the separated instrument
- Turn the inserted wedge clockwise to engage the instrument Microtubes of the instrument removal system.
- Finally, move the microtube out of the canal to retrieve the separated instrument.
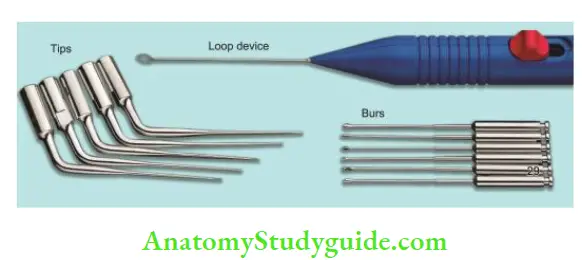
Wire Loop Technique
It consists of burs, ultrasonic tips, and a loop device for the removal of broken instruments. Before removal of the fractured instrument, the canal should be enlarged so as to gain straight-line access and exposure of the instrument.
For this Gates-Glidden drills or greater taper files can be used. Once the file is exposed, remove it using a loop device.
Surgical Management for Removal of Separated Instrument
It is indicated when
- The broken file is behind the curve
- The file fragment is not visible because of the curved root
- The instrument is in the apical part of the canal and is difficult to retrieve
- Much of the dentin has to be removed to allow file removal.
Prognosis
The prognosis of separated instrument depends upon the following factors:
- Timing of separation
- Status of pulp tissue
- Position of separated instrument
- Ability to retrieve or bypass the instrument.
Separated instruments are not the prime cause of endodontic failure but they impede mechanical instrumentation Of the canal, which may cause endodontic failure.
Studies have shown that if the instrument separates at later stages of instrumentation and close to the apex, the prognosis is better than if it separates in un-debrided canals, short of the apex, or beyond the apical foramen.
Prevention
- Examine each instrument before placing it into the canal. Always discard the instrument when there is
- Bending of instruments
- Corrosion of instrument
- Unwinding of flutes
- Excessive heating of the instrument
- Dulling of the instrument
- Instead of using carbon steel, use stainless steel fies
- Use the smaller size of instruments only once
- Always use instruments in sequential order
- Never force the instrument into the canal
- Canals should be copiously irrigated during the cleaning and shaping procedure
- Never use instruments in dry canals
- Always clean the instrument before placing it into the canal. Debris collected between the flutes retard the cutting efficiency and increases the frictional torque between the instrument and the canal wall
- Do not give excessive rotation to the instrument while working with it.
Deviation From Normal Canal Anatomy
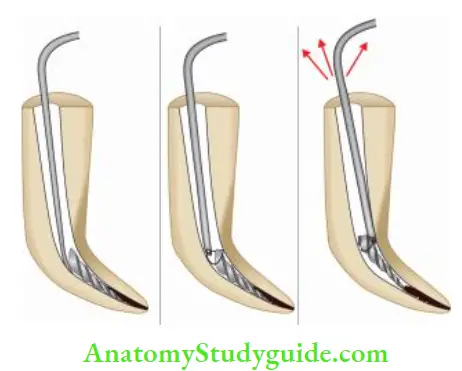
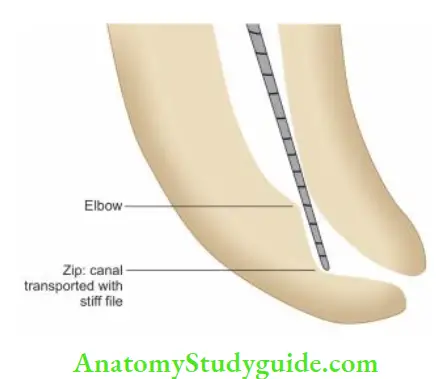
Zipping
Zipping is defined as the transposition of the apical portion of the canal due to improper shaping technique. Terms given to describe this shape are “hourglass shape,” “foraminal rip,” or “teardrop shape.”
Etiology
- Failure to preserve the files
- Forcing instruments in curved canals.
Features
- In zipping, apical foramen tends to become a teardrop or elliptical and is transported from the curve of the canal
- File placed in a curved canal cuts more on the outer portion of the canal wall at its apical extent and the innermost portion of the canal wall at the coronal third causing an uneven reduction of the dentin
- When a file is rotated in a curved canal a biomechanical defect, “elbow” is formed coronal to the elliptically shaped apical seat. This is the narrowest portion of the canal
- In many cases, the obturating material terminates at the elbow leaving an unfiled zipped canal apical to the elbow. This is a common occurrence with the laterally compacted gutta-percha technique.
- The use of vertical compaction of warm gutta-percha or thermoplasticized gutta-percha is ideal in these cases to compact a solid core material into the apical preparation without using an excessive amount of sealer.
Prevention
- Use of pre-curved fies
- Use of incremental firing technique
- Use of flexible fees
- Remove flies of fire at certain areas, for example, the fie portion which makes contact with the outer dentinal wall at the apex and the portion which makes contact with the inner dentinal wall, especially in the mid-foot area
- By overcurving in the apical part of the fie, especially when working for severely curved canals.
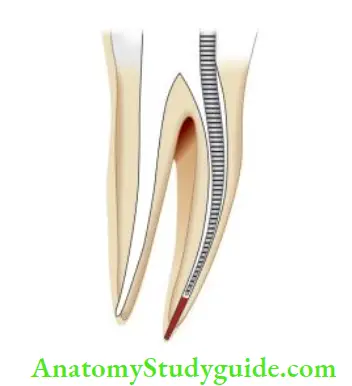
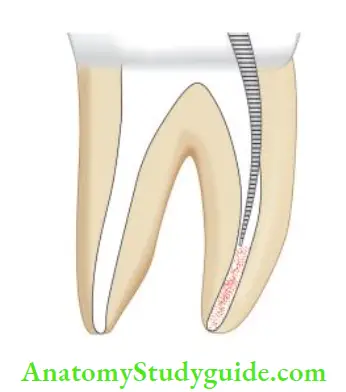
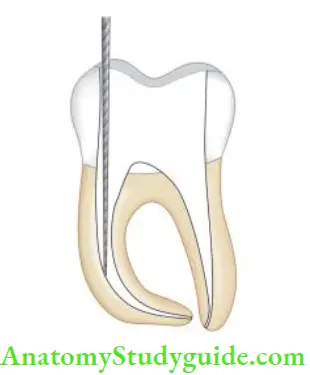
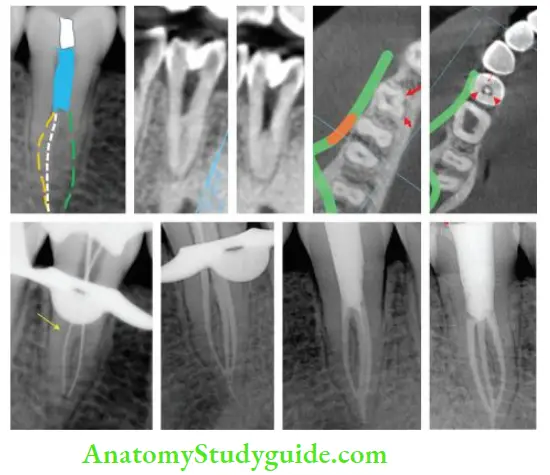
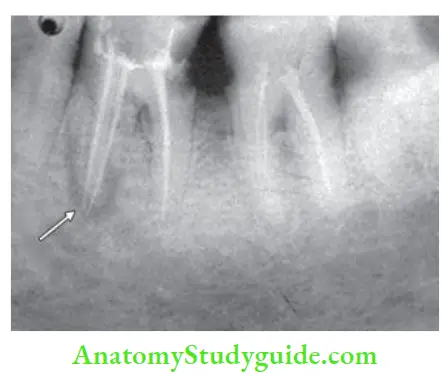
Stripping or Lateral Wall Perforation
“Stripping” is a lateral perforation caused by overinstrumentation through a thin wall in the root and is most likely to happen on the inside or concave wall of a curved canal such as the distal wall of mesial roots in mandibular first molars.
Stripping is easily detected by the sudden appearance of hemorrhage in a previously dry canal or by a sudden complaint by the patient.
Management
Successful repair of stripping or perforation relies on the adequacy of the seal established by the repair material. Access to mid-root perforation is most often difficult and repair is not predictable. Mineral trioxide aggregate (MTA) or calcium hydroxide can be used as a biological barrier against which obturating material is packed.
Prevention
- Use of pre-curved fies for curved canals
- Use of modified files for curved canals. A file can be modified by removing flutes of fie at certain areas, for example, the fie portion which makes contact with the outer dentinal wall at the apex and the portion which makes contact with the inner dentinal wall, especially in the mid-root area
- Using anti curvature filing, that is, more fishing pressure is placed on the tooth structure away from the direction of root curvature and away from the invagination, thereby preventing root thinning and perforation of the root structure.

Elbow
It is the narrowest portion of the zipped canal. It is usually formed in the middle of the curve in the canal with 30° curvature. This type of preparation results in insufficient taper and flow which further makes cleaning, shaping, and obturation difficult.
Canal Transportation
“Apical canal transportation is moving the position of canal’s normal anatomic foramen to a new location on external root surface”.
Classifiation
- Type 1: It is a minor movement of the physiologic foramen. In such cases, if sufficient residual dentin can be maintained, one can try to create positive apical canal architecture to improve the prognosis of the tooth.
- Type 2: Apical transportations of Type 2 show the moderate movement of the physiologic foramen to a new location. Such cases compromise the prognosis and are difficult to treat. Biocompatible materials like MTA can be used to provide a barrier against which obturation material can be packed.
- Type 3: Apical transportation of Type 3 shows the severe movement of the physiological foramen. In Type 3 prognosis is poorest when compared to Type 1 and Type 2. Three-dimensional obturation is difficult in this case. This requires surgical intervention for correction, otherwise, the tooth is indicated for extraction.
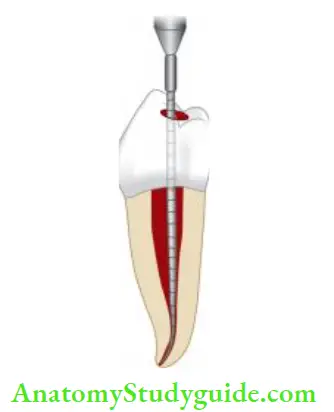
Inadequate Canal Preparation
Overinstrumentation
- Excessive instrumentation beyond the apical constriction violates the periodontal ligament and alveolar bone
- Loss of apical constriction creates an open apex with an increased risk of overfilling, lack of an adequate apical seal, pain, and discomfort for the patient
- Overinstrumentation is recognized when hemorrhage is evident in the apical portion of a canal with or without patient discomfort when tactile resistance of the boundaries of canal space is lost. It can be confirmed by taking a radiograph and inserting a paper point in the canal.
Overinstrumentation Treatment
- Re-establish the working length and carefully obturate the canal so as to prevent extrusion of the filling beyond the apex
- Another technique to prevent overexpression of the filing is developing an apical barrier. Materials used for this include dentin chips, calcium hydroxide powder, hydroxyapatite (HA), and MTA.
Prevention
- Using good radiographic techniques
- Accurately determining the apical constriction of the root canal
- Using sound reference points
- Using stable instrument stops
- Maintaining all instruments within the confines of the canal system
- Occlusal alterations before determination of the working length
- Intermittent radiographic confirmation of the working length
- Confirming the integrity of the apical stop with paper points.
Overpreparation
- Overpreparation is excessive removal of tooth structure in mesiodistal and buccolingual direction
- During biomechanical preparation of the canal, the size of apical preparation should correspond to the size, shape, and curvature of the root
- Excessive canal flaring increases the chances of stripping and perforation. One should avoid excessive removal of tooth structure because overprepared canals are potentially weaker and subject to fracture during compaction and restorative procedures.
![]()
Under preparation
- Under preparation is the failure to remove pulp tissue, dentinal debris, and microorganisms from the root canal system
- Sometimes, the canal system is inadequately shaped which prevents three-dimensional obturation of the root canal space.
Etiology
- Insufficient preparation of the apical dentin matrix
- Insufficient use of irrigants to dissolve tissues and debris
- Inadequate canal shaping, which prevents depth of spreader or plugger penetration during compaction
- Establishing the working length short of the apical constriction
- Creation of ledges and blockages that prevent complete cleaning and shaping.
Prevention
Underprepared canals are best managed by strictly following the principles of working length determination and biomechanical preparation
Copious irrigation and recapitulation during instrumentation ensure a properly cleaned canal.
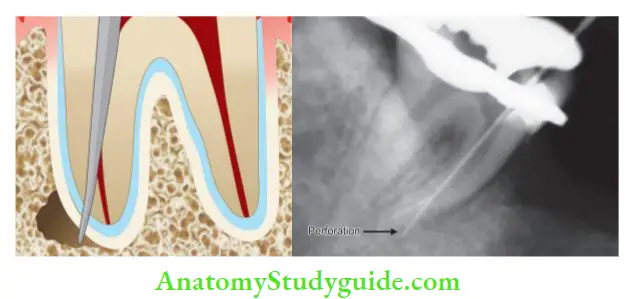
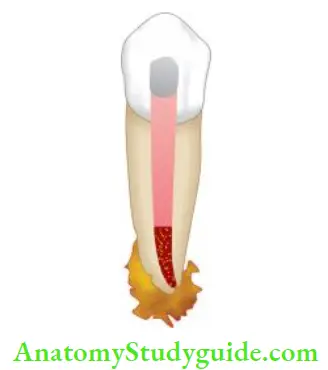
Perforation
According to the glossary of endodontic terms (by AAE), perforation is defined as “the mechanical or pathological communication between root canal system and the external tooth surface.” It can be cervical, mid-root, or apical levels depending upon the site of the perforation.
Coronal perforation occurs during access cavity preparation. If the perforation is above the periodontal attachment, leakage of saliva into the cavity or sodium hypochlorite in the mouth is the main sign. But if perforation occurs in the periodontal ligament, bleeding is the hallmark feature.
Root canal perforation can occur at three levels:
1. Cervical canal perforation:
It commonly occurs while locating the canal orifice and flying of the coronal third of the root canal. The sudden appearance of blood from the canal is the first sign of perforation
2. Mid-root perforation:
It commonly occurs due to overinstrumentation and over-preparation of the thin wall of the root or concave side of the curved canals. The sudden appearance of bleeding is the pathognomonic feature
3. Apical root perforation:
It occurs if when an instrument goes beyond the confines of the root canal and by overuse of chelating agents along with straight and stiffer large-sized instruments to negotiate ledge, canal blockage, or zipping, etc.
Management
The occurrence of a perforation can be recognized by:
- Placing an instrument into the opening and taking a radiograph
- Using paper point
- The sudden appearance of bleeding
- Complain of pain by the patient when the instrument touches the periodontal tissue.
Factors Affecting Prognosis of Perforation Repair
1. Location:
If perforation is located at the alveolar crest or coronal to it, the prognosis is poor because of epithelial migration and periodontal pocket formation. Perforation in the furcation area has a poor prognosis. Perforation occurring in the mid-root and apical part of the root does not have communication with the oral cavity and thus has a good prognosis
2. Size:
A smaller perforation has less tissue destruction and inflammation, thus having a better prognosis than larger sized perforation
3. Visibility and accessibility also affect the perforation repair
4. Time Perforation should be repaired as soon as possible to discourage further loss of attachment and prevent sulcular breakdown
5. Associated periodontal condition:
If the attachment apparatus is intact without pocket formation, the nonsurgical repair is recommended, whereas in the case of loss of attachment, surgical treatment should be planned
6. Esthetics influence the perforation repair and the material to be used for the repair of the perforation.
Materials Used for Perforation Repair
- An ideal material for perforation repair should
- Adhere to the preparation walls of the cavity and seal the root canal system.
- Be nontoxic
- Be easy to handle
- Be radiopaque
- Be dimensionally stable
- Be well tolerated by periradicular tissue
- Be nonabsorbable
- Not corrode
- Not to be affected by moisture
- Not stain periradicular tissues
Indium foil:
It was used as a perforation repair material but it has shown greater bone resorption as compared to other materials.
Zinc oxide eugenol (ZOE):
Studies have shown that ZOE can cause severe inflammatory reactions and resorption of the alveolar crest when used for perforation repair.
Intermediate restorative material (IRM):
It is reinforced ZOE cement. If used without an internal matrix, it shows leakage, so it should be used only with the matrix.
Cavit:
It produces a superior seal when compared to ZOE cement, zinc phosphate cement, and amalgam. Glass ionomer cement: It shows greater sealing potential than ZOE, zinc phosphate cement, and amalgam due to its adhesion property.
Amalgam:
It has been used for ages but produces inflammatory changes.
Plaster of Paris:
It is biocompatible with the rate of resorption equaling the rate of new bone growing into the tissue. It has been used as a bone substitute for filing defects.
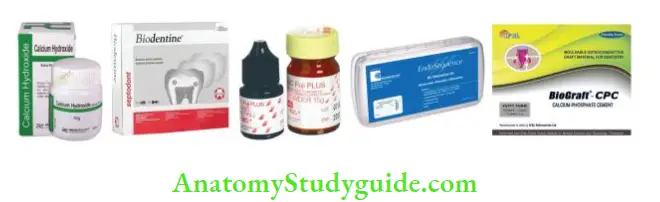
Calcium hydroxide:
It consists of a base paste and a catalyst paste. It is a biocompatible material which has shown positive results.
Dentin chips:
These are used as matrices in the repair of perforation defects.
Hydroxyapatite (HA):
It is used as an internal matrix and for perforation repair material.
Decalcified freeze-dried bone:
These chips are biocompatible, inexpensive, easy to obtain, easy to use, and degradable during the repair process and act as an excellent barrier against which filling material could be placed. When packed into the bony defect, it mixes with the blood and fuses together into a solid mass and fills the defect.
Calcium phosphate cement:
It is a mixture of two calcium phosphate compounds; one is acidic [dicalcium phosphate dehydrate or anhydrous dicalcium phosphate and the other is basic (tetra calcium phosphate)]. When mixed with water, HA is formed as the end product. It is biocompatible and is replaced by bone via osteoconduction and simultaneous cement absorption.
Portland cement:
It consists of tricalcium silicate, dicalcium silicate, tricalcium aluminate, tetra calcium aluminum ferrate, and hydrated calcium sulfate. It induces bone and cementum formation but does not provide a fluid tight seal.
Mineral trioxide aggregate (MTA):
It is an osteoconductive, inductive, and biocompatible material which was introduced by Dr. Torabinejad in 1993. It is available as gray and white MTA. It mainly consists of Portland cement (75%), bismuth oxide 20%, and gypsum.
MTA has the advantage of being hygroscopic so requires moisture for setting, is biocompatible, radiopaque, with excellent sealing ability. Problems with MTA include are difficult handling characteristics due to its sandy nature, long setting time, and discoloration by grey MTA.
Biodentine:
It is a calcium silicate-based bioactive material. It is easy to handle and manipulate. High-alkaline pH and its biocompatibility make it the material of choice for perforation repair.
Bioaggregate:
It is a bioceramic material composed of tricalcium silicate, dicalcium silicate, calcium phosphate monobasic, amorphous silicon dioxide, and tantalum pent oxide. It induces mineralized tissue formation and precipitation of apatite crystals that become larger with increasing immersion time.
EndoSequence:
It is a bioceramic material consisting of calcium silicates, zirconium oxide, calcium phosphate monobasic, and filer agents. It is produced with nanosphere particles that allow the material to enter into the dentinal tubules and interact with the moisture present in the dentin.
This creates a mechanical bond on setting and provides dimensional stability, and biocompatibility due to its high pH. It simulates tissue fluid, and phosphate buffered saline resulting in the precipitation of apatite crystals that become larger with increasing immersion times due to its being bioactive.
Management of the Coronal Third Perforations
In anterior teeth where esthetics is the main concern, calcium sulfate barrier along with composites, glass ionomer cement, and white MTA can be used for perforations repair For posterior teeth where esthetics is not the main criterion, super EBA, amalgam, and MTA can be tried.
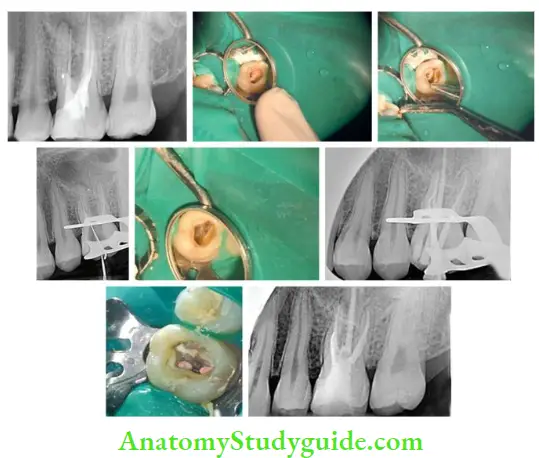
- (A) Preoperative radiograph showing gutta-percha in furcation area but not in the mesial root;
- (B) Photograph showing gutta-percha in perforation site;
- (C) Removal of gutta-percha from perforation site;
- (D) Negotiating MB1 and MB2 canals;
- (E) Photograph showing 4th canal;
- (F) Master cone radiograph;
- (G) Obturation with MTA in mesiobuccal canal;
- (H) Post-operative radiograph.
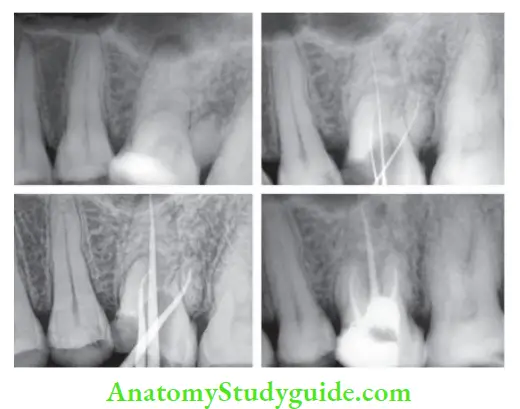
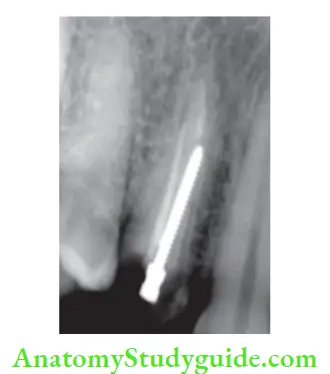
- (A) Preoperative radiograph;
- (B) Working length determination;
- (C) Master cone;
- (D) Postobturation using MTA as a sealer and perforation repair.
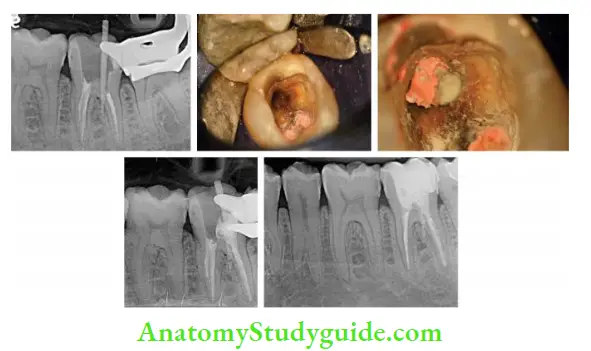
- (A) Radiograph showing confirmation of perforation using gutta-percha;
- (B) Obturation of mesial canals;
- (C) Coronal part of the distal canal is sealed with gutta-percha to avoid MTA blocking the canal. MTA placed at perforation site;
- (D) Distal master cone radiograph after MTA placement at perforation site;
- (E) Postobturation radiograph.
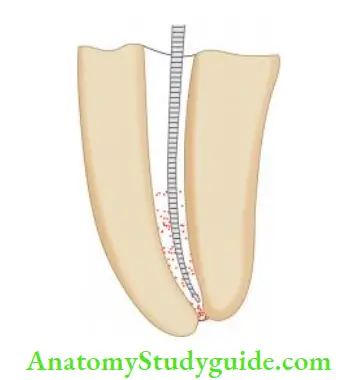
Management of Perforation in Mid-Root Level
In these cases, the success of perforation repair depends on hemostasis, accessibility, visibility, and selection of material for repair.
If the defect is small and hemostasis can be achieved, perforation can be sealed and repaired during three-dimensional obturation of the root canal. But in case the perforation defect is large and moisture control is difficult, then one should prepare the canal before going for perforation repair.
Lemon in 1992 gave the internal matrix concept for the repair of inaccessible strip perforations using microsurgical technique. The rationale behind this concept was that a matrix (HA) controls the material and prevents overfilling of repair material into the periradicular tissues. The material to be used as a matrix should be biocompatible and able to stimulate osteogenesis.
The technique of placement of matrix
- Attain the hemostasis and place fie, silver cones, or gutta-percha points in the canals to maintain their patency
- HA particles are wetted with saline to make a clump, then placed into perforation and condensed with pluggers
- Excess material is removed with an excavator to the level of the periodontal ligament
- After that, a bur is used to prepare the perforation site to receive the material. Using a flat instrument, apply restorative material like amalgam or GIC to repair the perforation.
Management of Perforation in Apical Third of the Root Canal
These types of perforations can be repaired both surgically as well as non-surgically. But one should attempt nonsurgical repair before going for surgery. MTA is a choice of material for perforation repair.
Technique
- Dry the root canal with paper points and isolate the perforation site
- Prepare the MTA material and condense it into the perforation site using pluggers or paper points
- During MTA placement, fie is placed into the canal to maintain its patency and moved up and down till MTA sets. It is done to avoid fie getting frozen in MTA. Place the temporary restoration to the seal chamber. In the next appointment, obturation is done.
Precautions to Prevent Perforation
- Evaluate the anatomy of the tooth before starting endodontic therapy
- Use smaller, flexible fies for curved canals
- Do not skip the five sizes
- Recapitulate with smaller files between sizes
- Confirm the working length and maintain instruments within confines of the working length
- Use anti curvature filing technique in curved canals to selectively remove the dentin
- Minimize the overuse of Gates-Glidden too deep or too large, especially in curved canals
- Avoid overuse of chelating agents, and larger stiffies in an attempt to negotiate procedural errors like ledges, canal blockages, etc.
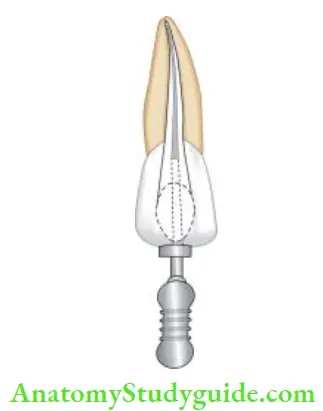
Postspace Perforation
Iatrogenic perforations during post-space preparations are usually caused by poor clinical judgment and improper orientation of the post-preparation drills. Perforation can be recognized by the sudden appearance of blood in the canal or radiographically. Treatment of post-space perforation involves the same principles as for the repair of other perforations.
Materials like dental amalgam, calcium hydroxide, glass ionomer, composite resins, freeze–dried bone, and tricalcium phosphate are used to repair the perforation.
Prevention
- Evaluate the root anatomy and its variations
- Avoid excessive use of Gates-Glidden or Peeso reamers to cut the dentin.
Obturation Related
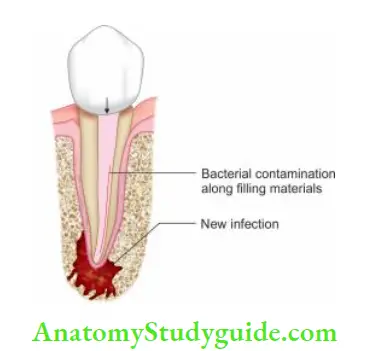
Underfiling/Incompletely Filled Root Canals
Underfilling is obturation of root canal >2 mm short of radiographic apex.
Etiology
- Inaccurate working length determination
- Inadequate irrigation and recapitulation during biomechanical preparation which can lead to the accumulation of dentin chips and tissue debris and thus canal blockage
- Presence of ledge
Significance
Inadequate removal of infected necrotic tissue in the apical portion of the root canal results in persistent bacterial infection and thus initiation or perpetuation of existing periapical pathosis
Prevention of Underfiling
- Obtaining straight-line access to the apex
- Preserving the fies before using in curved canals
- Copious irrigation and recapitulation of the canal
- Attaining apical patency
- Using the files in a sequential manner.
Overfilling of the Root Canals
Overfilling of the root canals is filing >2 mm beyond the radiographic apex.
Etiology
- Overinstrumentation of the root canal
- Inadequate determination of working length
- Incompletely formed root apex
- Inflammatory apical root resorption
- Improper use of reference points for measuring working length.
Significance
- Overinstrumentation often precedes overfilling which inevitably poses a risk of forcing infected root canal contents into the periradicular tissues, thereby impairing the healing process
- Overfilling may cause a foreign giant call reaction and may act as a foreign body which may support the formation of biofilms.
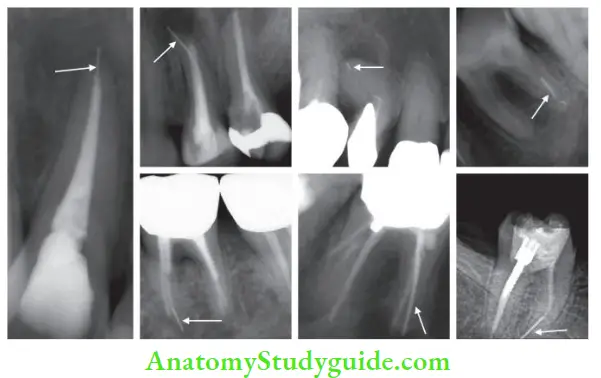
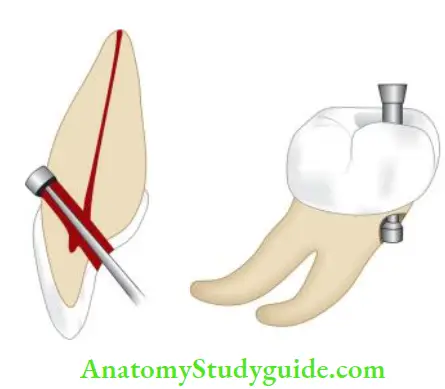
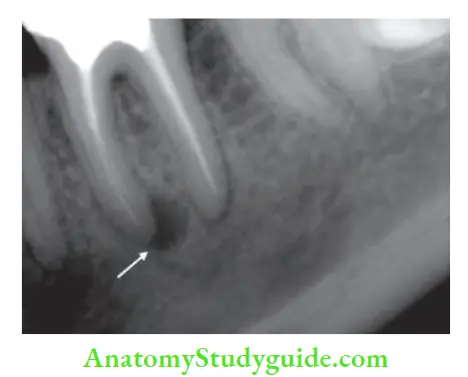
Vertical Root Fracture
Vertical root fractures can occur at any phase of root canal treatment. It results from wedging forces within the canal. These excessive forces exceed the binding strength of existing dentin causing fatigue and fracture.
Vertical root fracture Clinical Features
- It commonly occurs in the faciolingual plane
- A sudden crunching sound accompanied by pain is the pathognomonic of root fracture
- Fracture begins along the canal wall and grows outwards to the root surface
- Certain root shapes and sizes are more susceptible to vertical root fracture, for example, roots which are deep facially and lingually but narrow mesially and distally
- Susceptibility of root fracture increases by excessive dentin removal during canal preparation and excessive condensation forces during compaction of gutta-percha
- Radiographically vertical root fracture may vary from no significant changes to extensive resorption patterns. In chronic cases, they may show a hanging drop radiolucent appearance. According to Cohen, it can be seen radiographically as “J” shaped radiolucency or may appear as a halo-shaped defect around the involved root.
Treatment of vertical root fracture involves extraction in most of cases. In multirooted teeth, root resection or hemisection can be tried.
Prevention of Root Fracture
The main principles to preventing root fracture are to
- Avoid weakening of the canal wall
- Minimize the internal wedging forces.
To avoid the occurrence of vertical root fracture:
- Avoid over-preparation of the canal
- Use less tapered and more flexible compacting instruments to control condensation forces while obturation
- Posts should not be used unless they are necessary to retain a tooth.
Instrument Aspiration
Aspiration of instruments can occur during endodontic therapy if accidentally dropped in the mouth. It occurs especially if a rubber dam is not applied. High-volume suction tips, hemostats, or cotton pliers can be helpful only in some cases when the objects are readily accessible in the throat, otherwise, medical care is needed.
The patient must be provided medical care for the examination which includes a radiograph of the chest and abdomen. This accident can be prevented by using a rubber dam and tying up the rubber dam clamp or endodontic instrument with flss.
Procedural Accidents Conclusion
Endodontic treatment presents a great challenge to a clinician owing to difficult and variable root canal anatomy. Endodontic mishaps can occur at any stage of the treatment which can be avoided with thorough knowledge of complications, variations in root canal anatomy, good clinical skills, and excellent training.
The advent of magnification and contemporary instruments decreases the frequency of procedural accidents. Our ethical obligation towards the patient is met if we can provide treatment to prevent the loss of the tooth.
Leave a Reply