Magnification Devices for Endodontics Notes
Magnification
The concept of magnification was introduced in medicine during the late 19th century. Carl Nylen is the father of microsurgery, he first used a binocular microscope for ear surgery in 1921.
Table of Contents
Apotheker and Jako first introduced the microscope in dentistry in 1978. Nowadays, many advancements have been done to improve the visualization and magnification. The introduction of loupes, microscopes, endoscopes, etc. enables the clinician to magnify an object beyond that perceived by a human eye.
Read And Learn More: Endodontics Notes
Magnification Definitions
- Magnification: It is defined as making an object bigger in size.
- Differentiation: It is defined as making something distinct.
- Working distance: Th distance measured from the clinician’s eye to the treatment field.
- Depth of field: It refers to the ability of the lens system to focus on objects which are both near and far without changing the loupe position.
- Field of view: The area which is visible through optical magnification.

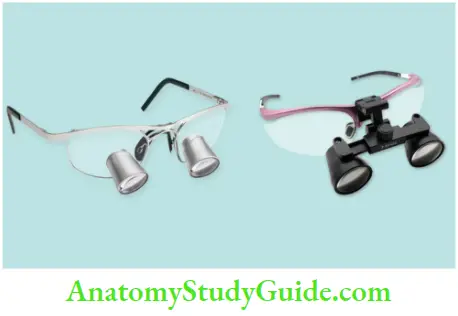
Loupes
These are most commonly used for magnification. Basically, loupes consist of two monocular microscopes, with side-by-side convergent lenses which are angled to focus on an object to form magnified images. These can provide magnifications ranging from ×1.5 to ×10.
Though loupes are most commonly used the main disadvantage is that eyes converge to view an image resulting in eye strain, fatigue, and even vision changes. These types of loupes are commonly used in dental practice.
1. Simple Loupes
Simple loupes consist of a pair of single, positive, side-by-side meniscus lenses. Each lens has two refracting surfaces, with one occurring as light enters the lens and the other when it leaves. They are cost-effective but have poor resolution and are subjected to spherical and chromatic aberrations causing image distortion.
2. Compound Loupes or Telescopic Loupes
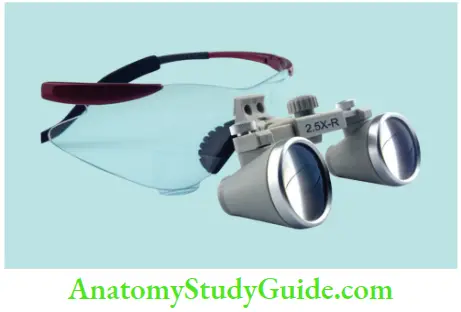
These are also called through the lens (TTL) which consists of multiple lenses with intervening air spaces which allow adjustment of magnification, working distance, and depth of field without increase in size or weight.
3. Prism Loupes

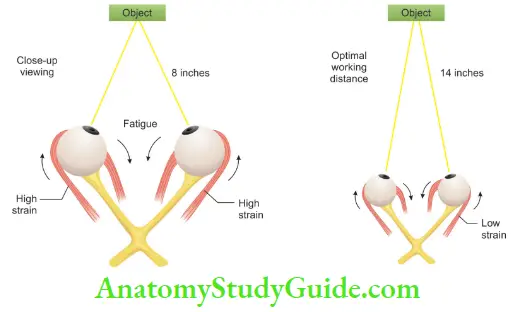
These are the most advanced loupes available which lengthen the light path through a series of mirror reflections within by virtually folding the light so that the barrel of the loupe can be shortened. They produce better magnification, larger fields of view, wider depths of field, and longer working distances. If compared, longer working distance produces less strain on eye muscles than close-up viewing.
Surgical Operating Microscope
The microscope consists of lenses that allow stereoscopic vision with a magnification of ×4–40 with excellent illumination of the working area. Since light beam falls parallel to the retina of the clinician, so convergence is not required causing minimum tiring of the muscles.
1. Classification of Dental Operating Microscope
- Based on use:
- Surgical microscope
- Examination microscope
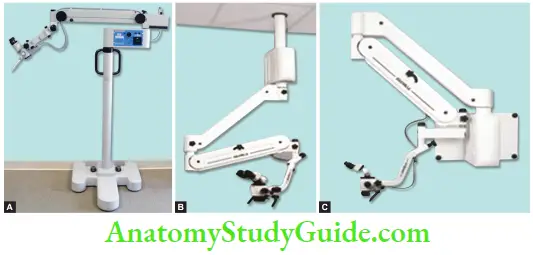
- Based on installation
- Floor mounted
- Ceiling mounted
- Wall mounted
- Based on magnification
-
- Lower magnifiation (2.5–8×)
- Midrange magnification (8–14×)
- Higher range magnification (14–30×).
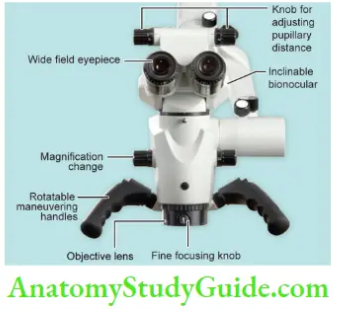
2. Parts of an Operating Microscope
The microscope consists of:
- Supporting structure
- Body of the microscope
- Source of light.
1. Supporting Structure
The supporting structure is to keep the microscope stable and easy to handle. It can be mounted on the floor, ceiling, or wall. The stability of the setup can be increased by decreasing the distance between the fixation point and the body of the microscope.
2. Body of the Microscope
It consists of lenses and prisms which produce magnification and stereopsis. The body is made of eyepieces, binoculars, magnification changer factor, and the objective lens- Eyepieces are usually available in powers of 10, 12.5, 16, and 20×. Binoculars hold the eyepieces and are available in different focal lengths. Longer is the focal length of binoculars, the better is the magnifiation with a smaller field of vision.
- Magnification changers are available as three or five-step manual changers providing the option of four different magnification levels.
- The objective lens determines the working distance between the microscope and the surgical field. The range of focal length is from 100 to 400 mm. Most of endodontists use a 200-mm lens which focuses at about 8 inches.
- All lenses of the microscope, like objective lenses, eyepiece lenses, magnification lenses, etc., have many layers of an antireflective coating on both surfaces, which absorb only a minimum amount of light so don’t decrease the illumination of the operative field.
3. How Does SOM Work?
It is discussed under four headings:
- Magnification
- Illumination
- Documentation
- Accessories.
- SOM Work Magnification is determined by:
- Power of eyepiece
- The focal length of binoculars
- The focal length of the objective lens
- Magnification change factor.
- Power of eyepiece: Eyepiece has diopter settings ranging from −5 to +5. These are used to adjust for accommodation, which is the ability to focus the lens of the eyes. An increase in the power of the eyepiece increases the magnification but decreases the field of view.
- The focal length of binoculars: Binoculars hold the eyepieces. The interpupillary distance is set by adjusting the distance between binocular tubes. An increase in focal length increases the magnification but decreases the field of view.
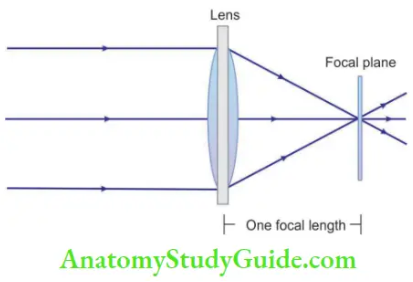
- Focal length of objective lens: Focal length of the objective lens determines the operating distance between the lens and the surgical field. If the objective lens is removed, the microscope focuses at infinity and performs as pair of field binoculars. For SOM, a variety of objective lenses is available with focal lengths ranging from 100 to 400 mm.
- Magnification changes: These are available as three- or firestop manual changers or power zoom-changers, located within the head of the microscope.
- SOM Work Illumination
The commonly used light source is a 100 W Xenon–halogen bulb. The intensity of light can be controlled by a rheostat. This light is reflected through the condensing lens to a series of prisms and then through an objective lens to the surgical field area. On reaching the surgical field, it is again reflected back through an objective lens through magnification changer lenses, through binoculars, and then exits to the eyes as two separate beams of light. This results in the stereoscope effect which allows the clinician to see the depth of the field. Illumination with an operating microscope is coaxial with line of sight. This means that light is focused between the eyepieces such that a dentist can look at the surgical site without seeing the shadow. - SOM Work Documentation
The ability to produce quality video slides is directly related to magnification and illumination systems. The adapter attaches video camera to the beam splitter. It also provides the necessary focal length so that camera records an image with same magnification and field of view as seen by the operator. - SOM Work Accessories
- Bicycle-style handles attached at the bottom of the head to facilitate movement during surgery
- Eyepiece with reticle field for alignment during videotaping and photography
- Observation ports for helping in teaching situations
- LCD screen so as to provide a view to the patient as well as to the assistant.
- SOM Work Magnification is determined by:
7. Positioning of Operating Microscope It consists of
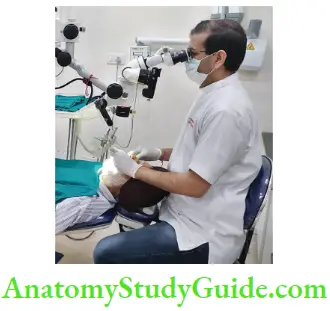
- Operator positioning: Most preferable position is an 11 or 12-clock position with hips perpendicular to the floor and knees perpendicular to the hips
- Tentative patient positioning: The patient is positioned in Trendelenburg position and the chair is raised until patient is in focus
- Focusing of the operating microscope: Move the microscope up and down till the working area comes into the focus
- Adjustment of interpupillary distance (IPD): Interpupillary distance is the key adjustment for using any magnification system. To understand your IPD, focus both the binocular eyepieces to initially see two images or circles and adjust it to the point, where they merge and become one circle. This point is identified as the IPD and used as a permanent reference for the use of magnifications
- Final positioning of the patient: Adjust the patient for optimal focusing. For maxillary teeth, the position should be horizontal, and for mandibular teeth, it should be Trendelenburg
- Fine focus adjustment: Adjust the focus for sharp magnification. The working area in focus to the operator should be in the same focus to the assistant for the video camera.
8. Fundamental Prerequisites for Optimal Use of Microscope
- Optimal Use of Microscope Vision
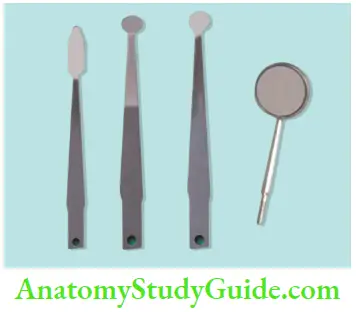
With a microscope, it is almost impossible to do endodontic treatment using direct vision. So, a front surface good quality mirror which is silvered on the surface of glass should be used for having the best quality undistorted reflected image. - Optimal Use of Microscope Lightening
Adequate lightening is also mandatory for using a microscope. An inbuilt lightening system is usually present in the microscope, but if necessary an auxiliary light can also be used. Ths can be placed perpendicular to long axis of the tooth at the level of the pulp chamber. - Optimal Use of Microscope Patient Compliance
Patient compliance is must for use of a microscope. Even a slight movement of the patient’s head can affect field of vision adversely. For optimal view through a microscope, a patient needs to have an extended neck. This can be achieved by providing a U-shaped inflatable pillow. - Optimal Use of Microscope Cooperation from Dental Assistance
A dental assistant can also be helpful in increasing the efficiency of clinicians. Use of a secondary eyepiece from a microscope provides a better view of root canals. A dental assistant should be given adequate training for use of a microscope. - Optimal Use of Microscope Rubber Dam Placement
Rubber dam placement is necessary because direct viewing with microscope is difficult. So if the mirror is used without using a rubber dam, due to the exhalation of patient, mirror would fog immediately. This would affect visualization. For absorbing bright reflected light and accentuating tooth structure, use of a blue or green rubber dam sheet is recommended. - Mouth Mirror Placement
Mouth mirror should be placed slightly away from the tooth. If it is placed close to tooth, it will make use of endodontic instruments difficult. - Indirect View and Patient Head Position
Mirror should be placed at 45° to the microscope. For indirect viewing, the patient’s head should be positioned such that it form 90° angle between the binocular and the maxillary arch. - Optimal Use of Microscope Instruments
Clinicians should possess microinstruments for locating canals, use of files called micro-openers, micromirrors, and other microinstruments is recommended.
8. Uses of SOM
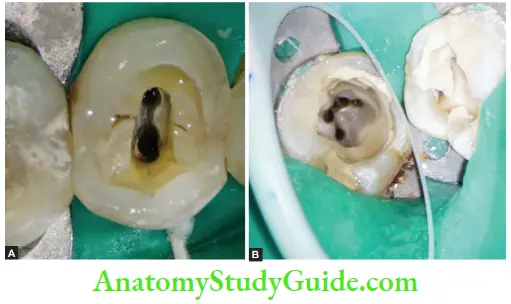
SOM is useful in all aspects of endodontic therapy from diagnosis to the evaluation of final obturation.
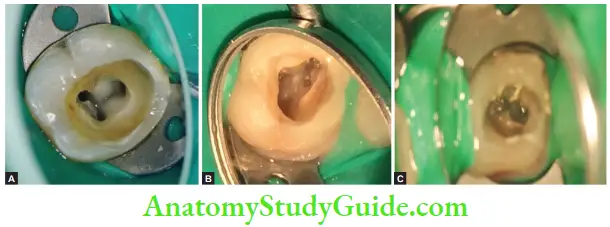
1. Dentinal map in mandibular fist molar;
2. MB2 canal in maxillary fist molar;
3. Fractured instrument in MB2.
- Diagnosis
- It allows calcified, irregularly positioned, or accessory canals to be found with ease and thereby increasing the success rate and decreasing stress
- SOM helps to detect microfractures that are not visible with the naked eye
- Missing canals (most common MB2 of the maxillary molar) can be successfully located by use of an endomicroscopy.
- Removal of foreign materials like the cast post and filing material can be made easy due to better vision
- Endodontic retreatment involving the removal of screw posts separated instruments, and silver points can be guided by use of endomicroscopy
- Perforation repair can be precisely done by use of SOM by the accurate placement of the repair material and by précised manipulation of the tissue
- Evaluation of the canal preparation can be accurately done by use of endomicroscopy
- SOM is also useful in the evaluation of the final obturation of root canals. With the help of SOM, one can assess the irregularly shaped and poorly obturated canals and the quality of the apical seal
- Intracanal isthmus communication and canal anatomy can be well assessed by use of endomicroscopy
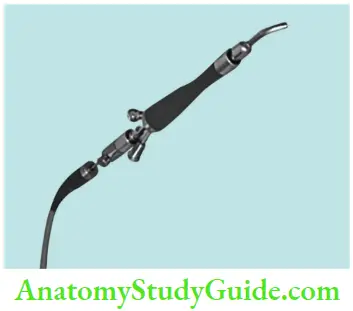
Endoscope
It was introduced in endodontics in 1979. The endoscope consists of glass rods, a camera, a light source, and a monitor. Endoscope offrs a better magnifiation than loupes or a microscope. It is mainly used during surgical endodontic treatment.
- Endoscope Advantage
Provides better view to the surgical site in the nonfixed field of vision. - Disadvantage of endoscope
Requires hemostasis of the operating field.
Orascope
Orascope is a fier optic endoscope. Since fiber optics are made up of plastics, they are small, flexible, and lightweight. It is mainly used for intracanal visualization. A horoscope consists of 10,000 parallel visual fiers. The quality of the image produced by orascope is directly related to number of fires.
- Orascope Advantage
Better imaging of the apical third of the canal. - Orascope Disadvantages
- Canal must be enlarged to number 90 fie in coronal 15 mm of canal
- The presence of sodium hypochlorite blurs the image.
Magnifiation Conclusion
- In endodontics, along with other advancements, microsurgical procedures coupled with microscopic magnification offer absolute clinical accuracy.
- The use of surgical microscopes has brought revolutionary transformation in the predictable success of endodontic procedures.
- In spite of their significant cost, learning new techniques with their use, and their peculiar appearance to patients, magnifying loupes and endomicroscopy assist endodontists in producing higher-quality dentistry.
- Working under magnification is useful, and clinicians should give strong consideration to adopting the concept.
Leave a Reply