The success of endodontic treatment is based on proper diagnosis, treatment planning, and biomechanical preparation followed by obturation. Obturate means to fill the shaped and disinfected canal with a temporary or permanent filling material.
Table of Contents
It can be achieved by using cement, pastes, plastics, or solids. Gutta-percha, in its various forms, has remained the material of choice for obturation.
Why To Obturate
Microorganisms and their byproducts are the major cause of pulpal and periapical diseases. However, it is difficult to consistently and totally disinfect root canal systems. Therefore, the goal of three-dimensional (3-D) obturation is to provide an impermeable fluid-tight seal within the entire root canal system, to prevent oral and apical microleakage.
Read And Learn More: Endodontics Notes
Objectives of obturation are:
- Elimination of coronal leakage of microorganisms or potential nutrients to support their growth in dead space of root canal system
- To confirm any residual microorganisms that have survived the chemomechanical cleaning and shaping, to prevent their proliferation and pathogenicity
- To prevent the percolation of periapical fluids into the root canal system and feeding microorganisms
History:
- 1757—Carious teeth were extracted, filed with gold/lead, and replanted again.
- 1847—Hill’s stopping was developed.
- 1867—CA Bowman claimed to be the first to use gutta-percha for root canal filling.
- 1883—Perry claimed that he had been using a pointed gold wire wrapped with some gutta-percha (roots of present-day core carrier technique).
- 1887— SS White Company began to manufacture GP points.
Timing Of Obturation
Patient Symptoms:
Sensitivity on percussion—indicates inflammation of periodontal ligament space, hence canal should not be obturated before the inflammation has subsided.
Pulp and Periradicular Status:
Vital Pulp Tissue:
In the case of vital pulp, obturation can be done in a single visit after complete cleaning and shaping
Necrotic Pulp Tissue:
- Single-visit endodontics can be done if the tooth is asymptomatic
- If a patient presents with sensitivity on percussion, it indicates inflammation of periodontal ligament space, hence canal should be obturated after the inflammation has subsided.
Purulent Exudates:
If obturation is done in the tooth with purulent exudate, pressure, and subsequent tissue destruction may occur rapidly. In such cases, calcium hydroxide should be placed as an intracanal medicament.
Negative Culture:
Dependence on negative culture has decreased now because studies have shown that false negative results can give an inaccurate assessments of microbial flra; also the positive results do not indicate the potential pathogenicity of bacteria.
Extent Of Root Canal Filling
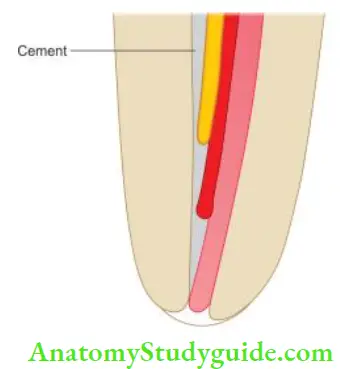
- The anatomic limit of pulp space is cementodentinal junction (CDJ) apically and pulp chamber coronally. Kuttler (1995) described CDJ as a minor apical diameter which ends 0.5 mm short of an apical foramen in young patients and 0.67 mm short in older patients.
- According to Cohen, the apical point of termination should be 1 mm from the radiographic apex. Radiographically, the root canal filling should have the appearance of a dense, 3-D filing up to cementodentinal junction.
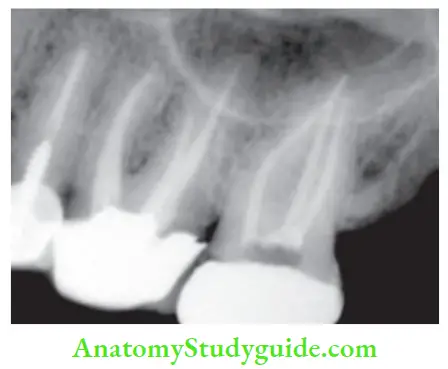
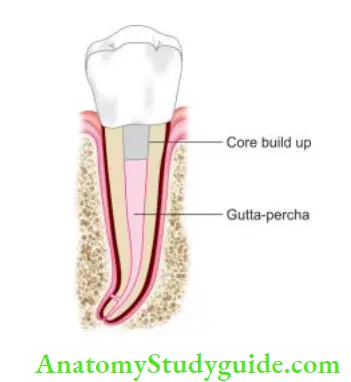
So ideal obturation should:
- Fill the entire root canal three-dimensionally as close to CDJ as possible
- Reflect a continuously tapered funnel same as external root morphology
- Radiographically appear as 3-D filing that extends close to CDJ
Overextended obturation is the vertical dimension of root filing beyond the apex.
Overfilling is total obturation of the root canal system with excess material extruding beyond the apical foramen.
Underfiling is the filing of root canal system >2 mm short of radiographic apex.
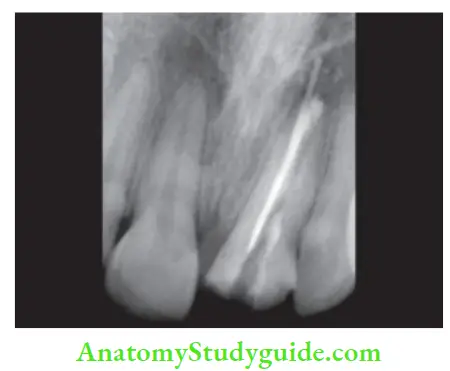
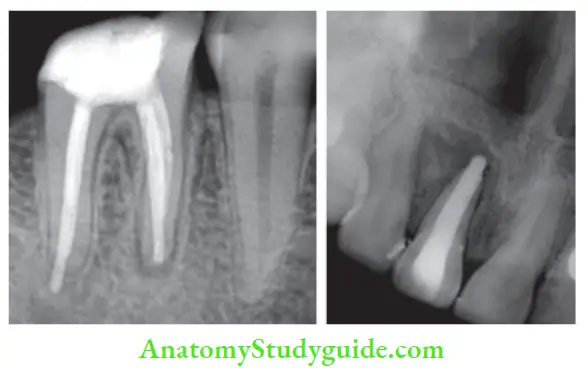
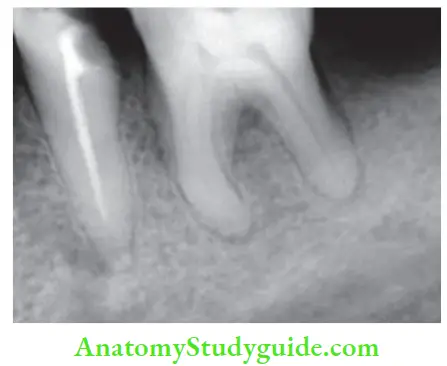
Evaluation of obturation:
Radiographically, an obturated tooth should show
- Three-dimensionally failed root canal
- Dense radiopaque filing of the root canal system
- Filling close to apical terminus without overextending periodically
But there can be difficulty in radiographic interpretation due to the radiopacity of the sealer, overlying bony anatomy, and 2-D view.
Materials Used For Obturation
An ideal root canal filling should be capable of completely preventing communication between the oral cavity and periapical tissue. Root canal sealers should be biocompatible or well tolerated by the tissues in their set state and are used in conjunction with the core filing material to establish an adequate seal.
Grossman (1982) grouped acceptable filing materials into plastics, solids, cement, and pastes. He gave the following 10 requirements for an ideal root canal filling material:
- Easily introduced into a root canal
- Seal the canal laterally as well as apically
- Not shrink after being inserted
- Impervious to moisture
- Bacteriostatic or at least do not encourage bacterial growth
- Radiopaque
- Nonstaining the tooth structure
- Nonirritating
- Sterile/easily sterilized immediately before obturation
- Easily removed from the root canal if necessary
Materials used for root canal obturation are:
- Silver cones
- Gutta-percha
- Custom cones
- Resilon
- Root canal sealers
Silver Cones:
- Jasper (1941) introduced silver cones with the same success rate as gutta-percha and easier to use
- The rigidity provided by the silver cones made them easy to place and permitted length control
- Due to the stiffness of silver cones, these were mainly used for teeth with fie, tortuous, and curved canals like canals of maxillary first premolars, mesial canals of mandibular molars
- Since silver cones lack plasticity, these are not used in oval canals like single canal premolars and teeth with oval canals in young persons
- But nowadays their use has declined, due to corrosion caused by them. The presence of traces of copper, nickel, etc. in silver points adds up the corrosion
Gutta-Percha:
Gutta-percha is derived from two words:
- “GETAH”—meaning gum
- “PERTJA”—the name of the tree in the Malay language
Gutta-percha was initially used as a restorative material and later developed into an indispensable endodontic filling material.
Being biologically inert, resilient, and electric insulator, it was used for various purposes such as coating the transatlantic telegraph cable, cores of golf balls, handles of knives, splints for holding fractured joints, to control hemorrhage in extracted sockets, in various skin diseases such as psoriasis and eczema.
Historical background:
- 1843—Sir Jose d’Almeida first introduced gutta-percha to the Royal Society of England.
- In Dentistry—Edwin Truman introduced gutta-percha as temporary filing material.
- 1847—Hill introduced Hill’s stopping (a mixture of bleached gutta-percha and carbonate of lime and quartz).
- 1867—Bowman first used gutta-percha as root canal filling material.
- 1883—Perry packed gold wire wrapped with gutta-percha in root canals.
- 1887—SS White Company started the commercial manufacture of gutta-percha points.
- 1893—Rollins used gutta-percha with pure oxide of mercury in root canals.
- 1914—Callahan softened the gutta-percha by using rosins and then used it for obturation of the root canals.
- 1959—Ingle and Levine proposed standardization of root canal instruments and filing materials.
- 1976—A group evolved into present-day ISO for approval of the specification of root canal instruments and filing materials. ADA specification for gutta-percha points is no. 78
Sources:
Gutta-percha is a rigid natural latex produced from the sap of trees of the genus Palaquium. These trees are found in Southeast Asia, especially in Malaysia and Indonesia. In India, these are found in Assam and Western Ghats.
Chemistry:
It is an isomer of natural rubber and the natural chemical form of gutta-percha is trans-1,4-polyisoprene. Th cis-form belongs to the latex elastomer.
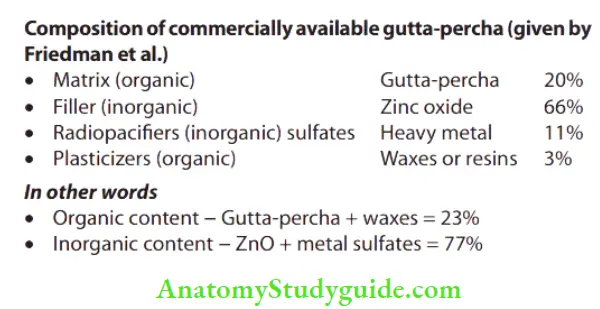
Phases of gutta-percha:
Chemically pure gutta-percha exists in two different crystalline forms, that is, α and β, which differ in molecular repeat distance and single bond form. Natural gutta-percha coming directly from the tree is in α-form while the most commercially available product is in β-form. These phases are interconvertible.
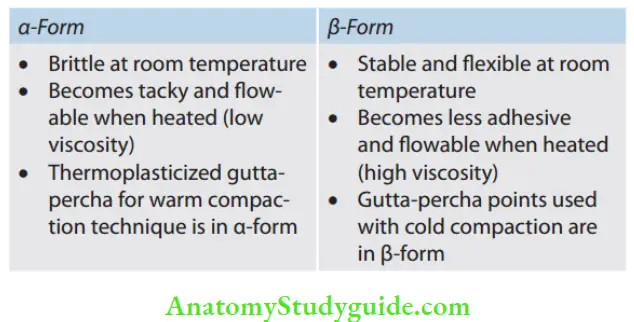
Properties of Gutta-percha:
- Biocompatibility: It is inert, highly biocompatible
- Ductility: Depending on phase existence, it is a ductile material
- Melting point: It is 60°C
- Dimensional stability: Expansion and shrinkage occurs due to heating and cooling, otherwise it is a dimensionally stable material
- Ease of handling: It can be used both in α- and β-form for obturation depending upon handling features
Clinical Considerations:
- On heating, gutta-percha expands which accounts for its increased volume which can be compacted into the root canal
- Gutta-percha shrinks as it returns to normal temperature. So, vertical pressure should be applied in all warm guttapercha techniques to compensate for volume change when cooling occurs (Schilder et al.)
- The aging of gutta-percha causes brittleness because of the oxidation process. Storage under artificial light also speeds up their deterioration. Brittle guttapercha can be rejuvenated by a technique described by Sorien and Oliet. In this, gutta-percha is immersed in hot water (55°C) for 1 or 2 s and then immediately immersed in cold water for a few seconds
- Gutta-percha cannot be heat sterilized. For disinfection of gutta-percha points, they should be immersed in 5.25% NaOCl for 1 min
- After this, gutta-percha should be rinsed in hydrogen peroxide or ethyl alcohol to remove crystallized NaOCl before obturation, as these crystallized particles impair the obturation
- Gutta-percha should always be used with sealer and cement to seal root canal space as gutta-percha lacks adhering qualities
- Gutta-percha is soluble in certain solvents like chloroform, eucalyptus oil, etc. This property can be used to plasticize gutta-percha by treating it with solvent for better filing in the canal. But it has shown that gutta-percha shrinks (1–2%) when solidified
- Gutta-percha also shows some tissue irritation which is due to the high content of zinc oxide
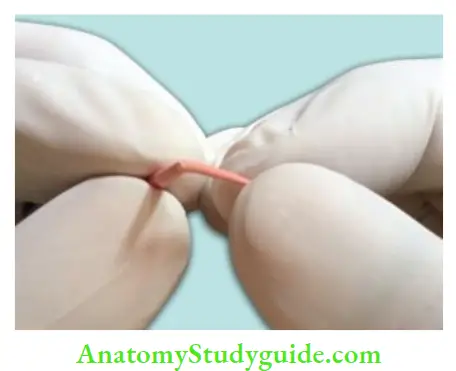
Current Available Forms of Gutta-percha:
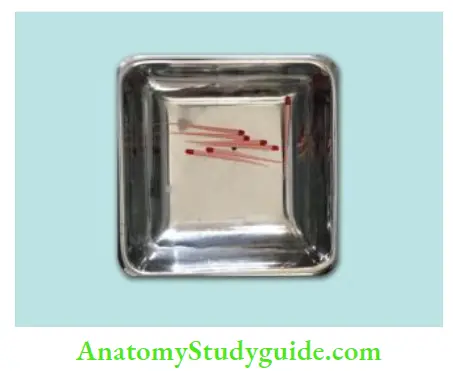
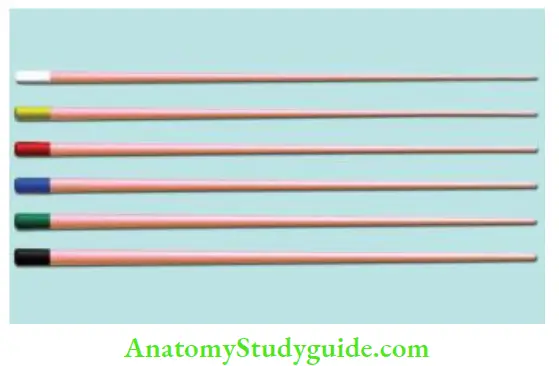
- Gutta-percha points: Standard cones are of the same size and shape as that of ISO endodontic instruments
- Auxiliary points: Non-standardized cones; perceive the form of root canal
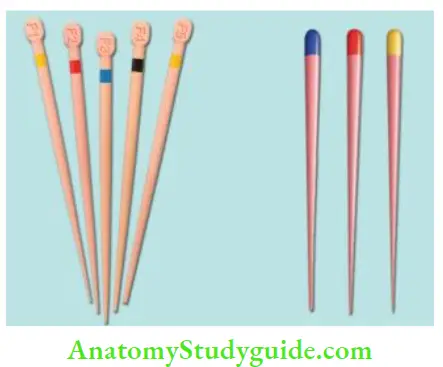
- Greater taper gutta-percha points: Available in 4%, 6%, 8%, and 10% taper
- Gutta-percha pellets/bars: They are used in thermoplasticized gutta-percha obturation, for example, obtura system
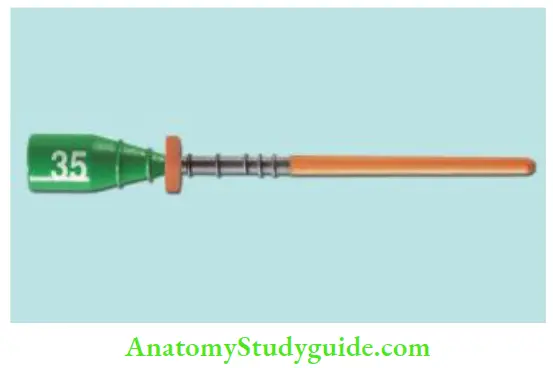
- Precoated core carrier gutta-percha: In these stainless steel, titanium or plastic carriers are precoated with α-phase gutta-percha for use in the canal, for example, thermal
- Syringe systems: They use low viscosity gutta-percha, for example, α-seal
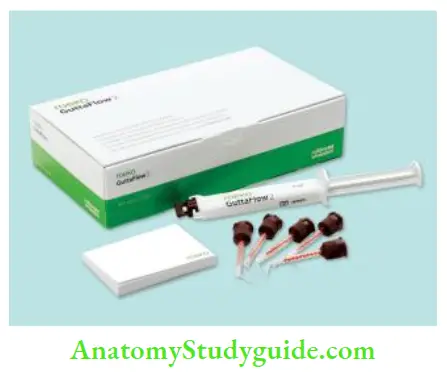
- Gutta flow: In this gutta-percha, the powder is incorporated into the resin-based sealer
- Gutta-percha sealers like chloropercha and eucopercha: In these, gutta-percha is dissolved in chloroform/ eucalyptol to be used in the canal
- Medicated gutta-percha: Calcium hydroxide, iodoform, or chlorhexidine diacetate containing gutta-percha points
Advantages of gutta-percha:
- Compatibility: Adaptation to canal walls
- Inertness: Makes it nonreactive material
- Dimensionally stable
- Tissue tolerance
- Radiopacity: Easily recognizable on the radiograph
- Plasticity: Becomes plastic when heated
- Dissolve in some solvents like chloroform, eucalyptus oil, etc. This property makes it more versatile as canal filling material
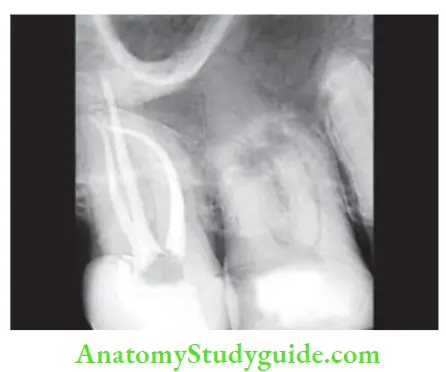
Disadvantages of gutta-percha:
- Lack of rigidity: Bending of gutta-percha is seen when lateral pressure is applied. So, difficult to use in smaller canals
- Easily displaced by pressure
- Lacks adhesive quality
Medicated Gutta-percha:
Calcium hydroxide containing gutta-percha: These are available in ISO size of 15–140 and are made by combining 58% of calcium hydroxide in a matrix of 42% gutta-percha. The action of calcium hydroxide is activated by moisture in the canal
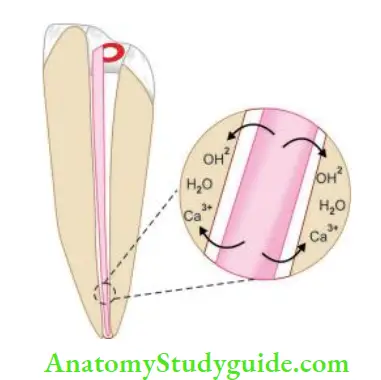
Advantages of calcium hydroxide points:
- Ease of insertion and removal
- Minimal or no residue left
- Firm for easy insertion
calcium hydroxide points Disadvantages:
- Short-lived action
- Radiolucent
- Lack of sustained release
- Calcium hydroxide plus points
- Along with calcium hydroxide and gutta-percha, they contain tenside which reduces the surface tension
- Due to the presence of water-soluble components, such as tenside and sodium chloride, they are three times more reactive than calcium hydroxide points
- They have superior pH and increase the wettability of canal surface with increased antibacterial property
- They have sustained alkaline pH for one week
- Iodoform containing gutta-percha:
- Iodoform containing gutta-percha remains inert till it comes in to contact with the tissue fluids
- On coming in to contact with tissue fluids, free iodine is released, which is antibacterial in nature
- Chlorhexidine diacetate containing gutta-percha:
- In this, the gutta-percha matrix is embedded in 5% chlorhexidine diacetate
- Ths material is used as an intracanal medicament
Resilon:
- A resin-based obturation system was introduced as an alternative to gutta-percha. It consists of a resin core material (Resilon) composed of polyester, difunctional methacrylate, bioactive glass, and radiopaque filers, and a resin sealer. The core material is available in conventional and standardized cones and pellets
- Resilon core bonds to resin sealer, which attaches to the etched root surface forming a “monoblock.” This results in a gutta-percha–sealer interface and a tooth–sealer interface. This bonding provides a better coronal seal and may strengthen the root Resilon is discussed in detail on page no. 290.

Custom Cones:
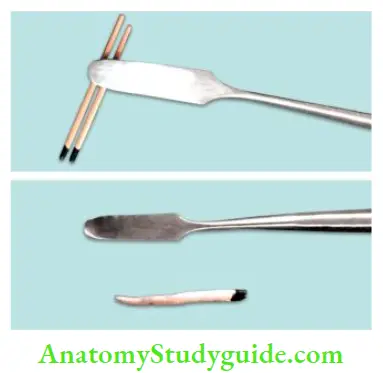
- When the apical foramen is open or the canal is large, a custom cone is made which allows adaptation of the cone to canal walls and improves the seal
- The technique involves the customization of gutta-percha cones according to the canal shape by:
- Softening it in chloroform, eucalyptol, or halothane for 1–2 seconds
- Heating several large gutta-percha cones and rolling the mass between two glass slabs until an appropriate size is obtained
- The softened cone is then placed into the canal and gently packed to the length. This process is repeated until an adequate impression of the canal is obtained at the prepared length
Root Canal Sealers:
The purpose of sealing root canals is to prevent periapical exudates from diffusing into the unfiled part of the canal, to avoid re-entry and colonization of bacteria, and to check residual bacteria from reaching the periapical tissues.
Therefore to accomplish a fluid tight seal, a root canal sealer is needed. Though sealer is used only as adjunct material in obturation, it affects the prognosis of endodontic treatment. An adequate combination of sealing ability and biocompatibility of root canal sealer is important for a favorable prognosis of root canal treatment.
Requirements of an Ideal Root Canal Sealer:
According to Grossman, a root canal sealer should be
- Tacky when mixed so as to provide good adhesion between it and the canal wall
- Able to create a hermetic seal
- Radiopaque so as to be visible on a radiograph. According to ANSI/ADA specification number 57, all endodontic sealers should be at least 2 mm Al more radiopaque than dentin or bone
- Of very fine powder particles for the optimal mix
- Not shrink upon setting
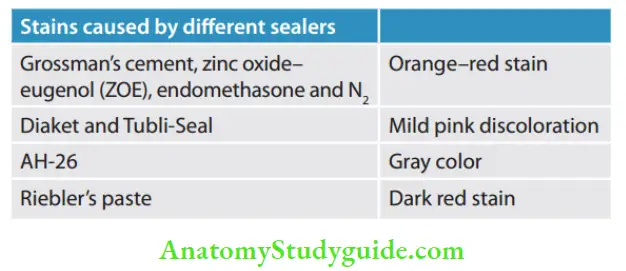
- Nonstaining to tooth structure
- Bacteriostatic or at least do not encourage bacterial growth
- Set slowly because long working time allows placement and adjustment of root filing if necessary
- Insoluble in tissue fluids
- Nonirritating to periarticular tissue
- Soluble in a common solvent so that it can be removed from the root canal if required
The following were added to Grossman’s basic requirements:
- It should not provoke an immune response in periarticular tissue
- It should be neither mutagenic nor carcinogenic
Functions of Root Canal Sealers:
- Antimicrobial agent: Sealers show an antibacterial effect which is excreted immediately after their placement
- Fill in the discrepancies between the obturating material and dentin walls
- Binding agent: Acts as a binding agent between obturating material and dentin walls
- As lubricant: When used with semisolid materials, sealer acts as a lubricant
- Radiopacity: Due to radiopacity, sealer can be seen on radiograph and thus can show the presence of auxiliary canals, resorptive areas, root fractures, and shape of the apical foramen
- Certain techniques dictate the use of a particular sealer: For example, chloropercha technique uses material as a sealer as well as a solvent for the master cone. It allows the shape of normal gutta-percha cone to be altered according to the shape of the prepared canal
Classification:
Classification of sealers According to their Composition
- Eugenol
- Silver containing cement:
- Kerr sealer (Rickert, 1931)
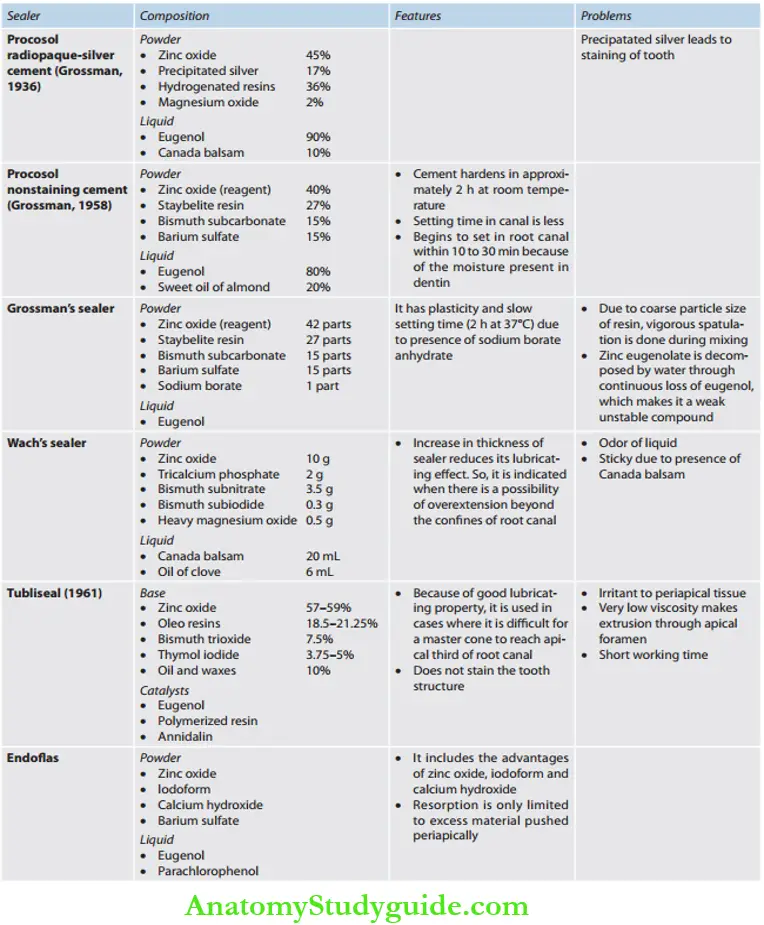
- Procosol radiopaque silver cement (Grossman, 1936)
- Silver-free cements:
- Procosol nonstaining cement (Grossman, 1958)
- Grossman’s sealer (Grossman, 1974)
- Tubliseal (Kerr, 1961)
- Wach’s paste (Wach)
- Noneugenol
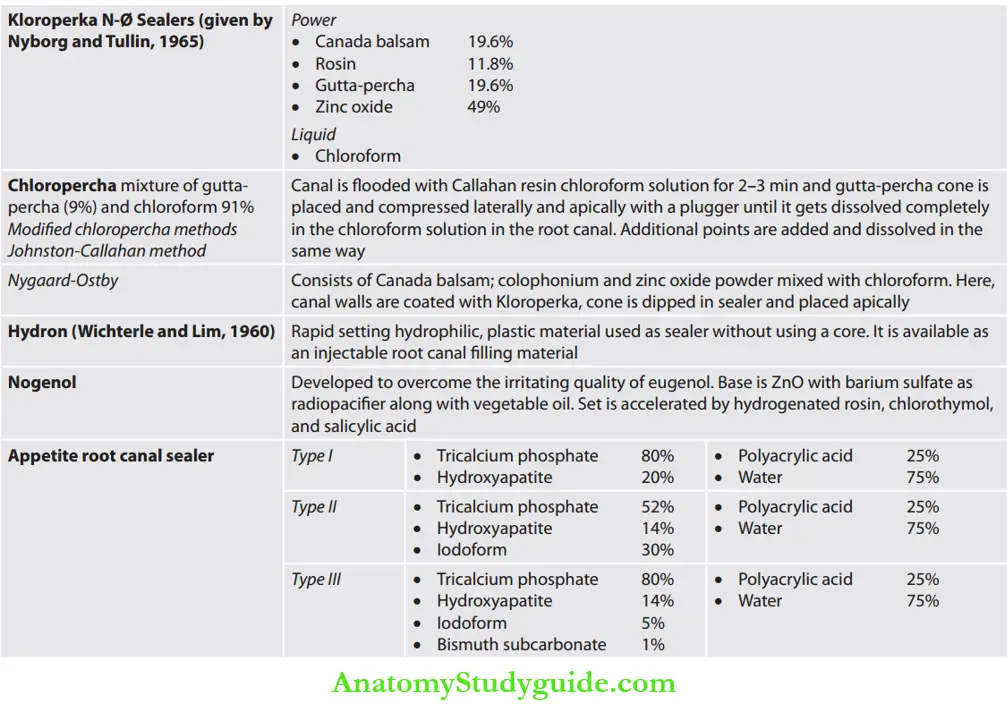
- Diaket
- AH-26
- Chloropercha and eucapercha
- Nogenol
- Hydron
- Endofi
- Glass ionomer
- Polycarboxylate
- Calcium phosphate cement
- Medicated: These sealers have therapeutic properties and are normally used without core materials
- Diaket-A
- N2
- Endomethasone
- SPAD
- Iodoform paste
- Riebler’s paste
- Mynol cement
- Ca(OH)2 paste
Classifiation According to Grossman:
- Zinc oxide resin cement
- Calcium hydroxide cement
- Paraformaldehyde cement
- Pastes
According to Cohen:
ADA specification no. 57 classifies endodontic filling materials as follows:
- Type 1: Material intended to be used with core material Subtypes:
- Class 1: Includes materials in the form of powder and liquid that sets through a nonpolymerizing process
- Class 2: Includes material in the form of two pastes that sets through a nonpolymerizing process
- Class 3: Includes polymers and resin systems that set through polymerization
- Type 2: Material intended to be used with or without core material or sealer
- Class 1: Powder and liquid nonpolymerizing
- Class 2: Paste and paste nonpolymerizing
- Class 3: Metal amalgams
- Class 4: Polymer and resin systems—polymerization
According to Ingle:
- Cement
- Pastes
- Plastics
According to Harty FJ:
- ZOE-based
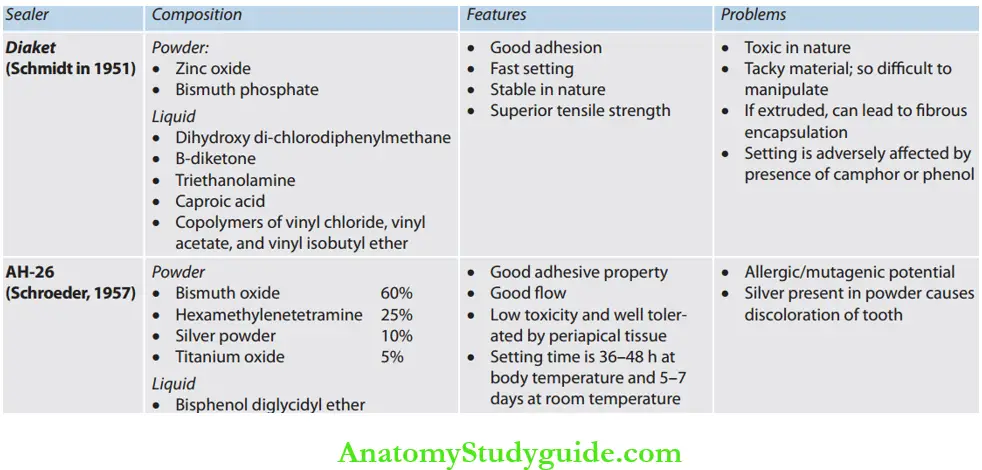
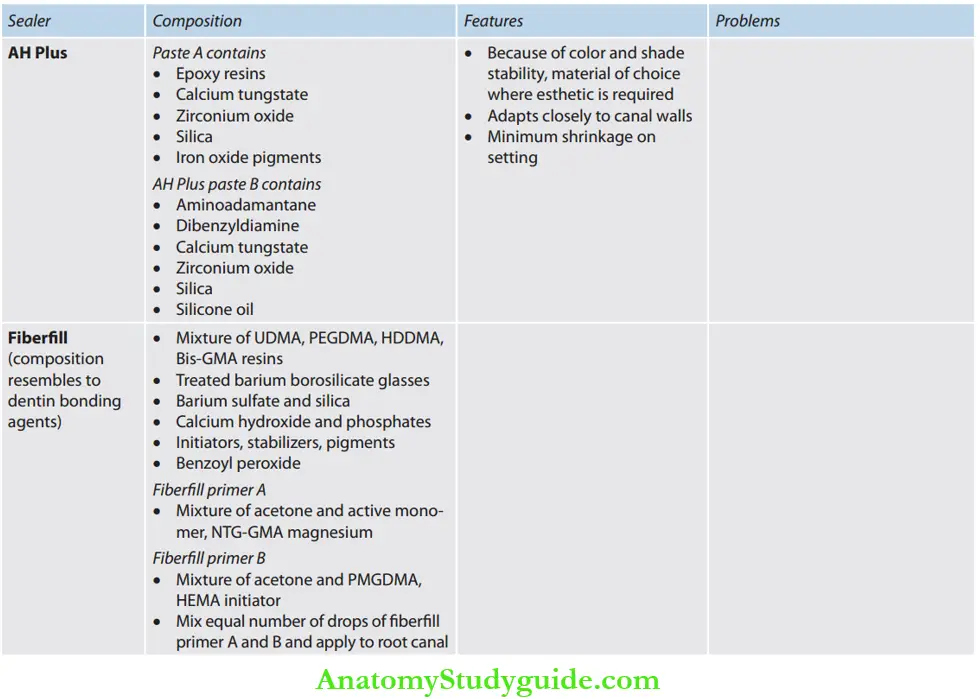
- Resin-based: Consists of an epoxy resin base which sets upon mixing with an activator. For example, AH-26, Diaket, hydron
- Gutta-percha-based cement consists of solutions of gutta-percha in organic solvents, for example, , Superga
- Dentin adhesive materials, like cyanoacrylate cement, glass ionomer cement, polycarboxylate cement, calcium phosphate, composite materials
- Materials to which medicaments have been added; these are divided into two groups:
-
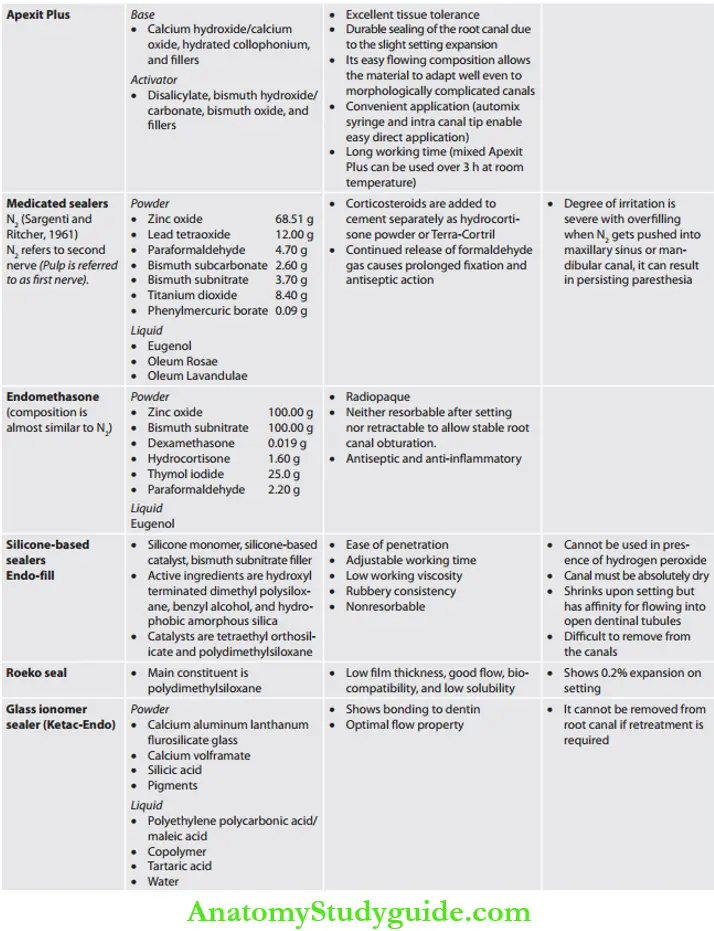
- In which strong disinfectants are added to decrease possible postoperative pain, like paraformaldehyde and corticosteroid preparation
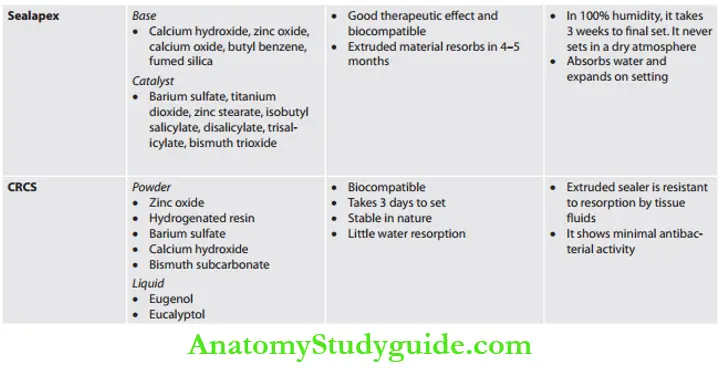
- Those in which calcium hydroxide is to induce cementogenesis and dentinogenesis at the foramen, thus creating a permanent biological seal. For example, antibiotic root canal sealer (CRCS), sealapex, and biocalex.
Zinc Oxide Eugenol (ZOE) Sealers:
Chisolm in 1873 introduced zinc oxide and oil of clove cement in dentistry.
Setting reaction:
It sets because of a combination of physical and chemical reactions, yielding a hardened mass of zinc oxide embedded in a matrix of long sheath-like crystals of zinc eugenol. The hardening of the mixture is due to the formation of zinc eugenol.
The presence of free eugenol tends to weaken the set and shows cytotoxicity. Practically, all ZOE sealer cement are cytotoxic and invoke an inflammatory response in connective tissue.

Root Canal Sealers without Eugenol:
Resin-Based Sealers:
Calcium Hydroxide Sealers:
Resilon:
Resilon (Epiphany, Pentron Clinical Technologies; Wallingford, CT; RealSeal, SybronEndo; Orange, CA) is developed to overcome the problems associated with guttapercha, viz
- Shrinkage of gutta-percha on cooling
- Gutta-percha does not bind physically to the sealer, it results in gap formation between the sealer and the gutta-percha
Resilon core shrinks only 0.5% and bonds to sealer by polymerization, so no gaps are seen. It is biocompatible, noncytotoxic, and nonmutagenic. The excellent sealing ability of resin system is attributed to the “monoblock”
which is formed by the adhesion of the resin cone to the epiphany sealer, which adheres and penetrates into the dentin walls of the root canal system.
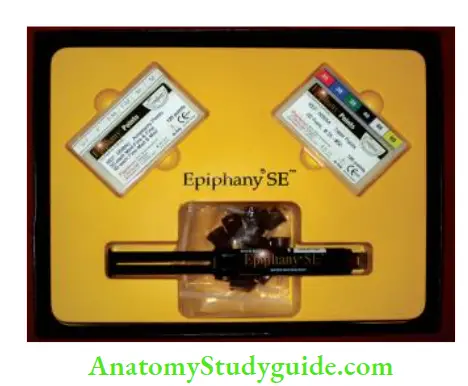
Components of Resilon System:
1. Primer:
It is a self-etch primer, which contains a sulfonic acid terminated functional monomer, HEMA, water, and a polymerization initiator
2. Resilon sealer:
It is a dual-cure, resin-based sealer. The resin matrix contains Bis-GMA, ethoxylated Bis-GMA, UDMA, and hydrophilic difunctional methacrylates. It contains filers of calcium hydroxide, barium sulfate, barium glass, bismuth oxychloride, and silica. Total fiber content is 70% by weight
3. Resilon core material:
It is a thermoplastic synthetic polymer-based (polyester) core material which contains bioactive glass, bismuth oxychloride, and barium sulfate. Filler content is 65% by weight
Method of Use:
1. Smear layer removal:
Sodium hypochlorite should not be the last irrigant to be used due to compatibility issues with resins. Use 17% EDTA or 2% chlorhexidine as a fial rinse
2. Placement of primer:
After drying the canal using paper points, primer is applied up to the apex. Use dry paper points to wick out the excess primer from the canal. Primer is very important because it creates a collagen matrix that increases the surface area for bonding. Low-viscosity primer also draws the sealer into the dentinal tubules
3. Placement of sealer:
The sealer can be placed into a canal using a lentil spiral or by coating the master cone
4. Obturation:
Obturate the canals by lateral or warm vertical compaction
5. Curing:
Resilon is cured with a halogen curing light for 40 s
6. Coronal restoration:
A coronal restoration is done to seal the access cavity
Advantages of epiphany:
- Biocompatible
- Good coronal seal; so less microleakage
- Nontoxic
- Nonmutagenic
- Forms monoblock
- Increases resistance to fracture in treated teeth
The disadvantage of epiphany:
- Does not retain its softness after heating
Monoblock Concept:
The literal meaning of monoblock is a single unit. The Monoblock concept means the creation of a solid, bonded, continuous material from one dentin wall of the canal to the other. The Monoblock phenomenon strengthens the root by approximately 20%.
Classifiation of the monoblock concept based on the number of interfaces present between the core filling material and bonding substrate:
Primary: In this, obturation is completely done with the core material, for example, use of Hydron, MTA, and BioGutta as en masse materials.
Secondary: They has two circumferential interfaces, one between the sealer and the primed dentin and the other between the sealer and core material. For example, a resin-based system.
Tertiary: In this, the conventional gutta-percha surface is coated with resin which bonds with the sealer, which further bonds to canal walls. So, there are three circumferential interfaces
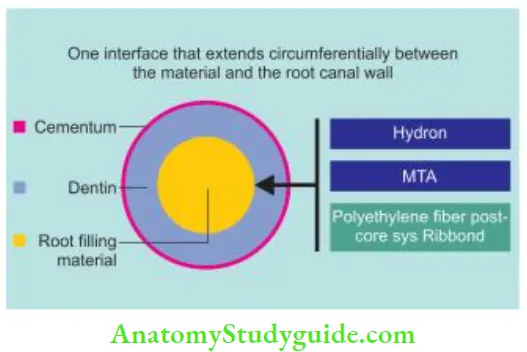
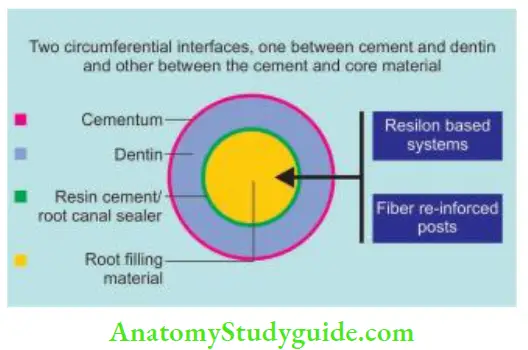
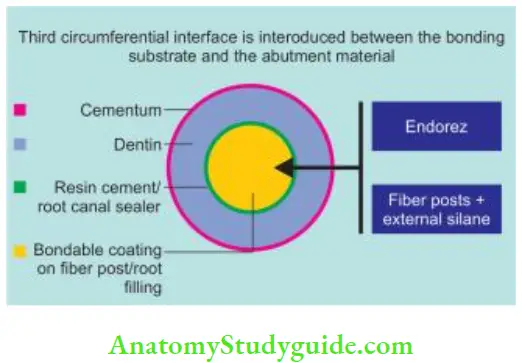
- Between the sealer and primed dentin
- Between the sealer and coating which has been applied over gutta-percha to make them bondable to the root surface
- Between the coating and the core material, For example, EndoRez and Activ GP system.
Two prerequisites for a monoblock to function as a mechanically homogenous unit:
- The material should be able to bond strongly and mutually to each other and the substrate used for monoblock
- Monoblock material should have the same modulus of elasticity as that of the substrate (dentin/restoration)
Methods Of Sealer Placement
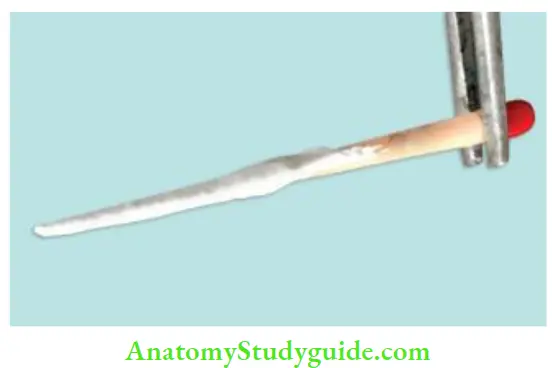
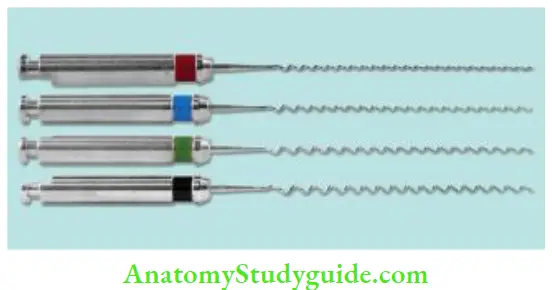
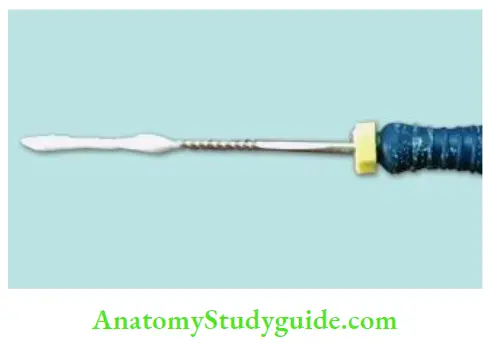
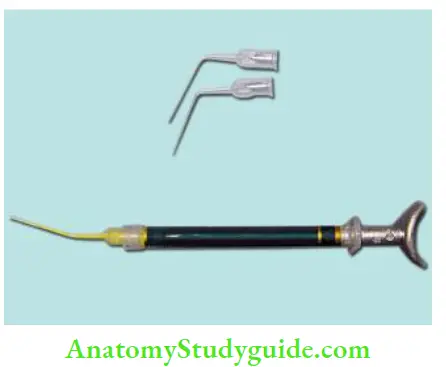
- Coating the master cone and placing the sealer in the canal with a pumping action.
- Placing the sealer in the canal with a lentil spiral
- Placing the sealer on the master apical fie and turning the fie counterclockwise
- Injecting the sealer with special syringes
- Sealer placement techniques vary with the status of the apical foramen
- If the apex is open, only apical one-third of the master cone is coated with sealer to prevent its extrusion into periapical tissues
- If the apex is closed, any of the above techniques can be used
Obturation Techniques
The material of choice for obturation is gutta-percha in conjunction with sealer. Obturation methods vary by direction of compaction (lateral/vertical) and/or temperature of gutta-percha used either cold or warm (plasticized).
There are two basic procedures:
- Lateral compaction of cold gutta-percha
- Vertical compaction of warm gutta-percha
Other methods are the variations of the warmed guttapercha technique.
Armamentarium For Obturation
- Primary and accessory gutta-percha points
- Spreaders and pluggers for compaction of guttapercha
- Absorbent paper points for drying the prepared root canal before applying sealer
- Lentulo spirals for placing sealer
- Scissors or GP cutter for cutting gutta-percha
- Endo gauge for measuring the size of gutta-percha
- Endo block for measuring gutta-percha points
- Endo organizer for arranging gutta-percha and accessory points of various sizes
- A heating devices like spirit lamps or butane gas torch
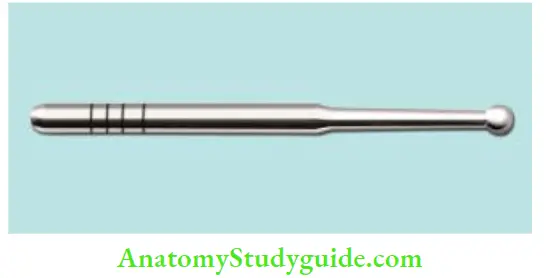
- Heating instruments like ball burnisher, spoon excavator, etc.
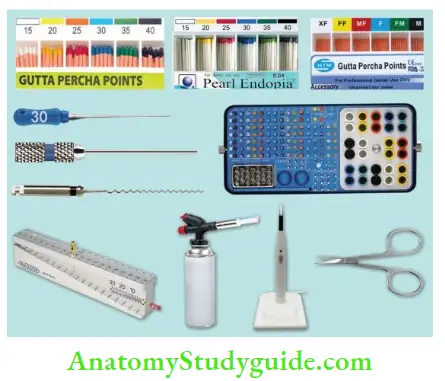
- (A) Primary gutta-percha points;
- (B) Absorbent paper points;
- (C) Accessory guttapercha points;
- (D) Spreader, plugger, and Lentulo spiral;
- (E) Endo organizer for keeping files and gutta-percha;
- (F) Endo gauge for measuring the size of gutta-percha;
- (G) Butane gas torch;
- (H) Gutta-percha cutter;
- (I) Scissor.
Root canal obturation with gutta-percha as a filling material can be mainly divided into the following groups:
- Use of cold gutta-percha
- Lateral compaction technique
- Use of chemically softened gutta-percha
- Chloroform
- Halothane
- Eucalyptol
- Use of heat-softened gutta-percha
- Vertical compaction technique
- System B continuous wave condensation technique
- Lateral/vertical compaction
- Sectional compaction technique
- McSpadden compaction of gutta-percha
- Thermoplasticized gutta-percha technique including
- Obtura II
- Ultrasonic plasticizing
- Ultrafi system
- Solid core obturation technique including
- Thermafi system
- Silver point obturation
Lateral Compaction Technique
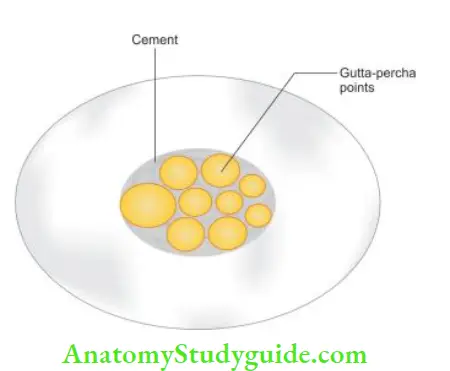
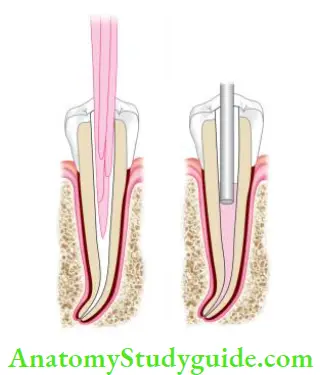
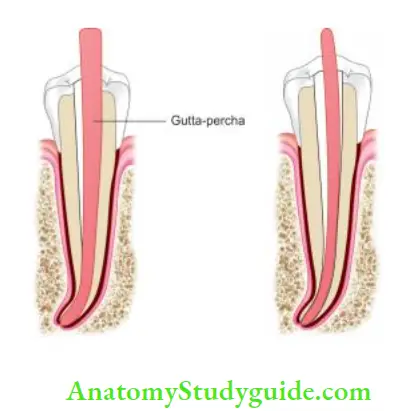
It is one of the most common methods used for root canal obturation. It involves the placement of tapered gutta-percha cones in the canal and then compacting them under pressure against the canal walls using a spreader. A canal should have a continuous tapered shape with a definite apical stop before it is ready to be filed by this method.
Technique:
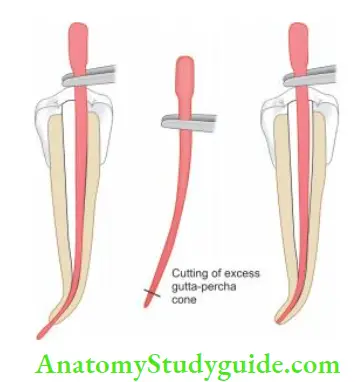
- Following the canal preparation, select the master gutta-percha cone whose diameter is the same as that of the master apical file. One should feel the tug back with master gutta-percha point. Master gutta-percha point is notched at the working distance analogous to the level of incisal or occlusal edge reference point
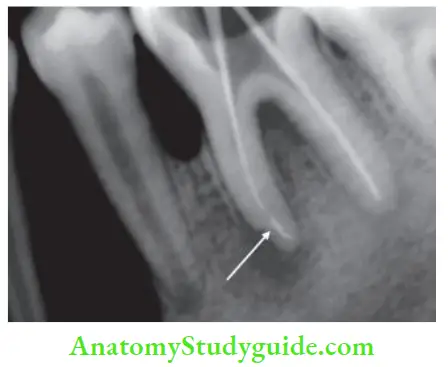
- Check the fi of the cone radiographically. If found satisfactory, remove the cone from the canal and place it in sodium hypochlorite:
- If the cone is short of the working length, check for dentin chip debris, any ledge, or curve in the canal and treat them accordingly
- If the cone selected is going beyond the foramen, either select the larger number cone or cut that cone to the working length
- If the cone shows an “s” shaped appearance in the radiograph, it means the cone is too small for the canal. In that case, a larger cone should be selected to fi in the canal
- Select the size of spreader to be used for lateral compaction of that tooth. It should reach 1–2 mm of true working length without binding in the canal should occur, there is a chance for tooth fracture with excessive pressures
- Dry the canal with paper points and apply sealer in the canal. Place the master gutta-percha cone in the canal
- Coat the premeasured cone with sealer and place it into the canal. After master cone placement, place the spreader into the canal alongside the cone. Spreader helps in the compaction of gutta-percha. It acts as a wedge to squeeze the gutta-percha laterally under vertical pressure not by pushing it sideways. It should reach 1–2 mm of the prepared root length
- Remove the spreader by rotating it back and forth. This compacts the gutta-percha and creates a space for accessory cones lateral to the master cone
- Place the accessory cone in this space and repeat the above procedure until the spreader no longer penetrates beyond the cervical line
- Now sever the protruding gutta-percha points at the canal orifice with a hot instrument
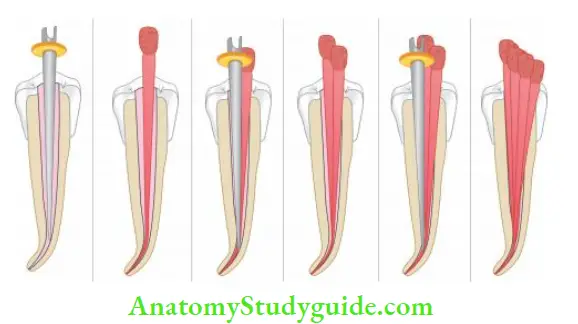
- (A) Check the fi of the spreader;
- (B) place the master gutta-percha cone in sealer coated canal;
- (C) place the spreader
alongside the master cone to compact the cone; - (D and E) Add accessory cones in the prepared space and repeat step C to create space for more accessory cones;
- (F) Place the accessory cone in this space and repeat the above procedure until the spreader no longer penetrates beyond the cervical line.
Lateral Compaction Technique Advantages:
- Can be used in most clinical situations
- Positive dimensional stability of root filling
- During compaction of gutta-percha, it provides length control, thus decreasing the chances of overfilling
Lateral Compaction Technique Disadvantages:
- Presence of voids
- Increased sealer: GP ratio
- Does not produce homogenous mass
- Space may exist between accessory and master cones
- Time-consuming
- Less able to seal lateral canals and intracanal defects
Variation in Lateral Compaction Technique:
Use of Vibration, Heat, and Ultrasonics
An alternative to cold lateral compaction is ultrasonics, a combination of vibration and heat. Lateral compaction done with alternating heat after placing the accessory gutta-percha cone can result in better compaction.
Gutta-percha is soluble in several solvents, namely, chloroform, eucalyptol, and xylol. This property of gutta-percha is used to adapt it in various canal shapes which are amenable to be filed by lateral compaction of the gutta-percha technique.
Indications:
- In teeth with blunderbuss canals and open apices.
- The root ends with resorptive defects
- In teeth with internal resorption
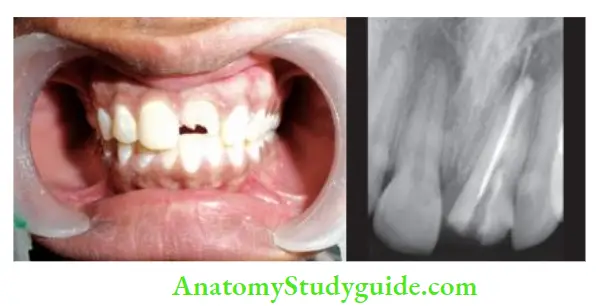
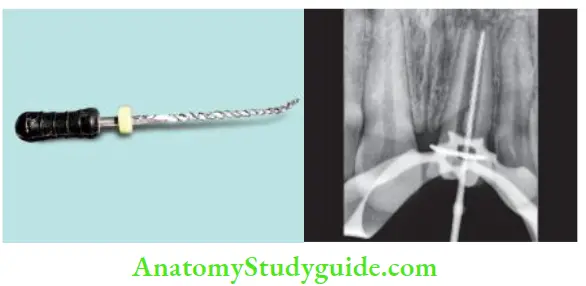
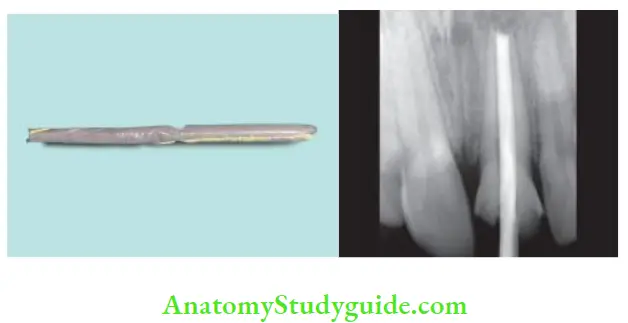
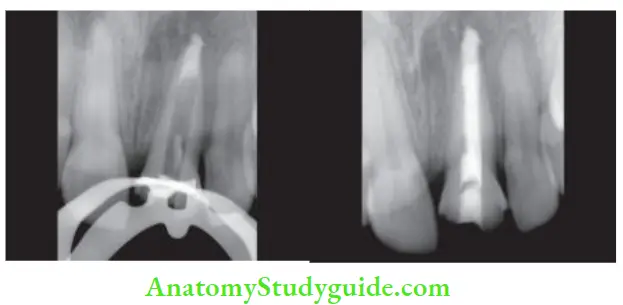
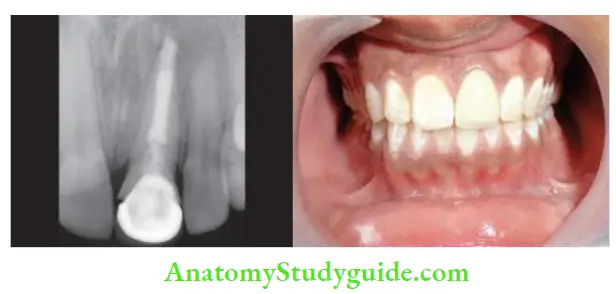
Technique:
- A root canal is cleaned and shaped properly
- The cone is held with a locking tweezer which has been adjusted to the working length
- Apical 2–3 mm of the cone is dipped into a solvent for 3–5 s
- The softened cone is inserted in the canal with slight apical pressure until the beaks of the locking tweezer touch the reference point
- Here care is taken to keep the canal moistened by irrigation, otherwise, some of the softened gutta-percha may stick to the desired canal walls, though this detached segment can be easily removed by using H-file
- Radiograph is taken to verify the fit and correct working length of the cone. When found satisfactory, the cone is removed from the canal, and the canal is irrigated with sterile water or 99% isopropyl alcohol to remove the residual solvent
- After this canal is coated with sealer. The cone is dipped again for 2–3 s in the solvent and thereafter inserted into the canal with continuous apical pressure until the plier touches the reference point
- A finger spreader is then placed in the canal to compact the gutta-percha laterally
- Accessory gutta-percha cones are then placed in the space created by the spreader
- Protruding gutta-percha points are cut at the canal orifice with hot instrument
Though this method is considered good for adapting gutta-percha to the canal walls, chloroform dip fillings have been shown to produce volume shrinkage which may lead to poor apical seals.
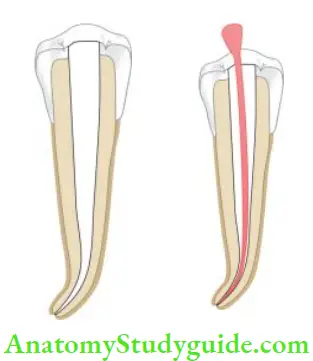
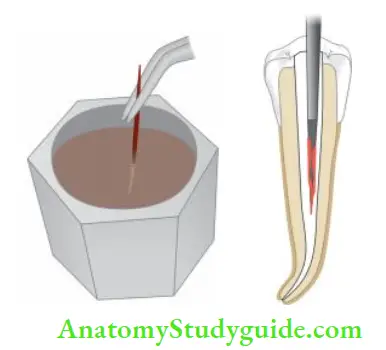
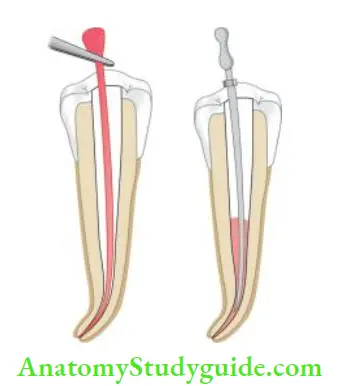
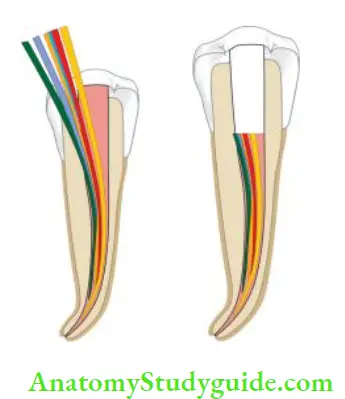
Warm Vertical Compaction Technique
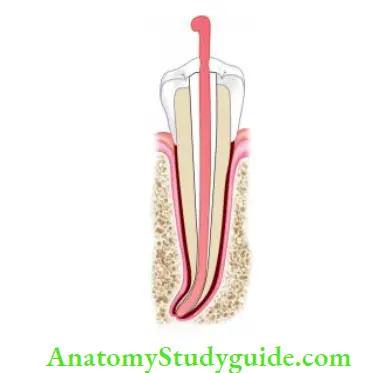
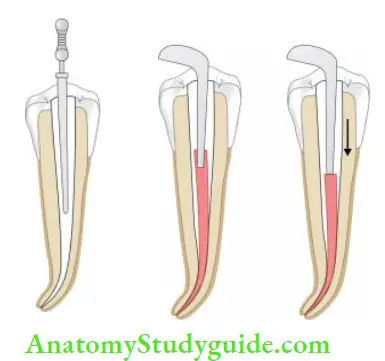
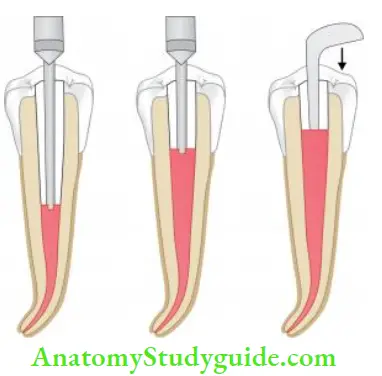
Vertical compaction of warm gutta-percha method of filing the root canal was introduced by Schilder with the objective of filing all the portals of exit with the maximum amount of gutta-percha and minimum amount of sealer. This is also known as Schilder’s technique of obturation.
In this technique using heated pluggers, pressure is applied in the vertical direction to heat the softened gutta-percha which causes it to flow and fill the canal space.
The basic requirements of a prepared canal to be filed by vertical compaction technique are
- Continuous tapering funnel shape from orifice to the apex
- Apical opening to be as small as possible so as to prevent extrusion of obturating material
- Decreasing the cross-sectional diameter at every point apically and increasing at each point as the canal is approached coronally
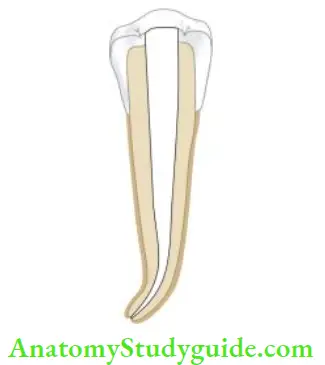
Technique:
- Select a master cone according to the shape and size of the prepared canal. The cone should fit in 1–2 mm of the apical stop because when softened material moves apically into the prepared canal, it adapts better to the canal walls
- Confirm the fi of the cone radiographically, if found satisfactory, remove it from the canal and place in sodium hypochlorite
- Irrigate the canal and then dry by rinsing it with alcohol and later using the paper points
- Select the heat-transferring instrument and pluggers according to canal shape and size
- Pluggers are profited at 5 mm intervals so as to capture the maximum cross-section area of the softened gutta-percha
- Lightly coat the canal with sealer
- Cut the coronal end of the selected gutta-percha at the incisal or occlusal reference point
- Now use a heated plugger to force the gutta-percha into the canal. The blunt end of the plugger creates a deep depression in the center of the master cone.
- The outer walls of softened gutta-percha are then folded inward to fil the central void; at the same time, the mass of softened gutta-percha is moved apically and laterally. This procedure also removes 2–3 mm of the coronal part of the gutta-percha
- Once the apical filing is done, complete the obturation by doing backfilling. Obturate the remaining canal by heating small segments of gutta-percha, carrying them into the canal, and then compacting them using heated pluggers as described above
- Take care not to overheat the gutta-percha because it will become too soft to handle
- Do not apply sealer on the softened segments of guttapercha because the sealer will prevent their adherence to the body of gutta-percha present in the canal
- After completion of obturation, clean the pulp chamber with alcohol to remove remnants of sealer or gutta-percha
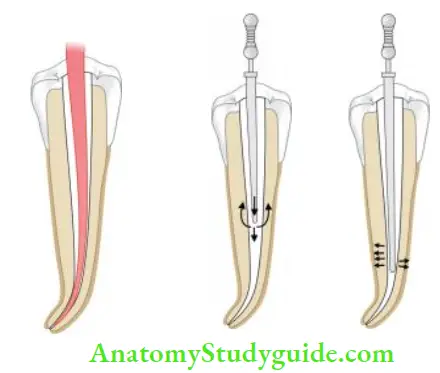
Warm Vertical Compaction Technique Advantages:
- Excellent sealing of canal apically, laterally, and obturation of lateral as well as accessory canals
- Oval canals get better filed than with lateral compaction technique
Warm Vertical Compaction Technique Disadvantages:
- Increased risk of vertical root fracture
- Overfilling of canals with gutta-percha or sealer from the apex
- Time-consuming
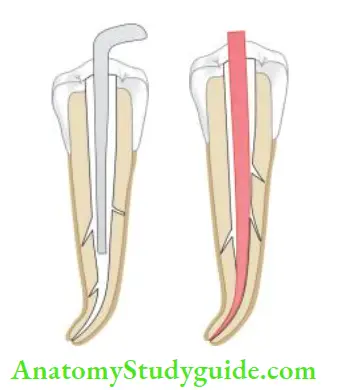
- Difficult to use in curved canals where rigid pluggers are unable to penetrate to the required depth
Temperature Control
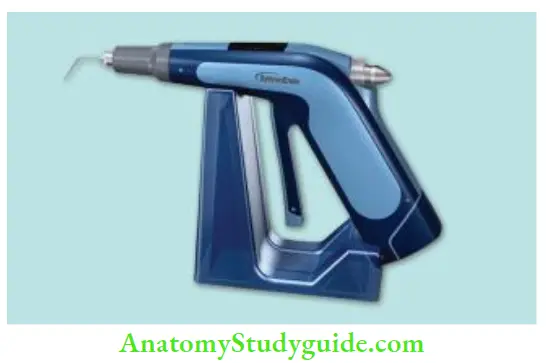
System B, Downpak cordless obturation device, and Touch and Heat are the devices which permit temperature control.
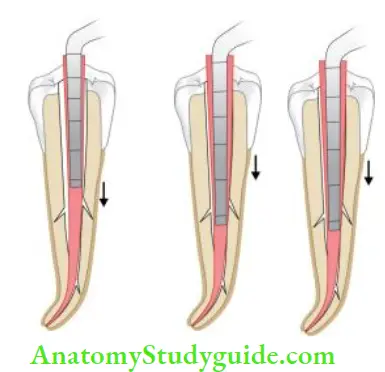
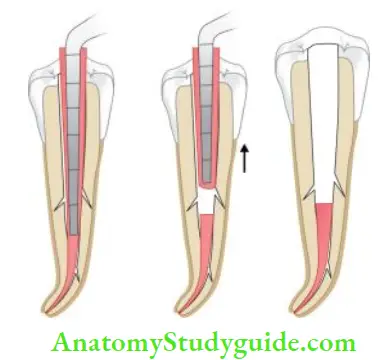
System B: Continuous Wave Condensation Technique:
System B is a newly developed device by Buchanan for warming gutta-percha in the canal. It monitors the temperature at the tip of heat carrier pluggers, thereby delivering a precise amount of heat
To have satisfactory 3-D obturation by using the System B technique, the following precautions should be taken:
- The canal shape should be continuous and perfectly tapered
- Do not set System B at a high temperature because this may burn gutta-perch
- While down packing, apply a constant firm pressure
Technique
- Select the Buchanan plugger which matches with the selected gutta-percha cone. Place rubber stop on the plugger and adjust it to its binding point in the canal 5–7 mm short of working length
- Confirm the fi of the gutta-percha cone
- Dry the canal, cut the gutta-percha 0.5 mm short of working length, and apply sealer in the canal
- With the System, B turned on to “use,” place it in touch mode, set the temperature at 200°C, and dial the power setting to 10. Sever the cone at the orifice with a preheated plugger.
- Afterward, a plugger is used to compact the softened gutta-percha at the orifice. Push the plugger smoothly through gutta-percha to 3–4 mm of binding point
- Release the switch. Hold the plugger here for 10 s with sustained pressure to take up any shrinkage which might occur upon cooling of gutta-percha
- Maintaining the apical pressure, activate the heat switch for 1 sec followed by 1 sec pause, and then remove the plugger
- After removal of the plugger, introduce a small flexible end of another plugger with pressure to confirm that the apical mass of gutta-percha has cooled, set, and not dislodged. Following radiographic confirmation, the canal is ready for the backfill by any means
System B: Continuous Wave Condensation Technique Advantages:
- It creates a single wave of heating and compacting thereby. Compaction of filling material can be done at the same time when it has been heating softened
- Excellent apical control
- Less technique sensitive
- Fast, easy, predictable
- Through condensation of the main canal and lateral canals
- Compaction of obturating materials occurs at all levels simultaneously throughout the momentum of heating and compacting instrument apically
Lateral/Vertical Compaction of Warm Gutta-Percha:
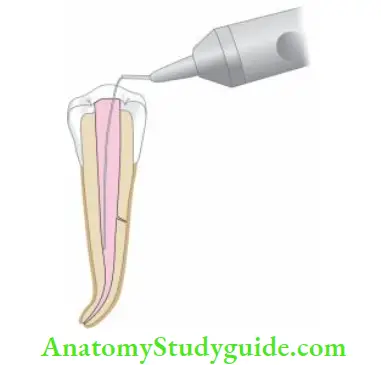
Vertical compaction causes dense obturation of the root canal, while lateral compaction provides length control and satisfactory ease and speed.
The advantages of both of these techniques are provided by a newer device, Endotec II, which helps the operator to employ length control with the warm gutta-percha technique. It comes with a battery which provides energy to heat the attached plugger and spreader.
Technique:
- Adapt master gutta-percha cone in the canal, select endnotes plugger, and activate the device
- Insert the heated plugger in the canal beside the master cone to be within 3–4 mm of the apex using light apical pressure
- Afterward, an unheated spreader can be placed in the canal to create more space for accessory cones. This process is continued until the canal is filed
Lateral/Vertical Compaction of Warm Gutta-Percha Advantages:
- Three-dimensional obturation of the canal
- Better sealing of accessory and lateral canals
- Endotec can also be used to soften and remove the gutta-percha
Calamus:
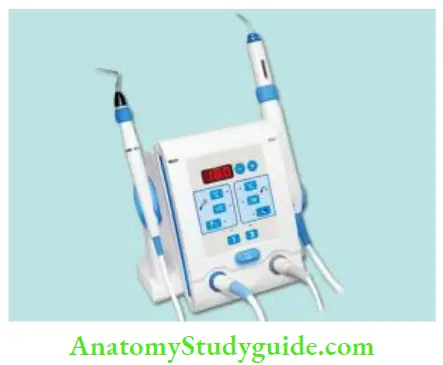
Calamus is a recent technique of obturation of the root canal system. It combines both Calamus “Pack” and Calamus “Flow” handpieces. With the Pack and Flow positioned side by side, a dense apical plug is created. Its handpiece has a 360° activation cuff which provides a smooth,
the continuous flow of gutta-percha.
Calamus Flow handpiece is used with a one-piece gutta-percha cartridge and integrated cannula to dispense warm gutta-percha. Calamus Pack handpiece with an electric heat plugger (EHP) is used to thermosoften, remove, and condense gutta-percha. Th EHPs are available in three ISO colors—black, yellow, and blue—which correspond to working end diameters and tapers of 40/03, 50/05, and 60/06, respectively.
Sectional Method Of Obturation Or Chicago Technique
In this technique, small pieces of gutta-percha cones are used to fill the sections of the canal. It is also known as the Chicago technique because it was widely promoted by Coolidge, Lundquist, and Blayney, all from Chicago.
Technique:
- A gutta-percha cone of the same size of the prepared root canal is selected and cut into sections of 3–4 mm long
- Select a plugger which loosely fits within 3 mm of the working length
- Apply sealer in the canal
- One end of the gutta-percha is mounted to a heated plugger and is then carried into the canal and apical pressure is given. After this, disengage the plugger from gutta-percha by rotating it
- Radiograph is taken to confirm its fit. If found satisfactory, fill the remainder of the canal in the same manner
Sectional Method Of Obturation Or Chicago Technique Advantages:
- It seals the canals apically and laterally
- In the case of post and core cases, only the apical section of the canal is filed
Sectional Method Of Obturation Or Chicago Technique Disadvantages:
- Time-consuming
- If the canal gets overfilled, difficult to remove sections of gutta-percha
McSpadden Compaction Or Thermomechanical Compaction Of The Gutta-Percha
McSpadden introduced a technique in which heat was used to decrease the viscosity of gutta-percha and thereby increasing its plasticity. This technique involves the use of a compacting instrument (McSpadden compacter) which resembles an inverted Hedstroem file.
This is fitted into a latch-type handpiece and rotated at 8,000–10,000 rpm alongside gutta-percha cones inside the canal walls. At this speed, the heat produced by friction softens the gutta-percha, and the designs of the blade force the material apically.
Because of its design, the blades of compaction break easily if it binds, so it should be used only in straight canals. But nowadays, its newer modification in the form of micro seal condenser has come, which is made up of nickel–titanium. Because of its flexibility, it can be used in curved canals.
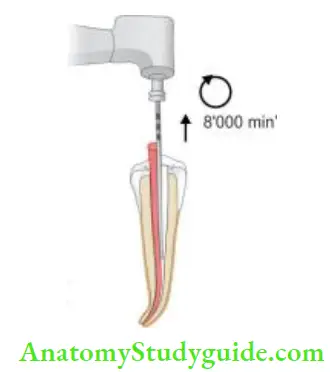
McSpadden Compaction Advantages:
- Requires less chair-side time
- Ease of selection and insertion of gutta-percha
- Dense, 3-D obturation
McSpadden Compaction Disadvantages:
- Liability to use in narrow and curved canals (canal has to be enlarged to a size no. 45)
- Frequent breakage of compactor blades
- Overfilling of canals
- Shrinkage of gutta-percha on cooling
Thermoplasticized Injectable Gutta-Percha Obturation
Obtura 2 Heated Gutta-Percha System/ High-Heat System
This technique was introduced in 1977 at Harvard Institute. It consists of an electric control unit with a pistol grip syringe and specially designed gutta-percha pellets which are heated to approximately 365–390°F (185–200°C) for obturation. In this, regular β-phase of gutta-percha is used.
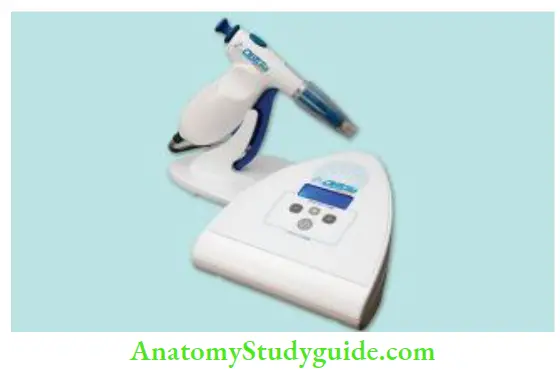
Prerequisites for Canal to be filed by Obtura 2
- Continuous tapering funnel shape for unrestricted flow of softened gutta-percha
- A definite apical stop to prevent overfilling
Indications for using Obtura 2
- Roots with straight or slightly curved canals
- For backfilling of canals
- For obturation of roots with internal resorption, perforations, etc.
Technique:
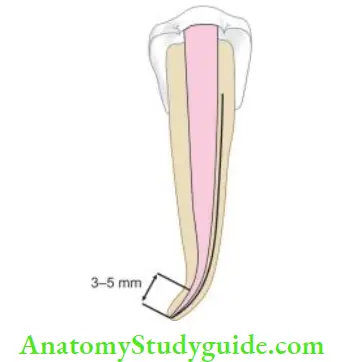
- Before starting the obturation, the applicator needle, and pluggers are selected. The needle tip should reach ideally 3–5 mm of the apical terminus passively
- Apply sealer along the dentinal walls to fill the interface between gutta-percha and dentinal walls
- Place obturator needle loosely 3–5 mm short of apex, as warm gutta-percha flows and fils the canal, back pressure pushes the needle out of the canal
- Now use pluggers to compact the gutta-percha; pluggers are dipped in isopropyl alcohol or sealer to prevent sticking of the gutta-percha
Continuous compaction force should be applied throughout the obturation of the whole canal to compensate for shrinkage and to close any voids if formed.
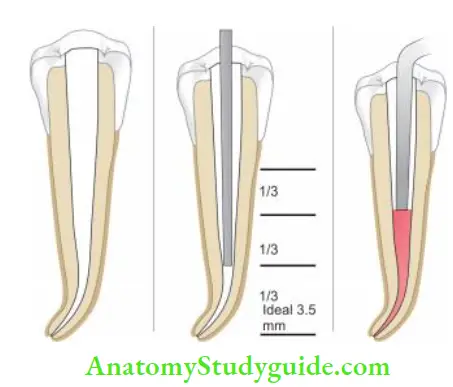
- (A) Tapering funnel shape of the prepared canal is well suited for obturation using obtura II;
- (B) Needle tip of obtura II should reach 3–5 mm of the apical end;
- (C) Compaction of gutta-percha using plugger
Variations in the Thermoplasticizing Technique of Gutta-Percha
Ultrasonic Plasticizing of Gutta-Percha
- It has been seen that ultrasonics can be used to fill the canals by plasticizing the gutta-percha
- Earlier, cavitron US scaler was used for this purpose but its design limited its use only in anterior teeth
- Recently, ENAC ultrasonic unit comes with an attached spreader which has been shown to produce homogenous compaction of gutta-percha
Ultrafi System:
- This system uses low-temperature, (90°C) plasticized α-phase gutta-percha
- Here gutta-percha is available in three different viscosities for use in different situations
- The regular set and the film set with the highest flow properties are primarily used for injection and need not be compacted manually. Endoset is more of viscous and can be condensed immediately after injection
Technique:
- cannula needle is checked in the canal for fitting. It should be 6–7 mm from the apex. After confirming the fi, it is placed in a heater which has a preset temperature of 90°C.
- Apply sealer in the canal and passively insert the needle into the canal. As the warm gutta-percha fills the canal, its backpressure pushes the needle out of the canal
- Once the needle is removed, profited plugger dipped in alcohol is used for the manual compaction of gutta-percha
Solid Core Carrier Technique
Thermafi Endodontic Obturators:
Thrmafi endodontic obturators are specially designed of flexible steel, titanium, or plastic carriers coated with α-phase gutta-percha. Thrmafi obturation was devised by W. Ben Johnson in 1978.
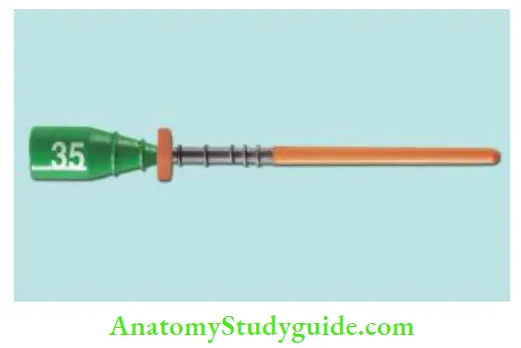
In this, carriers are made up of stainless steel, titanium, or plastic. They have ISO standard dimensions with matching color coding in sizes of 20–140. Plastic carrier is made up of special synthetic resin which can be liquid plastic crystal or polysulfone polymer. The carrier is not the primary cone for obturation.
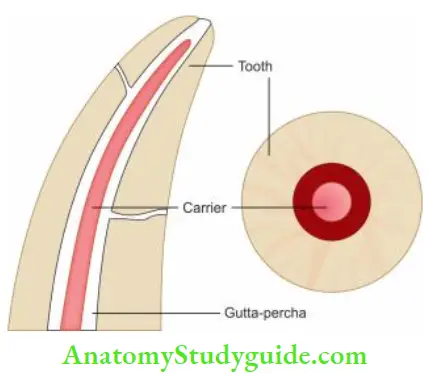
It acts as a carrier and condenser for thermally plasticized gutta-percha. Plastic cores allow post space to be made easily and they can be cut of by a heated instrument, stainless steel bur, diamond stone, or therma-cut bur.
Technique:
- Select a thermal obturator of the size and shape which is passively at the working length. Verify the length of verifier by taking a radiograph
- Now disinfect the obturator in 5.25% sodium hypochlorite for 1 min and then rinse it in 70% alcohol
- Preheat the obturator in the “Thrmaprep” oven for some time. This oven is recommended for heating the obturator because it offers a stable heat source with more control and uniformity for plasticizing the gutta-percha
- Dry the canal and lightly coat it with sealer. Place the heated obturator into the canal with a fim apical pressure to the marked working length
- Working time is 8–10 s after removal of obturator from oven. If more obturators are required, insert them immediately
- Verify the fi of obturation in the radiograph. When found accurate, while stabilizing the carrier with the index finger, sever the shaft level with the orifice using a prep bur or an inverted cone bur in a high-speed handpiece
- Do not use flame heated instrument to sever the plastic shaft because the instrument cools too rapidly and thus may cause inadvertent obturator displacement from the canal
- Now use a small condenser coated with vaseline or dipped in alcohol, to condense gutta-percha vertically around the shaft
- When a post is indicated, sever the obturator with the fissure bur at the selected length and give counterclockwise rotation of the shaft following insertion to disengage the instrument
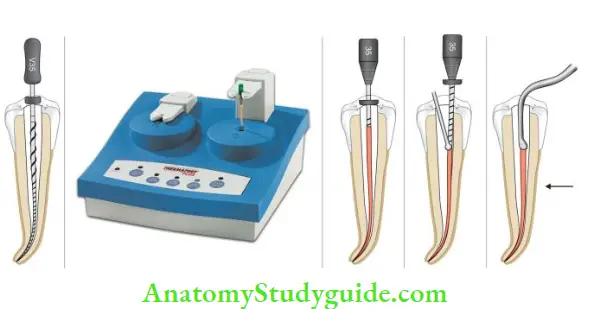
- (A) Select a thermal obturator that fis into the canal passively at the working length;
- (B) Preheat the thermaprep oven;
- (C) Place the heated obturator into the canal with fim apical pressure;
- (D) Cut the thermal using thermal cut bur;
- (E) Condense gutta-percha vertically around the shaft.
Thermafi Endodontic Obturators Advantages:
- Requires less chair-side time
- Provides dense 3-D obturation as gutta-percha flows into canal irregularities such as fis, anastomoses, and lateral canals
- No need to preserve obturators because of flexible carriers
- Since this technique requires minimum compaction, so less strain while obturation with this technique
Ultrafi 3-D:
Ultrafi 3-D is an injectable gutta-percha system which provides three viscosities to accommodate different techniques. Success-Fil (Coltene/Whaledent, Inc.) utilizes high-viscosity gutta-percha which comes in a syringe. The sealer is lightly coated on the canal walls and the carrier with gutta-percha is placed in the canal to the prepared length.
Gutta-percha is then compacted around the carrier with various pluggers depending on the canal morphology. The carrier is severed at the orifice with a bur.
Cold Gutta-Percha Compaction Technique:
Gutta Flow
Gutta flow is an eugenol-free radiopaque form which can be injected into root canals using an injectable system. It is a self-polymerizing filing system in which gutta-percha in powder form is combined with a resin sealer in one capsule.
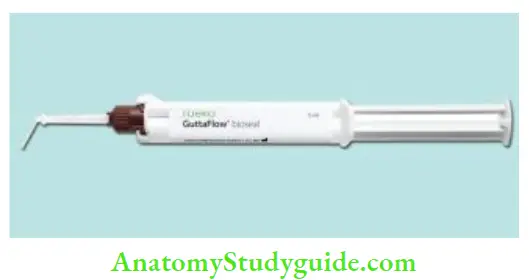
Composition:
Gutta flow consists of a polydimethylsiloxane matrix filled with powdered gutta-percha, silicon oil, paraffin oil, platinum, zirconium dioxide, and nanosilver.
Cold Gutta-Percha Compaction Technique Advantages:
- Easy to use
- Time-saving
- Does not require compaction
- Does not require heating
- Biocompatible
- Can be easily removed for retreatment
Obturation With Silver Cone
The use of silver cones is not the preferred method of obturation, mainly because of corrosion. Their use is restricted to teeth with fie, tortuous, curved canals which make use of gutta-percha with difficulty.
Indications for the use of silver cones:
- In round and straight canals, like canals of maxillary premolars, mesial canals of mandibular molars, and buccal canals of maxillary molars
- In mature teeth with small calcified canals
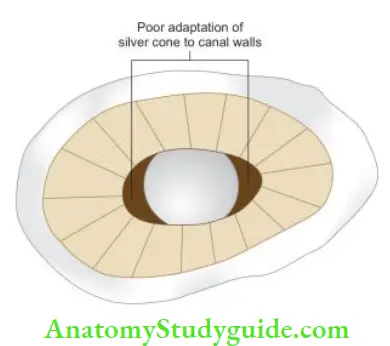
Contraindications:
- Teeth with open apex
- Large ovoid-shaped canals, like maxillary incisors, premolars with oval single canals, etc.
Steps:
- Select a silver cone conforming to the final shape and size of the prepared canal. Check if it is radiographically. If found satisfactory, remove it from the canal and sterilize it over an alcohol flame
- Dry the canal and coat the canal walls with sealer
- Insert the cone into the canal with a sterile cotton plier or Stieglitz forceps
- Take a radiograph to see the fi of the cone. If satisfactory, fill the remaining canal with accessory gutta-percha cones
- Remove excess of sealer with a cotton pellet and place restoration in the pulp chamber
Obturation With Silver Cone Advantages:
- Easy handling and placement
- Negotiates extremely curved canals
- Radiopaque in nature
- Mild antibacterial property
Obturation With Silver Cone Disadvantages:
- Prone to corrosion resulting in loss of apical seal
- Difficult to retrieve if it is snugly fitting
- Nonadaptable, so does not seal accessory canals
Stainless Steel:
They are more rigid than silver points and are used for fine and tortuous canals. They cannot seal the root canals completely without the use of a sealer.
Apical Third Filling
Sometimes apical barriers are needed to provide apical stop in cases of teeth with incomplete root development, overinstrumentation, and apical root resorption. Various materials can be used for this purpose. They are designed to allow the obturation without apical extrusion of the material in such cases.
Apical third filing:
- Carrier-based system
- Simplified obturator
- Fiberfil obturator
- Paste system
- Dentin chip filing
- Calcium hydroxide filing
- MTA filing
Simplified Obturator:
It was originally developed at light-speed technology so as to complement the canal shape formed by using light-speed instruments. In this, the apical gutta-percha size is the same ISO size as the light-speed master apical rotary.
Here a stainless steel carrier is used to place gutta-percha in the apical portion of the canal.
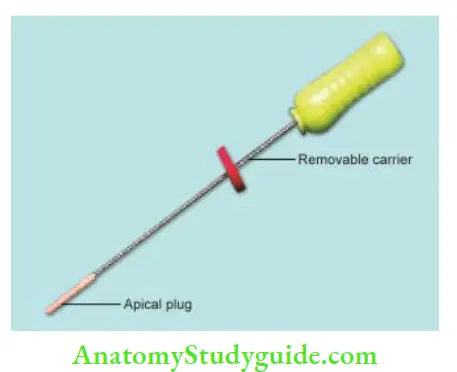
Steps:
- Try the size of the apical GP plug so as to ensure an optimal apical fitting. This apical GP plug is of the same size as the light-speed master apical rotary
- Set the rubber stop 4 mm short of the working length and advance the GP plug apically without rotating the handle
- Once GP plug fis apically, rotate the carrier anticlockwise without pushing or pulling the handle of the carrier
- Now backfilling of the canal is done using a syringe system
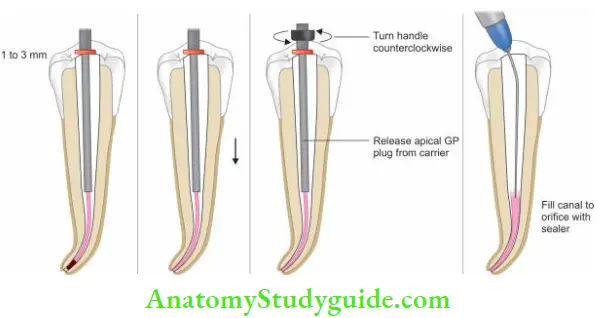
- (A) Check the fi of the apical gutta-percha (GP) plug;
- (B) condense apical GP plug to working length;
- (C) Once GP plug fis apically, rotate the carrier anticlockwise without pushing or pulling the handle of the carrier;
- (D) Backfilling of the canal is done using a syringe system.
Fiberfil Obturator:
- Ths obturation technique combines a resin post and obturator forming a single until and apical 5–7 mm of gutta-percha
- This apical gutta-percha is attached with a thin flexible filament to be used in moderately curved canals
- The advantage of this technique is that due to the presence of dual-cure resin sealer, chances of coronal microleakage are less
- But it poses difficulty in retreatment cases
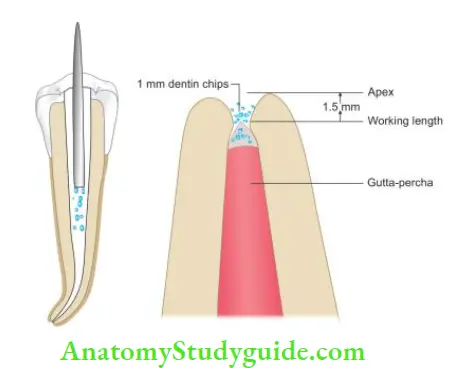
Dentin Chip Filling:
Dentin chip filing forms a Biologic seal. In this technique, after thorough cleaning and shaping of the canal, H-fie is used to produce dentin powder in the central portion of the canal, which is then packed apically with the butt end of the paper point.
Technique:
- Clean and shape the canal
- Produce dentin powder using Hedstroem fie or Gates Glidden drill
- Using the butt end of a paper point, push and compact dentin chips apically
- 1–2 mm of chips should block the apical foramen. The density of the pack is checked by resistance to perforation by #15 or 20 fie
- Backpacking is done using gutta-percha compacted against the plug
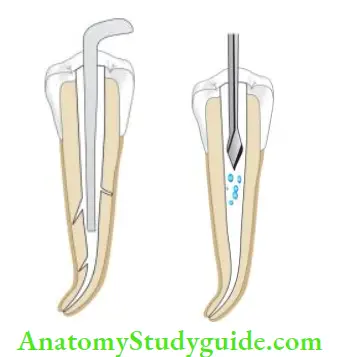
Dentin Chip Filling Advantages:
- Biocompatible
- Promotes healing and decreases inflammation
- Prevents extrusion of filling material from the canal space
Dentin Chip Filling Disadvantage:
Care must be taken in this technique because infected pulp tissue can be present in the dentinal mass.
Calcium Hydroxide:
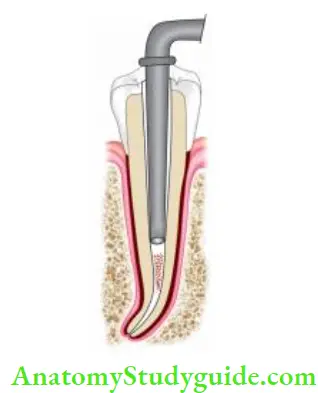
It has also been used frequently as an apical barrier. Calcium hydroxide has been shown to stimulate cementogenesis. It can be used both in a dry or moist state. Moist calcium hydroxide is placed with the help of a plugger and amalgam carrier, injectable syringes, or by lentils
spirals.
A dry form of Ca(OH)2 is carried into the canal by an amalgam carrier which is then packed with pluggers. Calcium hydroxide has shown to be a biocompatible material with the potential to induce an apical barrier in apexification procedures.
Mineral Trioxide Aggregate:
Mineral trioxide aggregate was developed by Dr. Torabinejad in 1993. It contains tricalcium silicate, dicalcium silicate, tricalcium aluminate, bismuth oxide, calcium sulfate, and tetra calcium aluminoferrite. pH of MTA is 12.5, thus having biological and histological properties similar to calcium hydroxide.
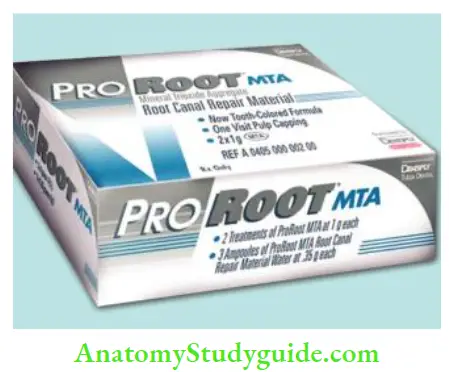
The setting time is 2 h and 45 min. In contrast to Ca(OH)2 , it produces a hard setting non-resorbable surface. Because of being hydrophilic in nature, it sets in a moist environment. It has low solubility and shows resistance to marginal leakage. It also exhibits excellent biocompatibility in relation to vital tissues.
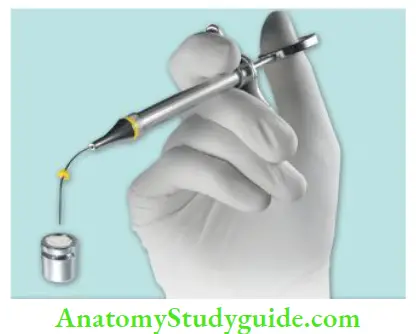
To use MTA, mix a small amount of liquid and powder to putty consistency. Since MTA mix is a loose granular aggregate, it cannot be carried out in a cavity with a normal cement carrier and thus has to be carried in the canal with messing gun, amalgam carrier, or specially designed carrier. After its placement, it is compacted with microbloggers.
Advantages of MTA include its excellent biocompatibility, least toxicity of all the filing materials, radiopaque nature, bacteriostatic nature, and resistance to marginal leakage. However, it is difficult to manipulate with a long setting time (3–4 h).
Coronal Seal:
Irrespective of the technique used to obturate the canal, coronal leakage can occur through well-obturated canals, resulting in infection of the periapical area. The coronal seal should be enhanced by the application of restorative materials (like Cavit, super EBA cement, MTA) over the canal orifice.
Postobturation Instructions
Postoburation pain can be seen in some cases. Since pain is a subjective symptom it is related to many factors like the presence of preoperative pain, periradicular infection, retreatment, etc. Sometimes, pain is due to the extrusion of root canal filling or a tiny bubble of air, which can be forced out periodically causing pressure and pain.
Pain is most likely to occur in the first 24 h and decreases as time passes. The patient is advised not to chew unduly on the treated tooth until it is protected by permanent restoration.
Patient Recall:
The patient should be recalled regularly to evaluate tissue repair and healing progresses. In the case of periapical radiolucency, radiographs should be taken at 3, 6, and 9 months interval periods to see the continued new bone formation.
A radiograph of a successful endodontic treatment shows uniformly thickened periodontal ligament and continuous lamina dura along the root.
Repair Following Endodontic Treatment
Repair of the tooth being treated begins as soon as the infection is controlled.
Repair occurs in the following steps:
- Organization of blood clot
- Formation of granulation tissue
- Development of scar tissue by laying down of collagen fiers
- In the periapical area, bone is there. Her healing process is more complicated because soft tissue must be converted to hard tissue
- Bone contains a protein matrix filled with calcium compounds like calcium phosphate and calcium carbonate. This protein matrix is formed by osteoblasts
- Osteoblasts produce an enzyme called alkaline phosphatase, which separates in organic phosphorus from organically bound phosphorus
- This increase of phosphate ions forms a saturated solution of calcium phosphate, which precipitates into the matrix. The precipitated areas of calcium phosphate join to form spongy trabeculae
- Resorption and deposition of bone may occur simultaneously depending upon the degree of periapical damage; repair usually takes 6–12 months after endodontic treatment
- Since repair proceeds from the periphery to the center, the granulation tissue formation, fibrous connective tissue maturation, and finally matrix for bone formation occur in steps
- In some cases, connective tissue matures into dense fibrous tissue instead of bone. These areas represent as areas of rarefactions in radiographs, though histologically healing has taken place
Leave a Reply